
Studio Backdrop Setup: Building a Permanent Multi-Backdrop System
Updated on Apr. 17, 2026
For the first three years of running my studio, I set up and took down backdrops for every single session. Clamps on light stands. Rolling and unrolling. Adjusting and readjusting.
I told myself it was fine. Part of the job. Normal.
Then I visited a friend's studio and watched her switch between three backdrops in under thirty seconds. No stands. No clamps. No wrestling with fabric. She just pulled one down and the previous one rolled back up automatically.
I drove home angry at myself for wasting so much time.
Building a permanent backdrop system was one of the best investments I've made in my studio. Not because it's fancy. Because it removed friction from every single session. That friction adds up to hours every week, and those hours add up to exhaustion and resentment toward work you're supposed to love. For a complete overview of photography backdrops, start with our ultimate backdrop guide.
This guide covers everything I learned setting up my own system and helping other photographers set up theirs.
Portable backdrops work when you're starting out, but there's a better way. A permanent studio backdrop system saves 2-3 hours every week and eliminates the physical strain of constant setup and breakdown.
The Case for Permanent Installation
Before we get into specifics, let's talk about why you'd want a permanent system at all.
Time savings are real. Setting up a portable backdrop stand takes 3-5 minutes if everything goes smoothly. Taking it down takes another 3-5 minutes. Do that twice a day, five days a week, and you're spending 2-3 hours per week on backdrop logistics. A permanent system reduces that to seconds.
Consistency improves. When your backdrop is always in the same position relative to your lights and camera, you develop muscle memory. You know exactly how your images will look before you press the shutter. That consistency makes you faster and more confident.
Professionalism shows. Clients notice when you fumble with equipment. They notice when setup takes forever. A permanent system looks professional because it is professional. You're not improvising. You're prepared.
Your body will thank you. Repeatedly setting up and taking down heavy stands and backdrops takes a physical toll. Shoulder strain. Back pain. The cumulative damage of thousands of setups. A permanent system eliminates most of that physical labor.
Option 1: Wall-Mounted Crossbar System
The simplest permanent solution. A horizontal bar mounted to the wall, high enough that backdrops can hang to the floor with room to spare.
What you need:
Heavy-duty wall brackets (rated for at least 50 pounds)
Metal or wooden crossbar (aluminum pipe works well)
Studs or appropriate wall anchors
Hooks or clips for hanging backdrops
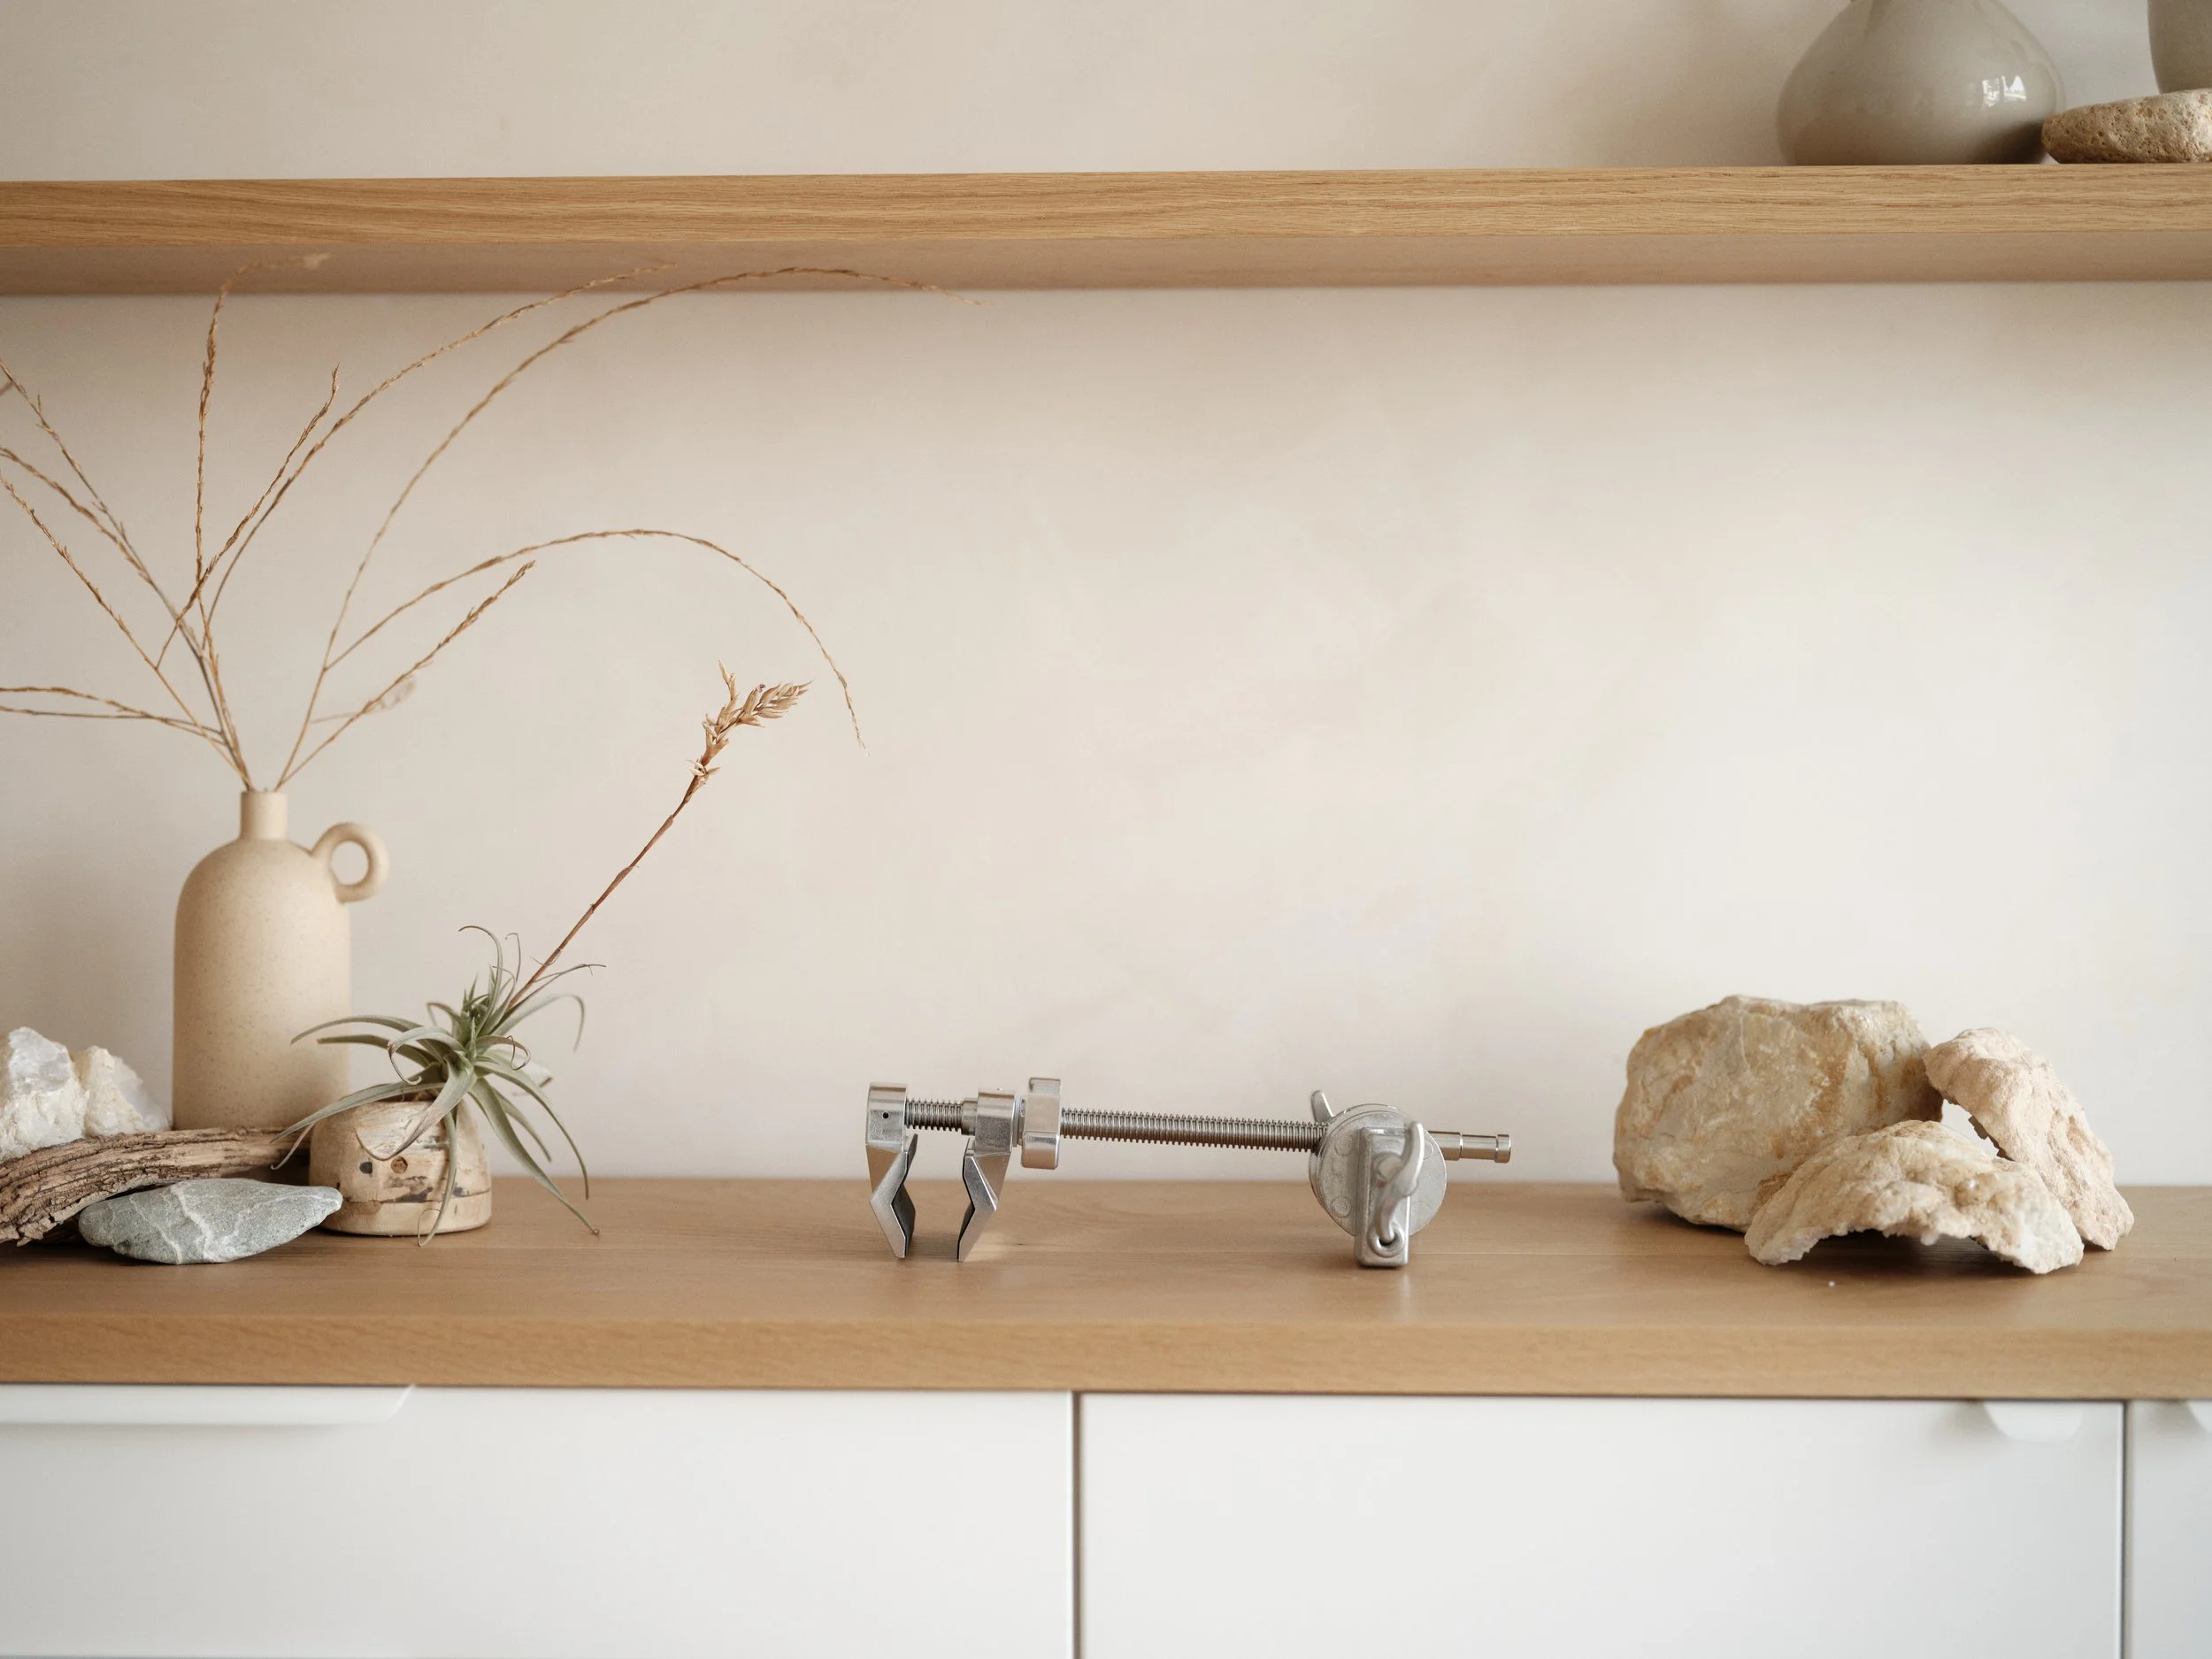
The hardware behind a wall-mounted crossbar system. Simple brackets, sturdy clamps, and a solid installation can transform your studio workflow for under $100.
How it works: Mount brackets to the wall at your desired height (typically 8-9 feet for standard ceilings). Install the crossbar between brackets. Hang backdrops from the bar using hooks, clamps, or sewn-in grommets.
Pros:
Inexpensive (under $100 for basic setup)
Simple installation
Works in any space with a suitable wall
Easy to understand and maintain
Cons:
Only accommodates one backdrop at a time (unless very wide)
Changing backdrops still requires physical handling
Limited to wall placement
Best for: Photographers with limited space or budget who want a step up from portable stands but don't need rapid switching between multiple backdrops.
Option 2: Ceiling-Mounted Roller System
The workhorse of professional studios. Multiple backdrops mounted on rollers attached to the ceiling, allowing you to raise and lower different options without removing anything.
What you need:
Ceiling-mounted roller brackets (one set per backdrop)
Roller tubes (typically 3-inch diameter aluminum or PVC)
Chain or cord mechanism for raising/lowering
Ceiling joists or appropriate mounting hardware
How it works: Each backdrop wraps around its own roller tube, which mounts to brackets attached to the ceiling. A chain or cord system allows you to raise and lower each backdrop independently. When not in use, backdrops roll up against the ceiling. When needed, you pull one down while the others stay tucked away.
Pros:
Multiple backdrops ready to use instantly
Switching takes seconds
Backdrops stay clean and protected when rolled up
No floor space required for storage
Professional appearance
Cons:
Higher upfront cost ($200-500 depending on number of backdrops)
More complex installation
Requires ceiling height (10+ feet ideal)
Installation in rental spaces may be complicated
Best for: Studios with adequate ceiling height that shoot multiple backdrop looks regularly. The standard choice for high-volume portrait studios.
My setup: I run three rollers with my most-used backdrops always loaded. A warm neutral, a darker option for dramatic work, and whatever color I'm using most that season. Switching between them takes about 10 seconds.
Option 3: Track System with Movable Mounts
For photographers who want flexibility in backdrop positioning, not just backdrop selection.
What you need:
Ceiling-mounted track (aluminum rail system)
Rolling trolleys that move along the track
Crossbar suspended from trolleys
Chain or manual adjustment for height
How it works: A track mounts to the ceiling, running the length of your shooting space. Trolleys roll along the track, allowing you to position your backdrop anywhere along that line. The backdrop hangs from a crossbar suspended from the trolleys.
Pros:
Backdrop can be positioned anywhere along the track
Can be moved closer or further from background wall
Works well for video where backdrop position matters
Allows multiple people to shoot simultaneously in larger studios
Cons:
Most expensive option ($500-1000+)
Most complex installation
Requires more ceiling infrastructure
Overkill for most portrait studios
Best for: Large studios with multiple shooting areas, studios that do both photo and video, or spaces where backdrop positioning needs to change frequently.
This is what a permanent backdrop system gives you: consistent results, predictable lighting, and the confidence to nail the shot every time. No guessing. No adjusting. Just shooting.
Ceiling Height Considerations
Your ceiling height determines what's possible.
8-foot ceilings (standard residential): Wall-mounted systems work best. Ceiling rollers are possible but backdrops will nearly touch the floor even when rolled up, which can look cluttered and risks damage.
9-10 foot ceilings: Ceiling rollers become practical. You'll have enough clearance for backdrops to roll up cleanly while still reaching the floor when deployed. Most common setup for converted residential or small commercial studio spaces.
10+ foot ceilings: Full flexibility. Ceiling rollers work perfectly. Track systems become practical. You can also hang backdrops higher for full-length portraits with overhead room to spare.
Vaulted or irregular ceilings: Wall-mounted systems are usually easier. Ceiling systems require custom solutions that add complexity and cost.
How Many Backdrops Should Your System Hold?
More capacity isn't always better. Every backdrop on your system is one you need to maintain, store, and choose between.
Two-backdrop system: Perfect for photographers with a consistent style. One neutral workhorse, one accent color. Covers most situations without decision fatigue.
Three-backdrop system: The sweet spot for most studios. Gives you a light option, a dark option, and a color option. Handles nearly any client request without overwhelming choice.
Four to six backdrops: For high-volume studios shooting diverse work. Different client types get different looks. Requires more space and organization but provides maximum flexibility.
More than six: Probably overkill unless you have a very large space and very diverse client base. More backdrops mean more maintenance, more decisions, and more visual clutter.
I'd recommend starting with capacity for three backdrops even if you only own two. It's much easier to add a third backdrop later than to expand your mounting system.

I keep my three most-used backdrops on ceiling rollers. Everything else lives in baskets like this. Easy to grab when a client requests something specific.
Installation Realities
Let's talk about what actually happens when you install these systems.
Finding studs matters. Wall-mounted systems need to anchor into studs, not just drywall. A backdrop loaded with a heavy canvas can pull out drywall anchors over time. Ceiling systems need to anchor into joists. If your studs or joists aren't where you need them, you'll need to add a mounting board or get creative.
Rental spaces complicate things. If you don't own your studio space, permanent installation might not be possible or might require landlord approval. Ask before you drill. Some photographers use heavy-duty tension rod systems as a compromise, though these aren't as stable as true permanent mounts.
Professional installation is worth considering. If you're not comfortable with tools and wall anchors, hiring a handyman for a few hours is money well spent. A poorly installed system that falls down mid-session is worse than no system at all.
Test before you load. After installation, hang something heavy from your system before you put your expensive backdrops on it. Confirm it holds. Confirm it's level. Confirm nothing shifts or creaks. Better to discover problems with a sandbag than with a backdrop.
Backdrop Preparation for Permanent Systems
How you attach backdrops to your system affects daily usability.
Grommets sewn into the top edge work with hooks on a crossbar. Simple and effective. Most backdrops can be modified to add grommets if they don't already have them.
Pole pockets allow you to slide a rod through the top of the backdrop, which then rests on brackets. Creates a very clean hang with no visible hardware.
Clamps and clips work with any backdrop but add bulk and can slip over time. Fine for occasional use, less ideal for permanent installation where you want things to stay put.
Velcro strips allow quick attachment and removal but may not hold heavier canvas backdrops reliably. Better for lighter fabric surfaces.
For canvas backdrops that will live on roller systems, I recommend having grommets added to the top edge. This allows you to hook them onto the roller tube securely.
Storage for Off-System Backdrops
Your permanent system holds your most-used backdrops. What about the rest?
Vertical rolled storage: Store rolled backdrops standing upright in a corner or closet. Like a bouquet of tubes. Takes minimal floor space and keeps backdrops accessible.
Horizontal rack storage: Wall-mounted horizontal racks hold rolled backdrops like wine bottles. More visible and accessible but requires wall space.
Closet with hanging system: A secondary closet with a simple crossbar lets you hang additional backdrops ready to swap onto your main system.
Under furniture: Rolled backdrops slide under couches, posing tables, or platform beds. Hidden but accessible.
Whatever you choose, the key is keeping backdrops rolled (not folded) and accessible enough that you'll actually rotate them into use.
Workflow Integration
A permanent system changes how you work. Lean into it.
Pre-session setup: Before your client arrives, pull down the backdrop you've planned. Confirm your lights are positioned correctly for that backdrop. Take a test shot. When your client walks in, you're ready to shoot immediately.
Mid-session switching: If you want variety in the session, switch backdrops between outfit changes or setup shifts. While your client is changing, you switch backdrops and adjust lights. No downtime for them, no rushed setup for you.
End of day: Roll up whatever's deployed. Wipe down surfaces if needed. Everything resets cleanly for tomorrow.
The goal is making backdrop changes feel like a non-event. So seamless that you do it without thinking, and your clients barely notice.
On-location setup with a hanging backdrop system. Takes time to assemble, but necessary for outdoor shoots. Back in the studio, my ceiling rollers are ready to go in seconds.
What I'd Do Differently
If I were setting up my studio system again, here's what I'd change:
I'd install more capacity than I thought I needed. Adding rollers later meant patching ceiling holes from the original installation. Starting with four rollers when I only owned two backdrops would have saved hassle.
I'd invest in motorized rollers. Manual chain systems work fine, but motorized rollers (controlled by remote or wall switch) feel more professional and eliminate the physical pulling. The price difference wasn't as dramatic as I expected.
I'd plan for lighting from the start. My backdrop system works great, but I installed it without thinking about where my lights would need to go. Ended up rearranging more than necessary because a roller bracket was exactly where I wanted to mount a strobe.
I'd get help with installation. I did mine solo and it took twice as long as it should have. One person holding things level while the other drills makes the whole process faster and safer.
The Investment
Wall-mounted crossbar: $50-150 including hardware Manual ceiling roller system (3 backdrops): $200-400 Motorized ceiling system (3 backdrops): $400-800 Professional installation: $100-300 depending on complexity
These numbers vary based on your space, your DIY ability, and your quality preferences. The cheapest option that works reliably is better than an expensive option you never install.
The return on investment comes from time saved. If a permanent system saves you 2 hours per week, and your time is worth $50/hour, the system pays for itself within a few months. Everything after that is profit in the form of time and energy.
Start Simple
If you're overwhelmed by options, start with a wall-mounted crossbar. It's the lowest commitment way to experience the benefits of a permanent system. If you love it (you will), you can always upgrade to ceiling rollers later.
The specific hardware matters less than having something permanent. Any system that eliminates the setup-and-takedown cycle transforms your studio workflow. Learn more in our complete photography backdrop guide.
Stop wrestling with portable stands. Build something permanent. You'll wonder why you waited so long.
Related Reading

Creators of premium photography backdrops and styling surfaces
Trusted by thousands of discerning creatives worldwide
Every piece is handcrafted with intention in Orange County, California