
Home Studio Backdrop Solutions: Working with Limited Space and Low Ceilings
Updated on Apr. 17, 2026
My first studio was a spare bedroom in a two-bedroom apartment in Huntington Beach. Ten feet by eleven feet. Eight-foot ceilings. One window. Carpet I couldn't rip out because I was renting.
I was convinced it was too small to use a real backdrop. So for the first six months, I just painted one wall a flat gray and shot against it. The images were fine. Boring, but fine. The gray was lifeless. The paint was too uniform. And every time I wanted a different look, I was staring at a wall I couldn't exactly repaint between Tuesday's headshot session and Thursday's maternity shoot.
The day I finally brought a hand-painted canvas into that room and figured out how to make it work in that tiny space, my portrait work changed overnight. Not because my skills suddenly improved. Because the images finally had the depth, warmth, and editorial quality I'd been chasing by editing alone. The backdrop gave me what the painted wall never could.
But I'll be honest: getting a professional backdrop to work in a small home studio isn't as simple as hanging it up and shooting. There are real challenges with ceiling height, subject-to-backdrop distance, lighting in tight quarters, and storage when your studio doubles as a guest room. I spent months figuring out workarounds through trial and error so you don't have to. For a complete overview of photography backdrops, start with our ultimate backdrop guide.
This guide is for every photographer running a portrait business out of a spare bedroom, converted garage, basement, or any space that feels too small for "real" studio work. It is. You just need the right approach.
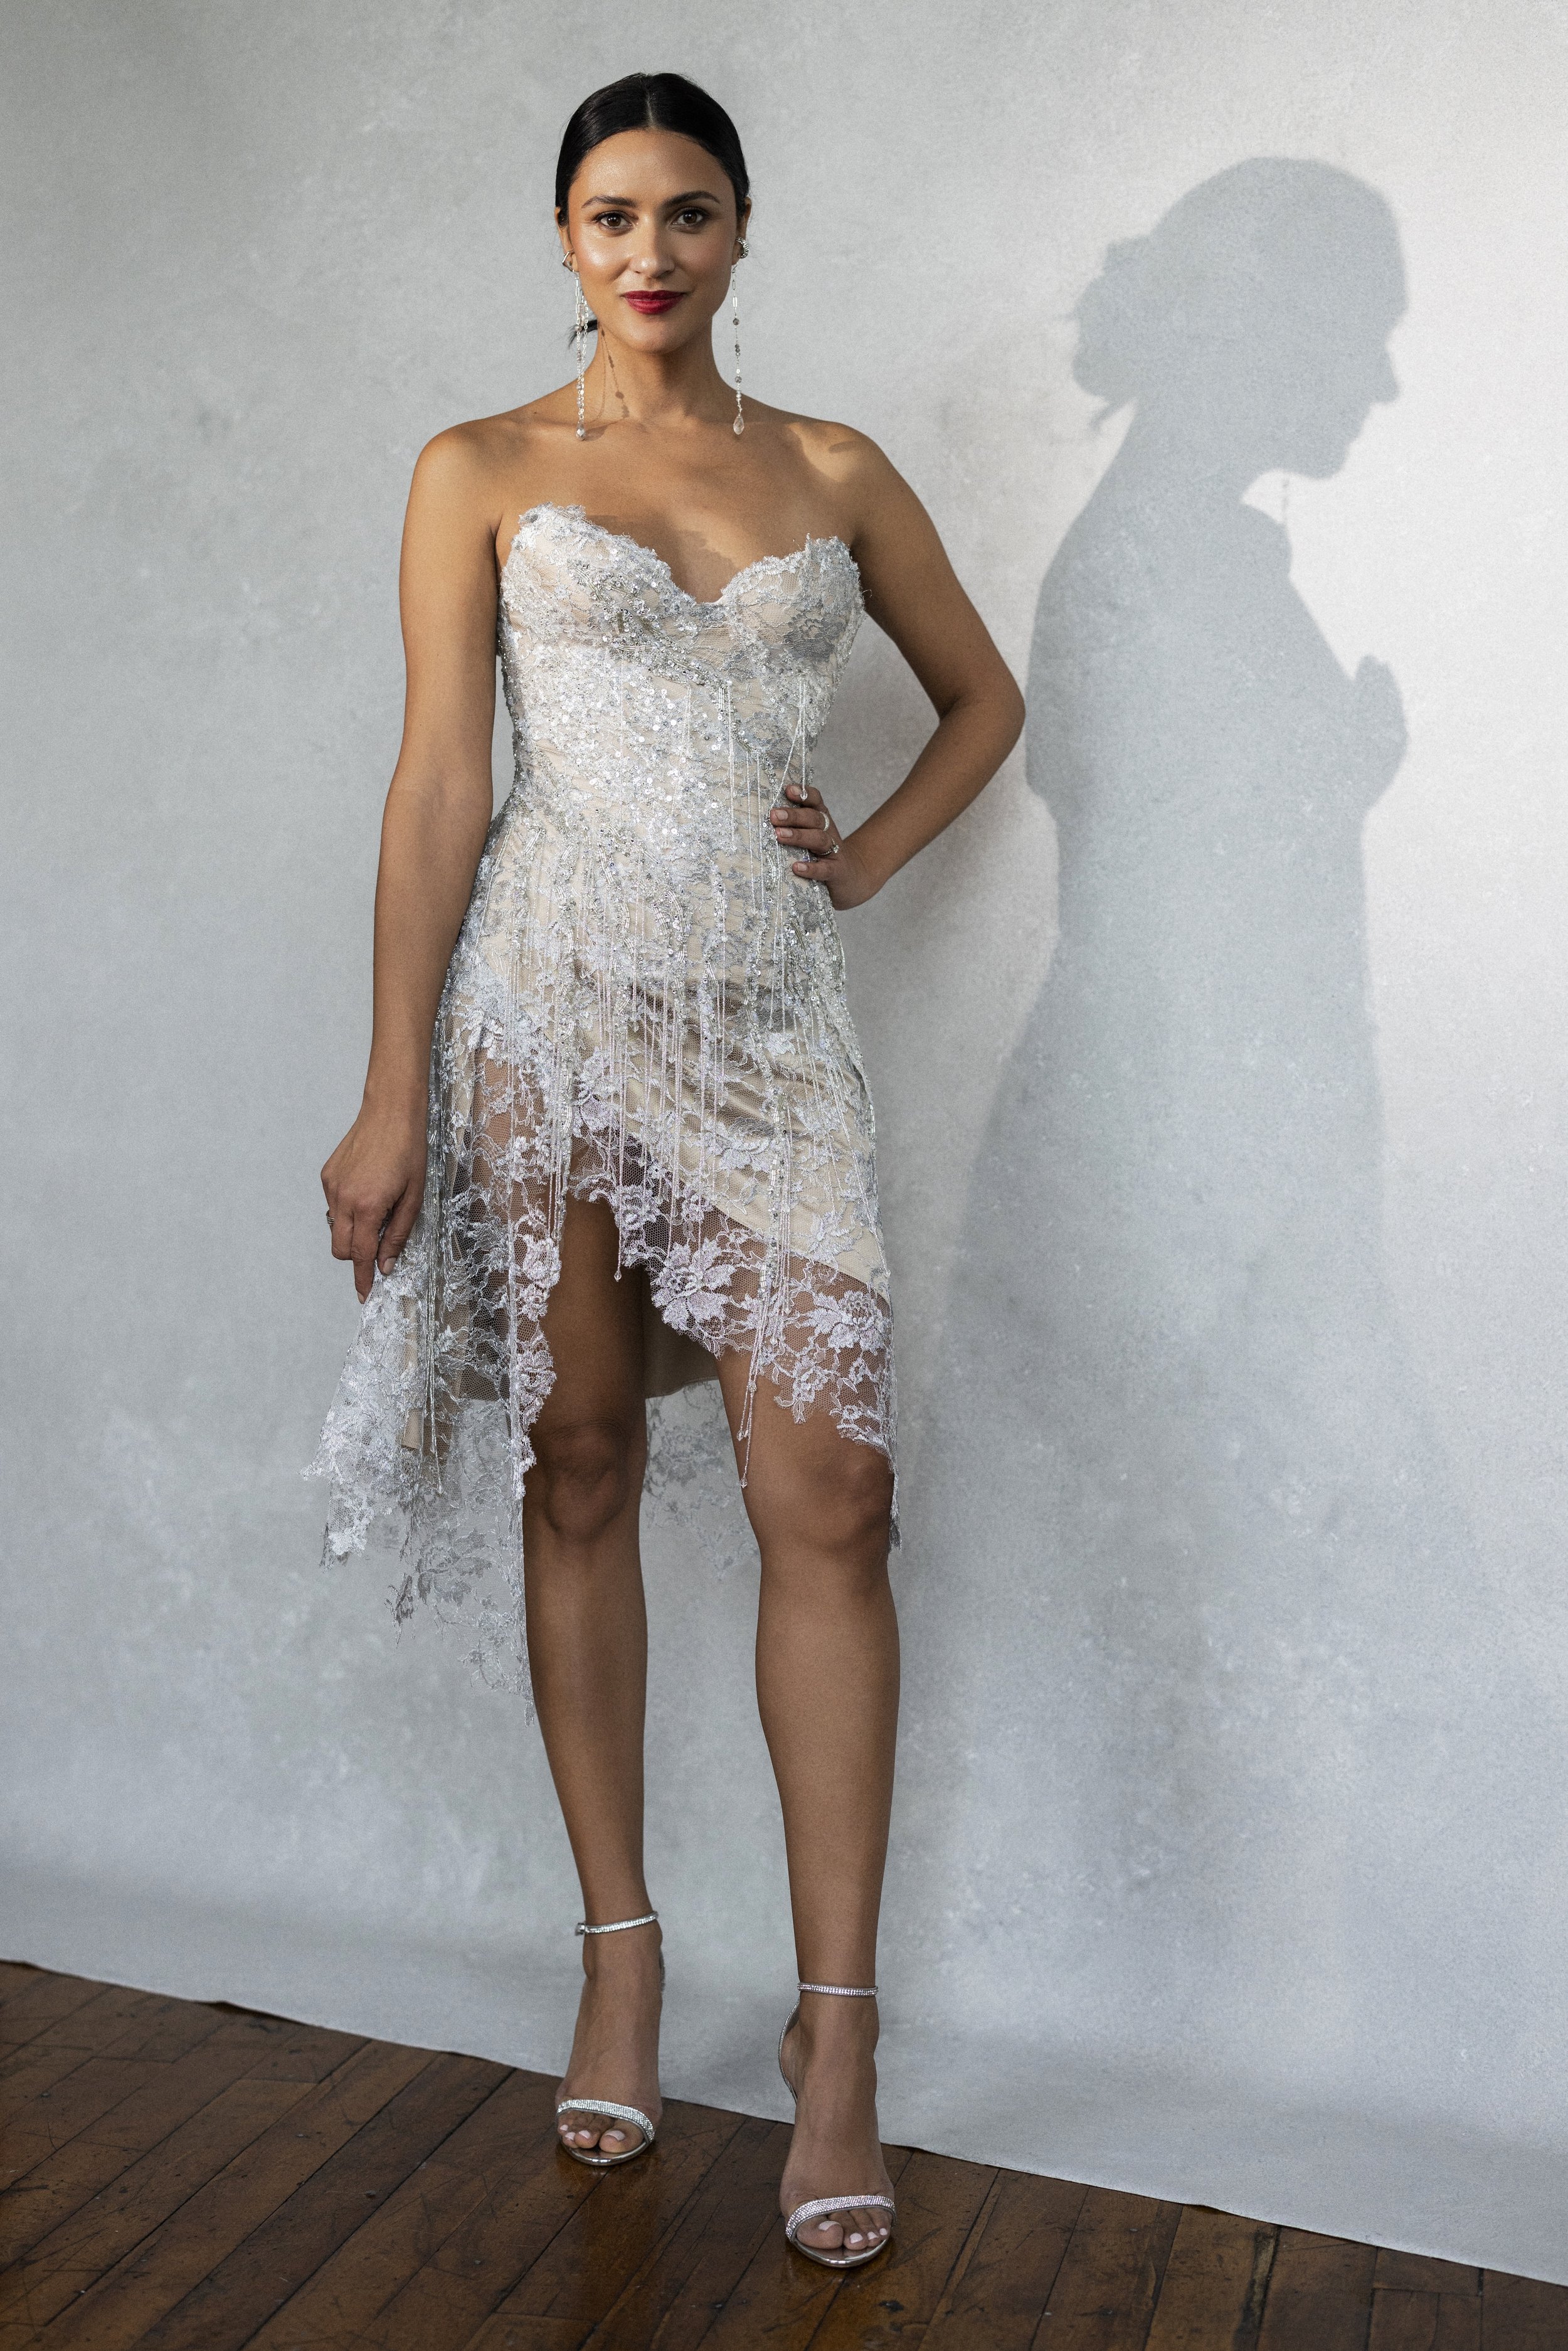
Struggling to make a backdrop work in a small home studio? A simple canvas backdrop setup can transform a spare bedroom into a professional portrait space.
The Real Dimensions You're Working With (And What They Actually Allow)
Let's start with honesty about common home studio dimensions, because most studio setup guides assume you have 15 or 20 feet of depth. You don't. Let's talk about what you actually have.
The Standard Spare Bedroom: 10x11 or 10x12 Feet
This is the most common home studio scenario I hear about from photographers. A second bedroom with roughly 110 to 120 square feet and standard 8-foot ceilings. It feels impossibly small until you understand the math.
A portrait session requires three zones of depth: the backdrop itself (essentially flat against the wall or stand), the gap between backdrop and subject (ideally 3 to 4 feet, but workable at 2 feet with the right lens), and the gap between subject and camera (depends on your focal length).
In a 10-foot-deep room, here's a realistic layout. The backdrop takes the far wall. Your subject stands 3 feet in front of it. That puts them at the 7-foot mark. You, with a 50mm lens on a full-frame camera, need roughly 5 to 6 feet from your subject for a three-quarter-length portrait. That puts you at 12 to 13 feet. You don't have that.
So you adapt. With an 85mm lens, you need roughly 7 to 8 feet from your subject for the same framing. With your subject at the 7-foot mark, you'd be at 14 to 15 feet. Still too far.
Here's the real solution for a 10-foot room: push the backdrop flat against the back wall (no stand gap needed), place your subject 2 to 2.5 feet from the backdrop, and shoot with a 50mm at f/2.8 or wider. At 50mm, you need about 4 to 5 feet from subject to camera for a head-and-shoulders to waist-up portrait. Subject at 2.5 feet from the wall, you at 7 feet from the wall. That's 7 feet of room depth used. You have 3 feet behind you for positioning and a tripod. It works.
The trade-off: 2.5 feet of subject-to-backdrop distance means less background blur and some shadow risk from the subject onto the backdrop. We'll solve both of those below.
The Converted Garage: 12x20 or Similar
If you have a garage, you have significantly more depth to work with. Even a single-car garage (roughly 12 by 20 feet) gives you enough room for full-length portraits on an 8x10 backdrop with proper subject-to-backdrop distance and camera-to-subject distance. The challenges in a garage are different: concrete floors, limited climate control, potential lighting issues from a garage door, and convincing your partner that parking outside is a permanent arrangement.
The Basement: Varies Wildly, But Watch the Ceiling
Basements offer square footage but often have the lowest ceilings in the house. Seven-foot ceilings are common. Some are as low as six and a half feet with ductwork. This is where ceiling height becomes your primary constraint, and we'll address that head-on in the next section.
The Low Ceiling Problem (And Five Real Fixes)
Standard residential ceilings are 8 feet. Older homes, basements, and bonus rooms can be 7 feet or lower. And photography backdrops are designed to hang vertically from stands that need clearance above the backdrop.
A standard backdrop stand crossbar sits at a minimum of about 7.5 feet when fully lowered. Hang an 8-foot-tall backdrop from that, and the bottom of the canvas hits the floor with the top requiring at least 8 feet of clearance. In an 8-foot ceiling room, you're already scraping.
In a 7-foot ceiling basement? You're in trouble. Or at least you think you are.
Fix #1: Go With a 5x8 and Hang It Lower
A 5x8 backdrop is 8 feet tall and 5 feet wide. In an 8-foot ceiling room, you can mount the crossbar flush against the ceiling (most stand systems allow this) and let the canvas hang down to the floor. The canvas just barely fits. You won't have flowing fabric pooling on the ground, but the backdrop will cover your frame from floor to ceiling for seated portraits, waist-up shots, and headshots.
In a room with 7.5-foot ceilings, you'll need to let the bottom of the backdrop rest on the floor and curl forward slightly. This actually looks natural in photos. The gentle curve where canvas meets floor creates a soft transition rather than a hard line.
For guidance on which backdrop size suits your shooting style, our backdrop sizing guide breaks down the 5x8 versus 8x10 decision in full detail.
Fix #2: Wall-Mount the Backdrop Directly
Skip the stands entirely. Wall-mounting a backdrop is the single best solution for low-ceiling home studios, and it's what I eventually settled on in my apartment.
The simplest approach: install two heavy-duty hooks or a curtain rod system at the top of your wall, as close to the ceiling as possible. Hang the backdrop from these mounting points. The canvas drapes flat against the wall and extends to the floor. No stands eating up floor space. No crossbar needing clearance above the backdrop. And your effective hanging height becomes your full wall height, ceiling to floor.
For a more flexible setup, install a wall-mounted backdrop roller system. These allow you to roll and unroll multiple backdrops from ceiling-mounted brackets. You can swap colors in seconds without taking anything down or pulling out stands. Several photographers I know who work from home studios have installed two or three roller mounts side by side, each holding a different Chasing Stone canvas. They pull down whichever color the session calls for.
The investment for a basic wall-mount system is $50 to $150 for hardware, plus an afternoon of installation. Compared to the floor space you reclaim by eliminating two light stands, it's one of the best upgrades a home studio photographer can make.
Fix #3: The Floor Sweep Technique
If your ceiling is truly limiting (under 7.5 feet) and you can't wall-mount, try the floor sweep approach. Instead of hanging the backdrop vertically, lay it partially on the floor and sweep it up against the wall in a gradual curve. Secure the top of the canvas to the wall at whatever height you can manage (even 5 or 6 feet works for seated portraits and detail work).
The curved transition from floor to wall eliminates the hard corner line and creates a seamless background in camera. It won't work for standing full-length portraits because the backdrop doesn't extend high enough. But for seated subjects, children, newborns, product photography, and pet portraits, the floor sweep is completely viable and actually quite elegant.
This technique is also fantastic for newborn photography, where the subject is always on the floor or a posing table anyway. Several newborn photographers I know work exclusively with floor sweeps in home studios with low ceilings and produce stunning work.
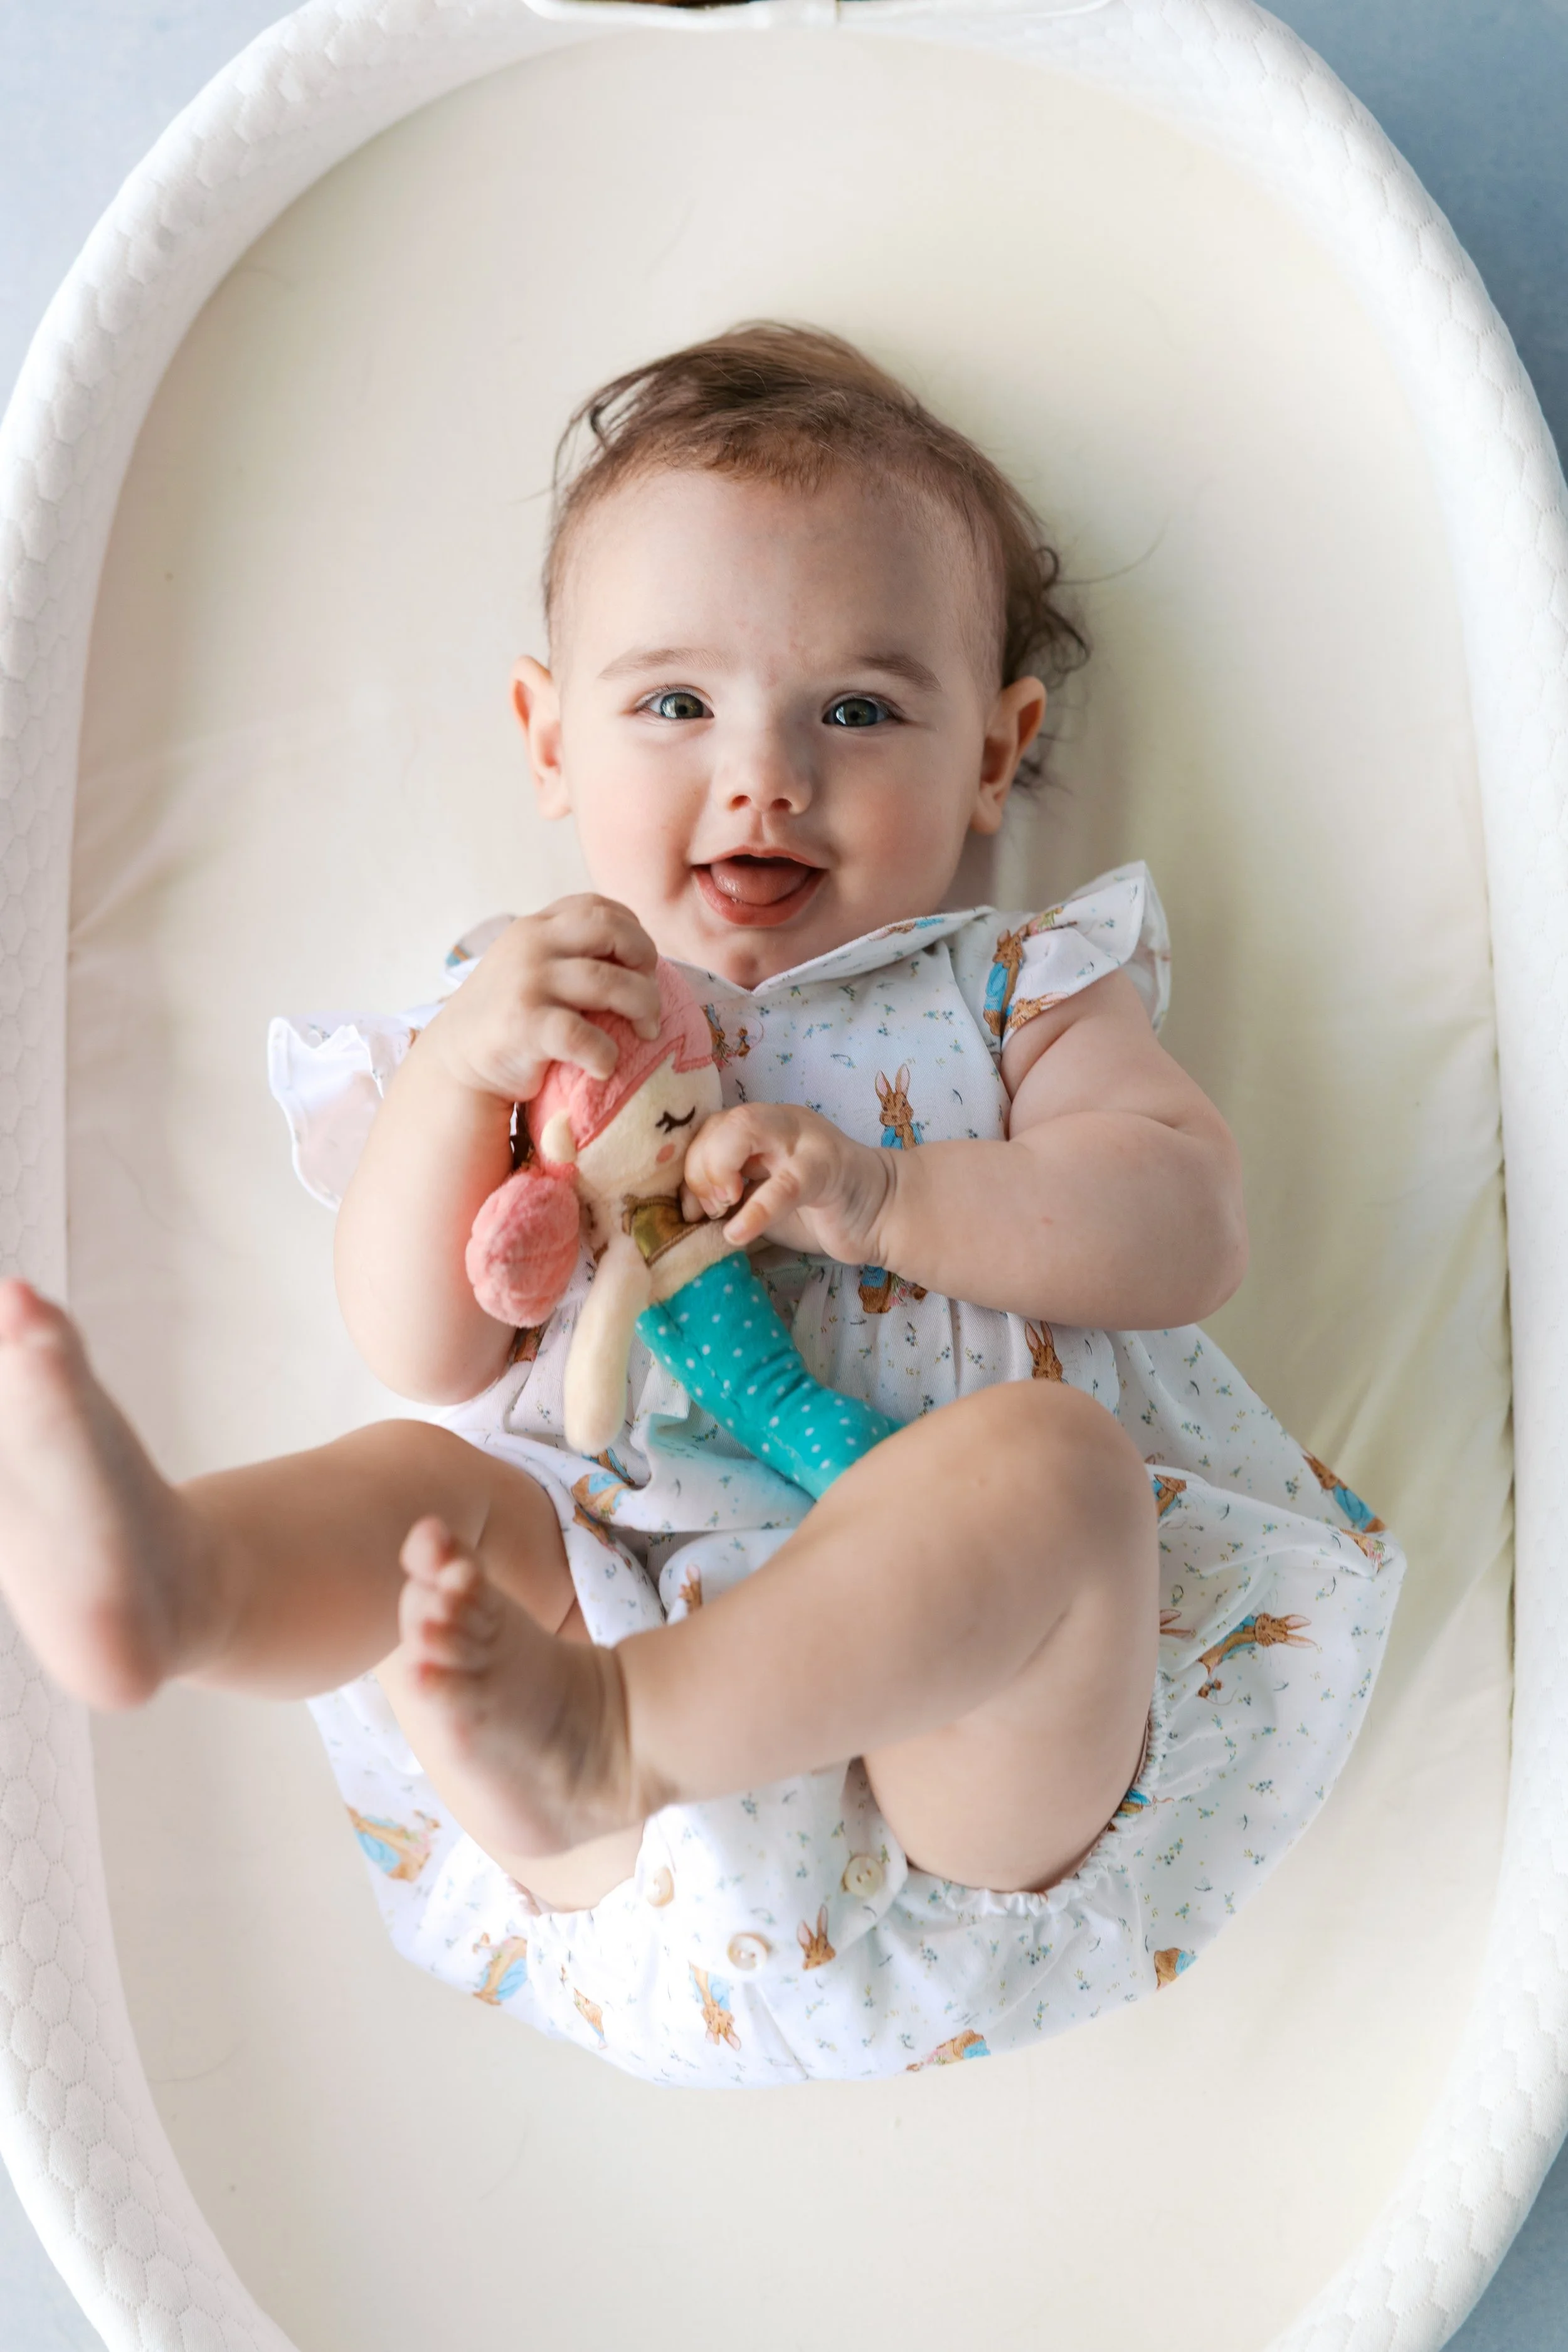
We hear this all the time from photographers: 'My home studio is too small for sessions.' In reality, simple baby portraits like this, photographed with a hand-painted backdrop, are perfect for small home studios.
Fix #4: Shoot Seated and Three-Quarter Length
Low ceilings only matter if you're trying to shoot standing full-length portraits. If you shift your shooting approach to seated portraits, stools, chairs, and floor poses, your ceiling height becomes almost irrelevant.
A subject seated on a stool with a backdrop hanging from 7 feet needs roughly 4 to 5 feet of vertical backdrop coverage visible in frame. A 5x8 canvas gives you 8 feet of height. You have more than enough, even in a basement.
This isn't a compromise. Some of the most compelling portrait work being created right now is seated, intimate, and tightly composed. Annie Leibovitz doesn't shoot everything full-length. Neither do you have to. The constraint can push your creative choices in better directions.
Fix #5: Choose Horizontal Orientation for Full-Length
Here's a trick that most small-space photographers overlook: rotate your 8x10 backdrop to horizontal orientation. Instead of 8 feet wide and 10 feet tall, you have 10 feet wide and 8 feet tall. In an 8-foot ceiling room, the 8-foot height fits perfectly. And the 10-foot width gives you enough lateral coverage for full-length individual portraits and even couples.
You lose 2 feet of vertical coverage compared to the standard vertical hang. But if your ceiling is exactly 8 feet, a horizontal 8x10 uses every available inch. It's a much better fit than trying to squeeze a vertical 10-foot backdrop into a space that can't handle it.
Making the Most of Limited Floor Space
Ceiling height is one constraint. Floor space is the other. When your studio is also your guest room or your office or your kid's play area, every square foot matters.
The Furniture Shuffle Reality
I'm not going to pretend that running a portrait studio from a spare bedroom doesn't require moving furniture. It does. The question is how much moving and how often.
If you shoot weekly, a wall-mounted backdrop system means you only need to clear the area directly in front of the wall. Push the bed or desk to one side. You need roughly 4 to 5 feet of clear floor space in front of the backdrop for your subject, plus enough room behind you for your camera position. In a 10x12 room, that means clearing roughly half the room.
If you shoot less frequently (a few times a month), a stand-based system that you set up and break down each time might be more practical. A backdrop stand folds down and stores in a closet. The backdrop rolls and leans in a corner. Setup takes 5 to 10 minutes once you've practiced.
The photographers who make home studios work long-term are the ones who design their room around the dual purpose from day one, rather than constantly fighting the furniture. Position your desk against the wall perpendicular to your backdrop wall. Use a daybed or futon that slides easily. Keep the backdrop wall and the 5 feet in front of it permanently clear if possible.
The 4-Foot Depth Minimum
Here's the minimum depth you need between your backdrop and your camera for usable portrait photography: about 8 feet total, broken into 2 to 3 feet of subject-to-backdrop distance and 5 to 6 feet of camera-to-subject distance (shooting with a 50mm lens for waist-up portraits).
If your room is shallower than 8 feet in any direction, you're going to struggle with standard portrait work. You can shoot detail-only and flat lay work (which doesn't need depth at all), but subject portraits will be extremely tight.
For rooms between 8 and 10 feet deep, the setup I described earlier (subject 2 to 2.5 feet from backdrop, 50mm lens, f/2.8 or wider) is your sweet spot. You'll be shooting waist-up and head-and-shoulders compositions primarily.
For rooms 12 feet or deeper, you have enough space for three-quarter and even full-length portraits with a 50mm. At 14 feet or more, you can use an 85mm comfortably for full-length work with beautiful compression and blur.
Lenses That Save You in Small Spaces
Your lens choice is the biggest factor in making small spaces work. A 35mm prime gives you the widest framing in the tightest quarters, but introduces slight distortion for close-up portraits (not ideal for headshots where facial distortion is noticeable). A 50mm is the workhorse for small studios: flattering compression, tight enough to shoot waist-up portraits from 5 to 6 feet away. An 85mm produces the most beautiful portrait compression but requires 8 to 10 feet of distance for the same framing, which many home studios can't accommodate.
My recommendation for a 10x12 home studio: use a 50mm prime as your default, and keep a 35mm available for those moments when you need a wider composition and can't back up any further.
Beautiful product and food photography doesn't require a large studio. With thoughtful styling and a hand-painted backdrop, even a small home studio can create images like this.
Lighting in Small Spaces (Where Everything Bounces Off Everything)
Lighting a small room is fundamentally different from lighting a large studio, and most lighting tutorials don't acknowledge this. In a large studio, light goes where you point it. In a 10x12 room with light-colored walls, light goes everywhere.
The Bounce Problem
In a small room, your key light hits the subject and then keeps going. It bounces off the opposite wall, the ceiling, the floor, and comes back to fill in shadows you might have wanted to keep. The result: flat, directionless light that lacks the drama and dimension you see in professional studio portraits.
If your walls are white or light-colored (as most spare bedrooms are), this bounce effect is amplified. The room essentially becomes a softbox, which sounds nice in theory but produces muddy, low-contrast light in practice.
Controlling Light in Tight Quarters
Black fabric panels (sometimes called "negative fill" or "flags") are your best friend in a small home studio. A 4x6-foot piece of black fabric on a stand, positioned opposite your key light, absorbs the light that would otherwise bounce back as fill. This gives you the shadow depth and contrast that makes portraits feel three-dimensional.
You can buy purpose-built flags or simply buy black fabric from a craft store and clip it to a light stand with A-clamps. Cost: maybe $30 total. Impact on your images: dramatic.
Position the flag on the shadow side of your subject, between your subject and the nearest light-colored wall. This blocks the bounce from that wall and creates a natural falloff on the shadow side of the face. The difference in a small room is night and day.
Window Light in Home Studios
If your spare bedroom has a window, you have arguably the best portrait light source available. North-facing windows provide consistent, soft, diffused light all day. East and west-facing windows give you beautiful directional light in the morning or afternoon (and challenging direct sun at other times). South-facing windows get direct sunlight that needs diffusion.
Position your backdrop on the wall perpendicular to your best window. This puts the window to the side of your subject, creating natural directional light with soft shadows. If the light is too harsh, a white sheer curtain acts as a diffuser. If it's too soft (overcast day, north window), a reflector on the opposite side bounces light back into the shadow side.
This single-window setup is how I shot every portrait session in my Huntington Beach apartment. Window to the left, backdrop straight ahead, black flag to the right. Simple. Consistent. Produced beautiful light that clients and editors loved. Our guide to lighting hand-painted backdrops covers window light positioning and techniques in full detail.
Artificial Light in Small Rooms
If you're using strobes or continuous lights in a small space, modifier choice matters more than light power. A large softbox in a small room is going to light everything, including your backdrop, your walls, and your subject. There's no room for the light to fall off before it hits something.
Instead, use a smaller modifier with a grid. A 2x3-foot softbox with a grid attachment directs the light specifically at your subject and prevents it from spilling onto the backdrop and walls. This gives you control over the light-to-shadow ratio that a large softbox in a small room simply can't provide.
Strip boxes (1x4-foot softboxes) are also excellent for small spaces. Their narrow profile means less spill, and they create beautiful, wraparound portrait light without filling the entire room.
Backdrop Storage When Your Studio Isn't Just a Studio
Your canvas backdrop needs to live somewhere between sessions. In a dedicated studio, it stays on the wall. In a spare bedroom that's also a guest room or home office, storage becomes a real consideration.
Standing Storage
A rolled canvas backdrop is a cylinder roughly 5 feet long (for a 5x8) or 8 feet long (for an 8x10). The easiest home storage solution: stand it upright in a corner. A rolled 5x8 takes up about as much floor space as an umbrella stand. A rolled 8x10 is taller but equally slim.
I stored my 8x10 backdrops in the corner of my bedroom closet for two years. Upright, leaning against the wall, taking up maybe 10 inches of floor space per backdrop. They were out of the way, protected, and grabbed easily when I needed them.
Under-Bed Storage
A rolled 5x8 backdrop can slide under most beds. An 8x10 is too long for most bed frames unless you have a king. If under-bed storage is your plan, measure before you buy.
The Critical Storage Rule
Always store canvas backdrops rolled, never folded. Folding creates permanent creases that are extremely difficult to remove from painted canvas. Rolling maintains the integrity of the paint and the canvas surface. Keep the backdrop on its cardboard core (the one it ships on) or roll it around a PVC pipe for structure.
For complete care instructions including cleaning and long-term storage, our backdrop care guide covers everything you need to know.
Building Your Home Studio Backdrop Collection Strategically
When floor space and storage are limited, every backdrop purchase needs to earn its place. You can't afford to buy three backdrops and realize two of them give you the same look.
Start With One Versatile Workhorse
Your first home studio backdrop should handle the widest range of sessions with the least limitation. That means a warm neutral, a color that works for headshots on Monday, maternity on Wednesday, and newborn photography on Saturday. Something like Bentonite (warm taupe), Limestone (light tan), or Mica (pale gray-brown).
For a home studio, I'd start with the 5x8 size unless you know you'll be shooting full-length work regularly. The smaller format is easier to mount, store, and manage in a tight space. And for the types of portraiture most home studio photographers do (headshots, waist-up portraits, maternity, newborn, product, flat lays), 5x8 covers the ground without the bulk.
Our portrait photography backdrop guide breaks down which backdrop colors and sizes work best for specific session types if you want to match your first purchase to your primary portrait specialty.
A warm neutral backdrop is the ultimate home studio workhorse, versatile enough for headshots, wedding portraits, maternity, and more.
Add a Mood Shift Second
Once you've shot 10 to 15 sessions on your neutral and understand how your specific room, lighting, and client base interact with it, add a second backdrop that gives you a meaningfully different mood. If your neutral is warm and light (like Limestone), go darker and moodier for your second: Silt, Graphite, or Serpentine. If your neutral is mid-tone (like Bentonite), your second could be lighter and airier (Mica) or warmer and earthier (Sandstone).
Two backdrops that look different from each other give your clients visible variety in their galleries and give you creative range without overwhelming your storage. With a wall-mount roller system, swapping between two backdrops takes about 15 seconds.
The Home Studio Sweet Spot: Two to Three Backdrops
For most home studio photographers, two to three canvas backdrops provide more than enough variety for a full portrait business. One warm neutral workhorse, one moody or dramatic option, and potentially one with more personality (a sage green, a dusty blue, a mauve) for clients who want something specific. That collection covers headshots, branding, maternity, family, newborn, and boudoir without needing dedicated storage space for a dozen surfaces.
If you also shoot flat lays (wedding details, product photography, food), our hand-painted flat lay surfaces and fabric flat lay mats store flat in a drawer or on a shelf and take up almost no space. They're a natural complement to a canvas backdrop collection for home studio photographers who want to offer styled detail work alongside portraits.
The Garage and Basement Conversion: Specific Considerations
Spare bedrooms are the most common home studio, but garages and basements present their own set of opportunities and headaches.
Garage Studios
The biggest advantage of a garage is depth. Even a single-car garage gives you 18 to 22 feet of usable length, which is enough for full-length portraits on an 8x10 backdrop with a telephoto lens and proper subject-to-backdrop distance. The width (usually 10 to 12 feet) accommodates an 8x10 backdrop comfortably.
The challenges are climate and flooring. Garages aren't insulated in most climates, which means extreme heat in summer and cold in winter. Clients notice. If you're going to run a portrait business from a garage, investing in a portable heater and a quality fan (not just for comfort but for keeping air moving so the space doesn't feel stale) is non-negotiable.
Concrete floors are the other issue. They're cold, hard, and ugly if they peek into your frame. A large area rug (8x10 or bigger) solves the floor problem visually and makes the space feel more like a studio. Position it in front of your backdrop so it covers the floor visible in your shooting area.
For lighting, a garage without windows is actually an advantage. No ambient light to compete with means complete control over your lighting setup. You're starting from true darkness, which is the ideal canvas for deliberate studio lighting.
Basement Studios
Basements offer space and climate stability (they stay cooler in summer, warmer in winter) but ceiling height is the perpetual enemy. If your basement has 7-foot ceilings, revisit the low-ceiling solutions earlier in this guide. A wall-mounted 5x8 backdrop with a floor sweep is often the best approach.
Basements also tend to have interruptions in the ceiling plane: ductwork, pipes, beams, low-hanging fixtures. Map your ceiling before you commit to a backdrop wall. Find the area with the highest uninterrupted ceiling height and make that your shooting zone.
Moisture is the other basement concern. Canvas backdrops are durable, but prolonged exposure to damp conditions can cause mildew. If your basement has any moisture issues, store your backdrops rolled and upright in a dry area of the house between sessions, and bring them down only when you're shooting. A small dehumidifier running in your shooting area protects both your backdrops and your gear.
My Home Studio Setup in 2019: What I'd Do Differently Now
Looking back at that Huntington Beach apartment, here's what I got right and what I'd change.
What worked: Wall-mounting the backdrop directly to the wall eliminated stands and saved precious floor space. Using window light with a black flag on the opposite side gave me consistent, beautiful light without any investment in strobes. Starting with one warm neutral backdrop (a color similar to what we now call Bentonite) handled 90% of the sessions I booked that first year.
What I'd change: I would have installed a two-backdrop wall-mount roller system from day one instead of swapping backdrops manually every time I wanted a different look. The time spent unhanging one canvas and hanging another between sessions added up over months. A roller system would have paid for itself in convenience within weeks.
I also would have invested in a good flag system earlier. I spent three months shooting with light bouncing off every wall before a photographer friend visited my studio and immediately said, "You need negative fill on that right side." One piece of black fabric transformed my lighting.
And I would have bought a 35mm lens sooner. My 50mm was great for headshots and waist-up work, but there were sessions where I physically could not back up far enough for a wider composition. A 35mm would have given me that flexibility for the price of a single lens.
The beautiful thing about a home studio is that it forces you to be resourceful. The constraints push you to understand light, composition, and your equipment at a level that photographers with 2,000-square-foot studios sometimes never develop. Some of the best portrait photographers I know started in spare bedrooms, and the intimacy and intention of that work still shows in their style years later.
We hear this from photographers all the time: 'My home studio is too small for styled shoots.' In reality, simple setups like this can transform even a small space into a creative workspace.
Frequently Asked Questions About Home Studio Backdrops
What size backdrop fits in a spare bedroom?
A 5x8 canvas backdrop fits in virtually any spare bedroom. It requires about 5 feet of wall width and works with standard 8-foot ceilings. For rooms 12 feet deep or more, an 8x10 backdrop is also viable, especially if mounted directly to the wall. For a detailed size comparison, our backdrop sizing guide walks through both options.
Can I use a photography backdrop with 8-foot ceilings?
Yes. A 5x8 backdrop fits an 8-foot ceiling with the canvas reaching from near the ceiling to the floor. An 8x10 backdrop can be hung horizontally (8 feet tall instead of 10) to fit an 8-foot ceiling while retaining 10 feet of width. Wall-mounting directly to the wall, rather than using stands, eliminates the need for extra clearance above the backdrop.
How far should the subject be from the backdrop in a small studio?
The ideal distance is 3 to 4 feet, but in tight spaces you can work with 2 to 2.5 feet. The closer the subject, the less background blur you'll get and the more risk of the subject casting shadows on the backdrop. Compensate by using a wider aperture (f/2.8 or wider) and positioning your light source to the side rather than behind the camera to minimize backdrop shadows.
What's the minimum room size for portrait photography with a backdrop?
About 8 feet of depth is the functional minimum for waist-up portraits using a 50mm lens. This gives you 2 to 3 feet of subject-to-backdrop space and 5 to 6 feet of camera-to-subject distance. Rooms smaller than 8 feet deep can still work for headshots with a wider lens (35mm) or for product and flat lay photography, which doesn't require depth.
How do I store a canvas backdrop in a small apartment?
Always store rolled, never folded. A 5x8 backdrop rolls to a cylinder about 5 feet long and 4 to 5 inches in diameter. Stand it upright in a closet corner, slide it under a bed, or lean it behind a door. An 8x10 is about 8 feet long when rolled and fits in most closets stood on end. Two or three backdrops stored this way take up less space than a floor lamp.
Can I mount a photography backdrop to my wall without damaging it?
For renters, heavy-duty removable adhesive hooks (rated for 10+ pounds each, using three to four across the top edge) can support a 5x8 canvas backdrop. For homeowners, a simple curtain rod system or wall-mounted hooks provide permanent, stable mounting. A roller system mounted at the ceiling line allows you to hang multiple backdrops and swap between them in seconds.
What's the best lighting setup for a small home studio?
Natural window light with a black flag for negative fill on the opposite side is the most effective and affordable setup for small rooms. Position your backdrop perpendicular to the window so light falls across your subject from the side. If you use artificial light, choose a small modifier with a grid (2x3-foot softbox or strip box) to control spill in tight quarters where light bounces off every surface.
Can I do full-length portraits in a home studio?
Yes, but it requires either a room with 12+ feet of depth (for proper camera-to-subject distance with a 50mm or longer lens) or strategic lens choice. In a 10-foot room, a 35mm lens can capture full-length from roughly 6 feet away, though be aware of slight perspective distortion. An 8x10 backdrop hung horizontally provides enough height and width for full-length individual portraits. For the most flattering full-length portraits, 14 feet of depth or more with an 85mm lens is ideal.
Build a Home Studio That Punches Above Its Weight
The photographers producing the most impressive home studio work aren't the ones with the biggest rooms. They're the ones who understand their constraints and build systems around them. The right backdrop, properly mounted and lit, transforms a spare bedroom into a shooting environment that clients can't distinguish from a commercial studio in the final images.
Every Chasing Stone backdrop is hand-painted by Jennifer in our Orange County, California studio on premium cotton canvas. The texture and tonal variation in each surface are especially valuable in small studios, where the backdrop occupies a larger portion of the frame and any flatness or uniformity becomes more obvious. Hand-painted dimension gives small-space portraits the same editorial depth you'd get in a full-scale studio. Learn more in our complete photography backdrop guide.
Explore the full collection of hand-painted canvas backdrops, hand-painted flat lay surfaces, and spill-proof fabric flat lay mats at chasingstone.com.

Creators of premium photography backdrops and styling surfaces
Trusted by thousands of discerning creatives worldwide
Every piece is handcrafted with intention in Orange County, California