
Outdoor Backdrop Photography: Wind, Weather, and Stability Solutions
Posted on Mar. 24, 2026
The first time I took a backdrop outside for a wedding, I nearly lost it to the Pacific Ocean.
It was a beach ceremony in Malibu. The couple wanted bridal portraits with a clean, editorial background rather than the busy parking lot and public restrooms visible from the only shaded area near the ceremony site. Smart request. So I brought my LIMESTONE canvas and set it up on a single C-stand near a bluff, thinking the natural windbreak of the hillside would protect us.
It didn't. A gust came off the water and turned my 8x10 backdrop into a sail. The C-stand tipped, the canvas caught air, and the whole assembly started sliding toward a 30-foot drop to the rocks below. I caught the stand with one hand and the canvas with the other while the bride watched in what I can only describe as polite horror.
The portraits turned out beautifully. But I drove home that evening knowing I needed a completely different approach to outdoor backdrop work.
That was four years ago. Since then I've shot outdoor backdrop sessions in beach wind, desert heat, unexpected rain, coastal fog, and everything in between. I've figured out what works, what doesn't, and what specific gear decisions make the difference between a confident outdoor setup and a near-disaster.
Our venue setup guide covers outdoor work briefly as one of five venue types. This post goes much deeper. If you've ever wanted to take your backdrop outside but worried about logistics, this is the piece that answers every question you have.
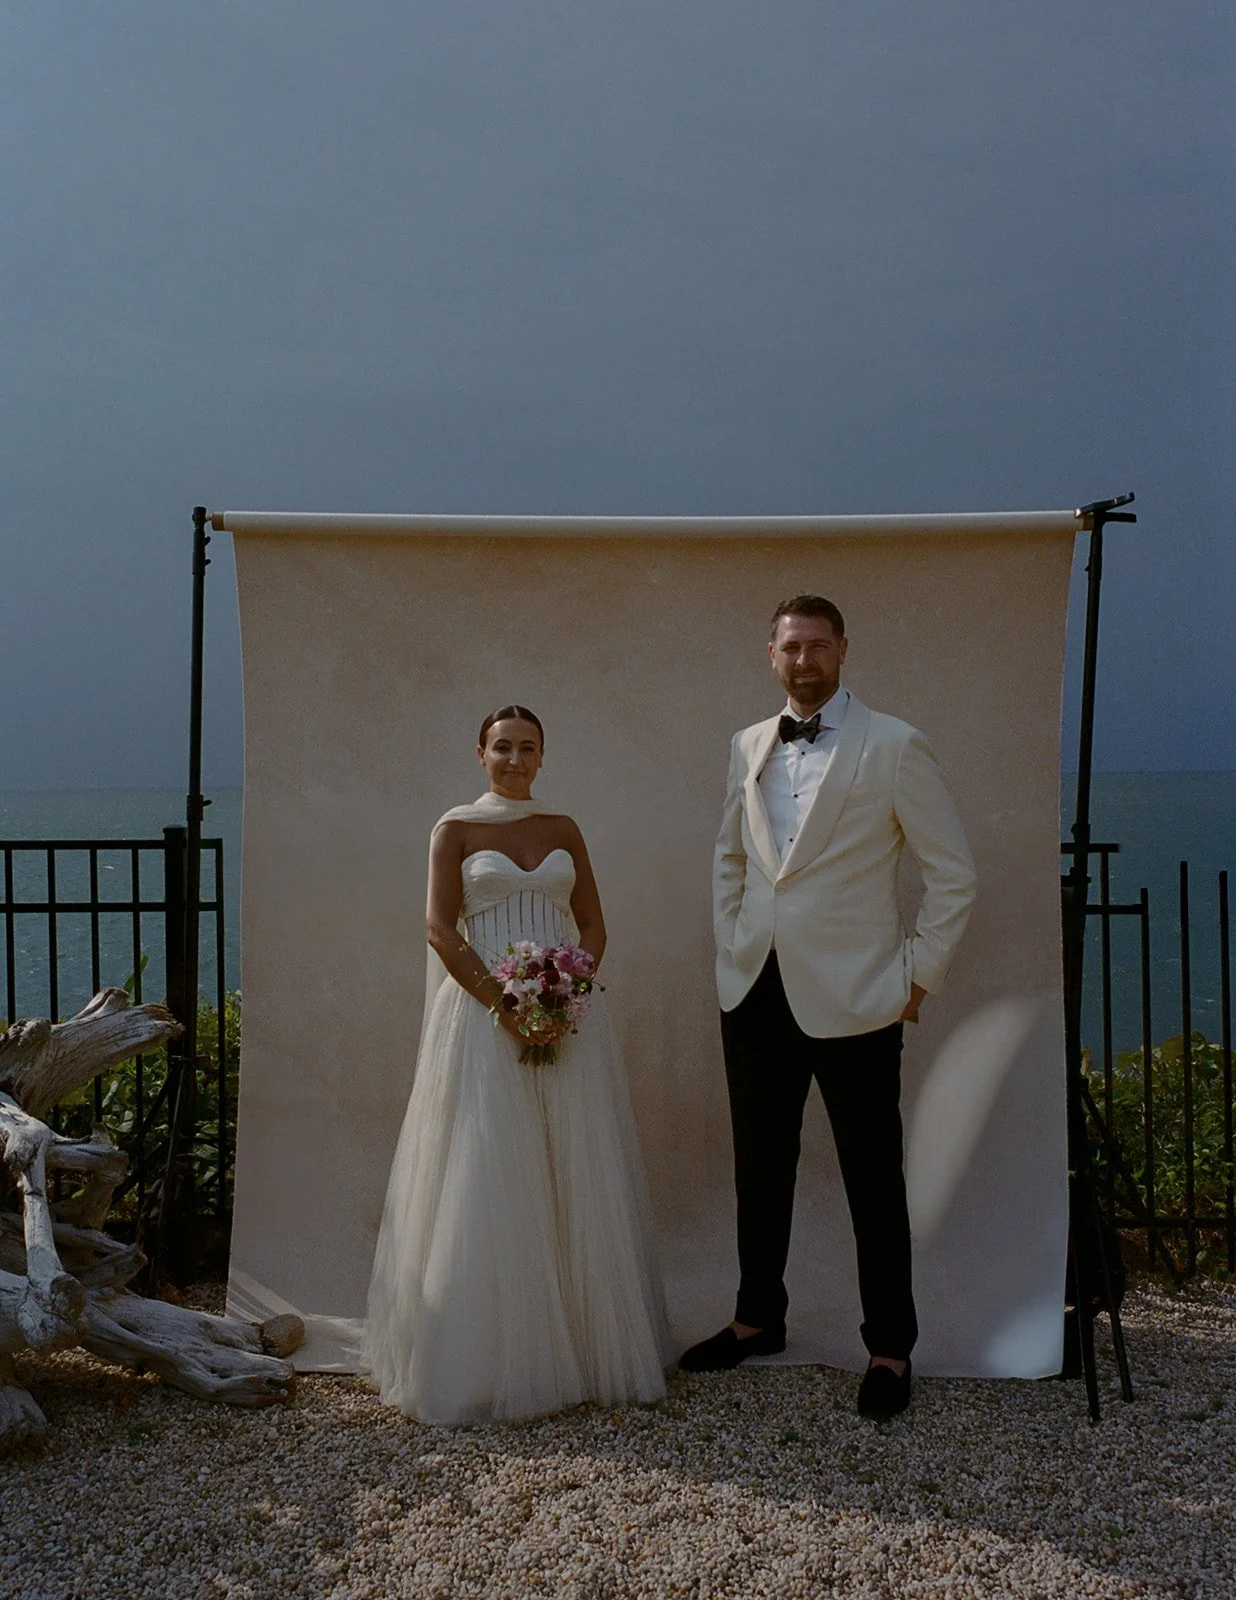
Outdoor backdrop photography works beautifully when the setup is engineered for stability. Dual stands, sandbags, and proper positioning keep canvas portraits secure, even at coastal venues.
Why Outdoor Backdrop Work Is Worth the Effort
Before we get into the solutions, let me make the case for why you'd bother shooting a backdrop outside in the first place. You're introducing variables that don't exist indoors. Wind, sun position, ground conditions, public attention. Why not just shoot indoors where you have control?
Because the outdoor light is better.
That's the simple answer. The quality of natural light you get outdoors, especially in open shade or during golden hour, is almost impossible to replicate indoors. Window light is beautiful, but it comes from a single direction and falls off quickly. Outdoor open shade wraps around your subject from multiple angles, creating soft, dimensional light that flatters everyone and makes hand-painted canvas texture come alive in ways that indoor window light can't match.
I noticed this the first time I compared indoor and outdoor shots on the same backdrop from the same wedding. The indoor portraits were strong. Good light, good posing, clean images. But the outdoor portraits had this luminous quality that I couldn't explain at first. The canvas had more visible dimension. The color felt richer. The subject had softer, more even lighting with no harsh shadow side.
What I eventually understood is that outdoor open shade provides a much larger effective light source than any window. The entire sky becomes your softbox. And when that massive, soft light source rakes across a hand-painted canvas surface, every brushstroke gets gently illuminated from multiple angles simultaneously. The texture practically glows.
That's the reward. The rest of this post is about managing the risks that come with it.
Understanding Wind and Canvas: The Physics That Matter
Here's something most photographers don't think about: a hand-painted canvas backdrop mounted on a C-stand is, from an engineering perspective, a sail.
An 8x10 canvas presents 80 square feet of surface area to the wind. Even a gentle 10 mph breeze creates meaningful force across that surface. A 20 mph gust can generate enough force to topple an unweighted C-stand instantly. I know this from experience, and from watching it happen to other photographers who thought their setup was stable.
But here's the good news: canvas handles wind better than any other backdrop material. Muslin catches wind and balloons like a spinnaker because it's so lightweight and loosely woven. Vinyl is rigid and reflects wind force directly into the stand. Paper rips.
Canvas is dense enough to absorb some wind energy rather than transferring all of it to the stand. It flexes slightly without deforming. And because our hand-painted canvases are heavier than raw canvas (the multiple paint layers add weight), they resist light breezes better than you'd expect. That said, canvas is not wind-proof. It's wind-tolerant within limits. Your job is knowing those limits and engineering around them.
The Wind Assessment: Shoot, Adapt, or Abort
Not all wind is the same, and not all wind conditions are unworkable. Here's the framework I use to make a go/no-go decision before I ever unroll a backdrop outside.
Calm to light breeze (0 to 7 mph): This is your ideal outdoor window. Leaves rustle gently but nothing moves with any force. A properly weighted C-stand setup handles these conditions easily. You can shoot full-size backdrops without stress. Most early morning and late afternoon conditions in Southern California fall in this range, which is why I schedule outdoor backdrop portraits during those times whenever possible.
Moderate breeze (8 to 15 mph): Workable but requires active management. You'll feel the wind on your face consistently. Small branches move. Your canvas will sway slightly on the stand, which means you need to time your shots between gusts. This is where dual-stand setups and heavy sandbags become non-negotiable rather than optional. I can produce strong work in this range, but I'm working harder and my shot count drops because I'm waiting for calm moments between gusts.
Fresh breeze (16 to 25 mph): I switch to the 5x8 backdrop if I'm shooting at all. The smaller surface area catches significantly less wind. My setup is fully weighted, I'm using the low-hang technique (more on this below), and I have an assistant physically steadying the stand between shots. I'll get fewer setups, but the images that work in this range often have a beautiful, dynamic quality because a little canvas movement between shots means every frame is slightly different.
Strong breeze or higher (25+ mph): I put the backdrop away. No portrait is worth damaged gear, injured people, or the stress of fighting a losing battle with physics. At this point I'm shooting environmental portraits with the natural landscape as background, and the backdrop stays in the car. Knowing when to abort is as important as knowing how to adapt.
One thing I check before every outdoor wedding: the hourly wind forecast for the specific location. Not the general city forecast. The specific spot. Coastal venues, hilltop estates, and open desert locations have dramatically different wind patterns than sheltered garden venues, even when they're only a few miles apart. Weather apps like Windy and WindAlert give you location-specific wind data hour by hour. I check the forecast the morning of and adjust my timeline accordingly. If the wind is projected to pick up after 3 PM, I schedule backdrop portraits before noon.
This is the moment photographers worry about when taking a backdrop outside. Wind, uneven ground, and shifting light all matter. With the right setup, it works beautifully.
The Stability Toolkit: Gear That Actually Works Outdoors
Let me be specific about what I carry for outdoor backdrop work, because "use sandbags" is advice that's about 20% of the actual solution.
Sandbags (two minimum, 25 pounds each). These go on the base of every C-stand, every time. Not on the legs. On the base column, as low as possible. Weight at the base lowers the center of gravity of the entire assembly. I've seen photographers drape sandbags over the top of C-stand arms, which does almost nothing because the weight is too high. Keep the weight low. I use fillable sandbags that I can empty for travel and fill with sand or gravel on-site. Most venues with outdoor ceremony spaces have landscape materials nearby. Ask the coordinator.
Two C-stands instead of one (for 8x10 or larger). Indoors, one C-stand with an adapter mount handles an 8x10 canvas fine. Outdoors, I always use two. Each stand clamps one side of the backdrop's top edge. This distributes the wind load across two bases instead of one, and it keeps the canvas taut between the two attachment points rather than allowing it to swing freely from a single point. Two stands with two sandbags each means 100 pounds of base weight holding your setup in place. That's a meaningful difference.
The low-hang technique. This is the single most effective wind-management strategy I've developed, and it's dead simple. Instead of hanging your backdrop at maximum height with the bottom edge brushing the ground, lower both C-stands so the top edge of the canvas is at about 6 feet rather than 7.5 or 8. The bottom of the canvas now sits on the ground with fabric pooling slightly at the base.
Why this works: wind speed increases with height. The air at 3 feet off the ground is calmer than the air at 8 feet. By lowering your canvas, you're moving the top edge (which catches the most wind because it's the highest point) out of the stronger wind zone and into calmer air. The canvas pooling on the ground also acts as a natural anchor, adding friction that resists the wind pulling the backdrop forward.
The trade-off: you lose the "floating" aesthetic where the canvas hangs freely with space visible below. But for outdoor work in any breeze, the floating look is a liability anyway because the wind catches the bottom edge and turns it into a lever. Pooling the canvas on the ground is both more stable and, honestly, it often looks more intentional. The fabric gathering at the base creates a soft, organic floor line that photographs beautifully.
A human windbreak. On shoots where I have an assistant, I position them on the windward side of the backdrop (the side the wind is coming from) just outside the frame. Their body blocks a surprising amount of wind from reaching the canvas. This is especially effective with intermittent gusts. The assistant doesn't need to hold anything. They just stand there and act as a physical barrier. I've also used open car doors, decorative walls, and wedding party members waiting for their turn to shoot as improvised windbreaks. Nobody needs to know they're serving a structural purpose.
Reading Outdoor Light for Hand-Painted Canvas
Our lighting guide covers the fundamentals of how hand-painted canvas responds to light, and everything in that guide applies outdoors. But outdoor light has specific characteristics that deserve attention beyond what's in that post.
Open shade is your best friend. I keep saying this because it's the single most important outdoor lighting principle for backdrop work. Open shade means your subject and backdrop are in shadow, but the sky above (not direct sun) provides illumination. The north side of a building on a sunny day. Under a large tree canopy. A covered porch or pergola. These locations give you soft, even, directional light without hot spots or harsh shadows.
The critical detail: the direction of open shade matters as much as its presence. If you're on the north side of a building, the light comes from overhead and slightly from the south (bouncing off the ground and surrounding surfaces). Position your backdrop so this ambient light rakes across the canvas at an angle rather than hitting it from directly above. Sometimes this means angling the canvas slightly rather than hanging it perfectly vertical. A 10 to 15-degree forward lean catches that overhead ambient light as side light across the texture, which brings out significantly more dimension than a straight vertical hang.
Direct sun destroys texture. If direct sunlight hits your hand-painted canvas, the texture flattens completely. The light is so strong and directional that it overwhelms the subtle shadow play between brushstrokes. Your $800 hand-painted canvas photographs like a $50 piece of seamless paper. I've seen photographers set up in direct sun and wonder why their backdrop looks flat and lifeless in the images. It's not the backdrop. It's the light.
If you must shoot in a sunny location (ceremony timeline doesn't allow waiting for shade to move), position the backdrop so it faces away from the sun. The canvas should be in its own shadow, with the sun behind it. Your subject stands on the shadow side, lit by reflected and ambient light. This isn't ideal, but it's far better than front-lit canvas.
Golden hour is magic on canvas. The warm, low-angle light during golden hour does something special to hand-painted texture. Because the light enters from such a low angle, it rakes across the canvas surface almost horizontally. Every brushstroke catches a warm highlight on one edge and falls into cool shadow on the other. The color temperature shift also interacts with the paint in beautiful ways. Warm neutrals like SANDSTONE deepen into rich honey tones. Cool tones like CELESTITE gain a warm edge that makes them feel romantic rather than cold.
I schedule outdoor backdrop portraits during golden hour whenever timelines allow. The combination of low-angle warm light and hand-painted canvas texture produces images with a quality that I simply cannot replicate at any other time of day. It's worth building your timeline around.
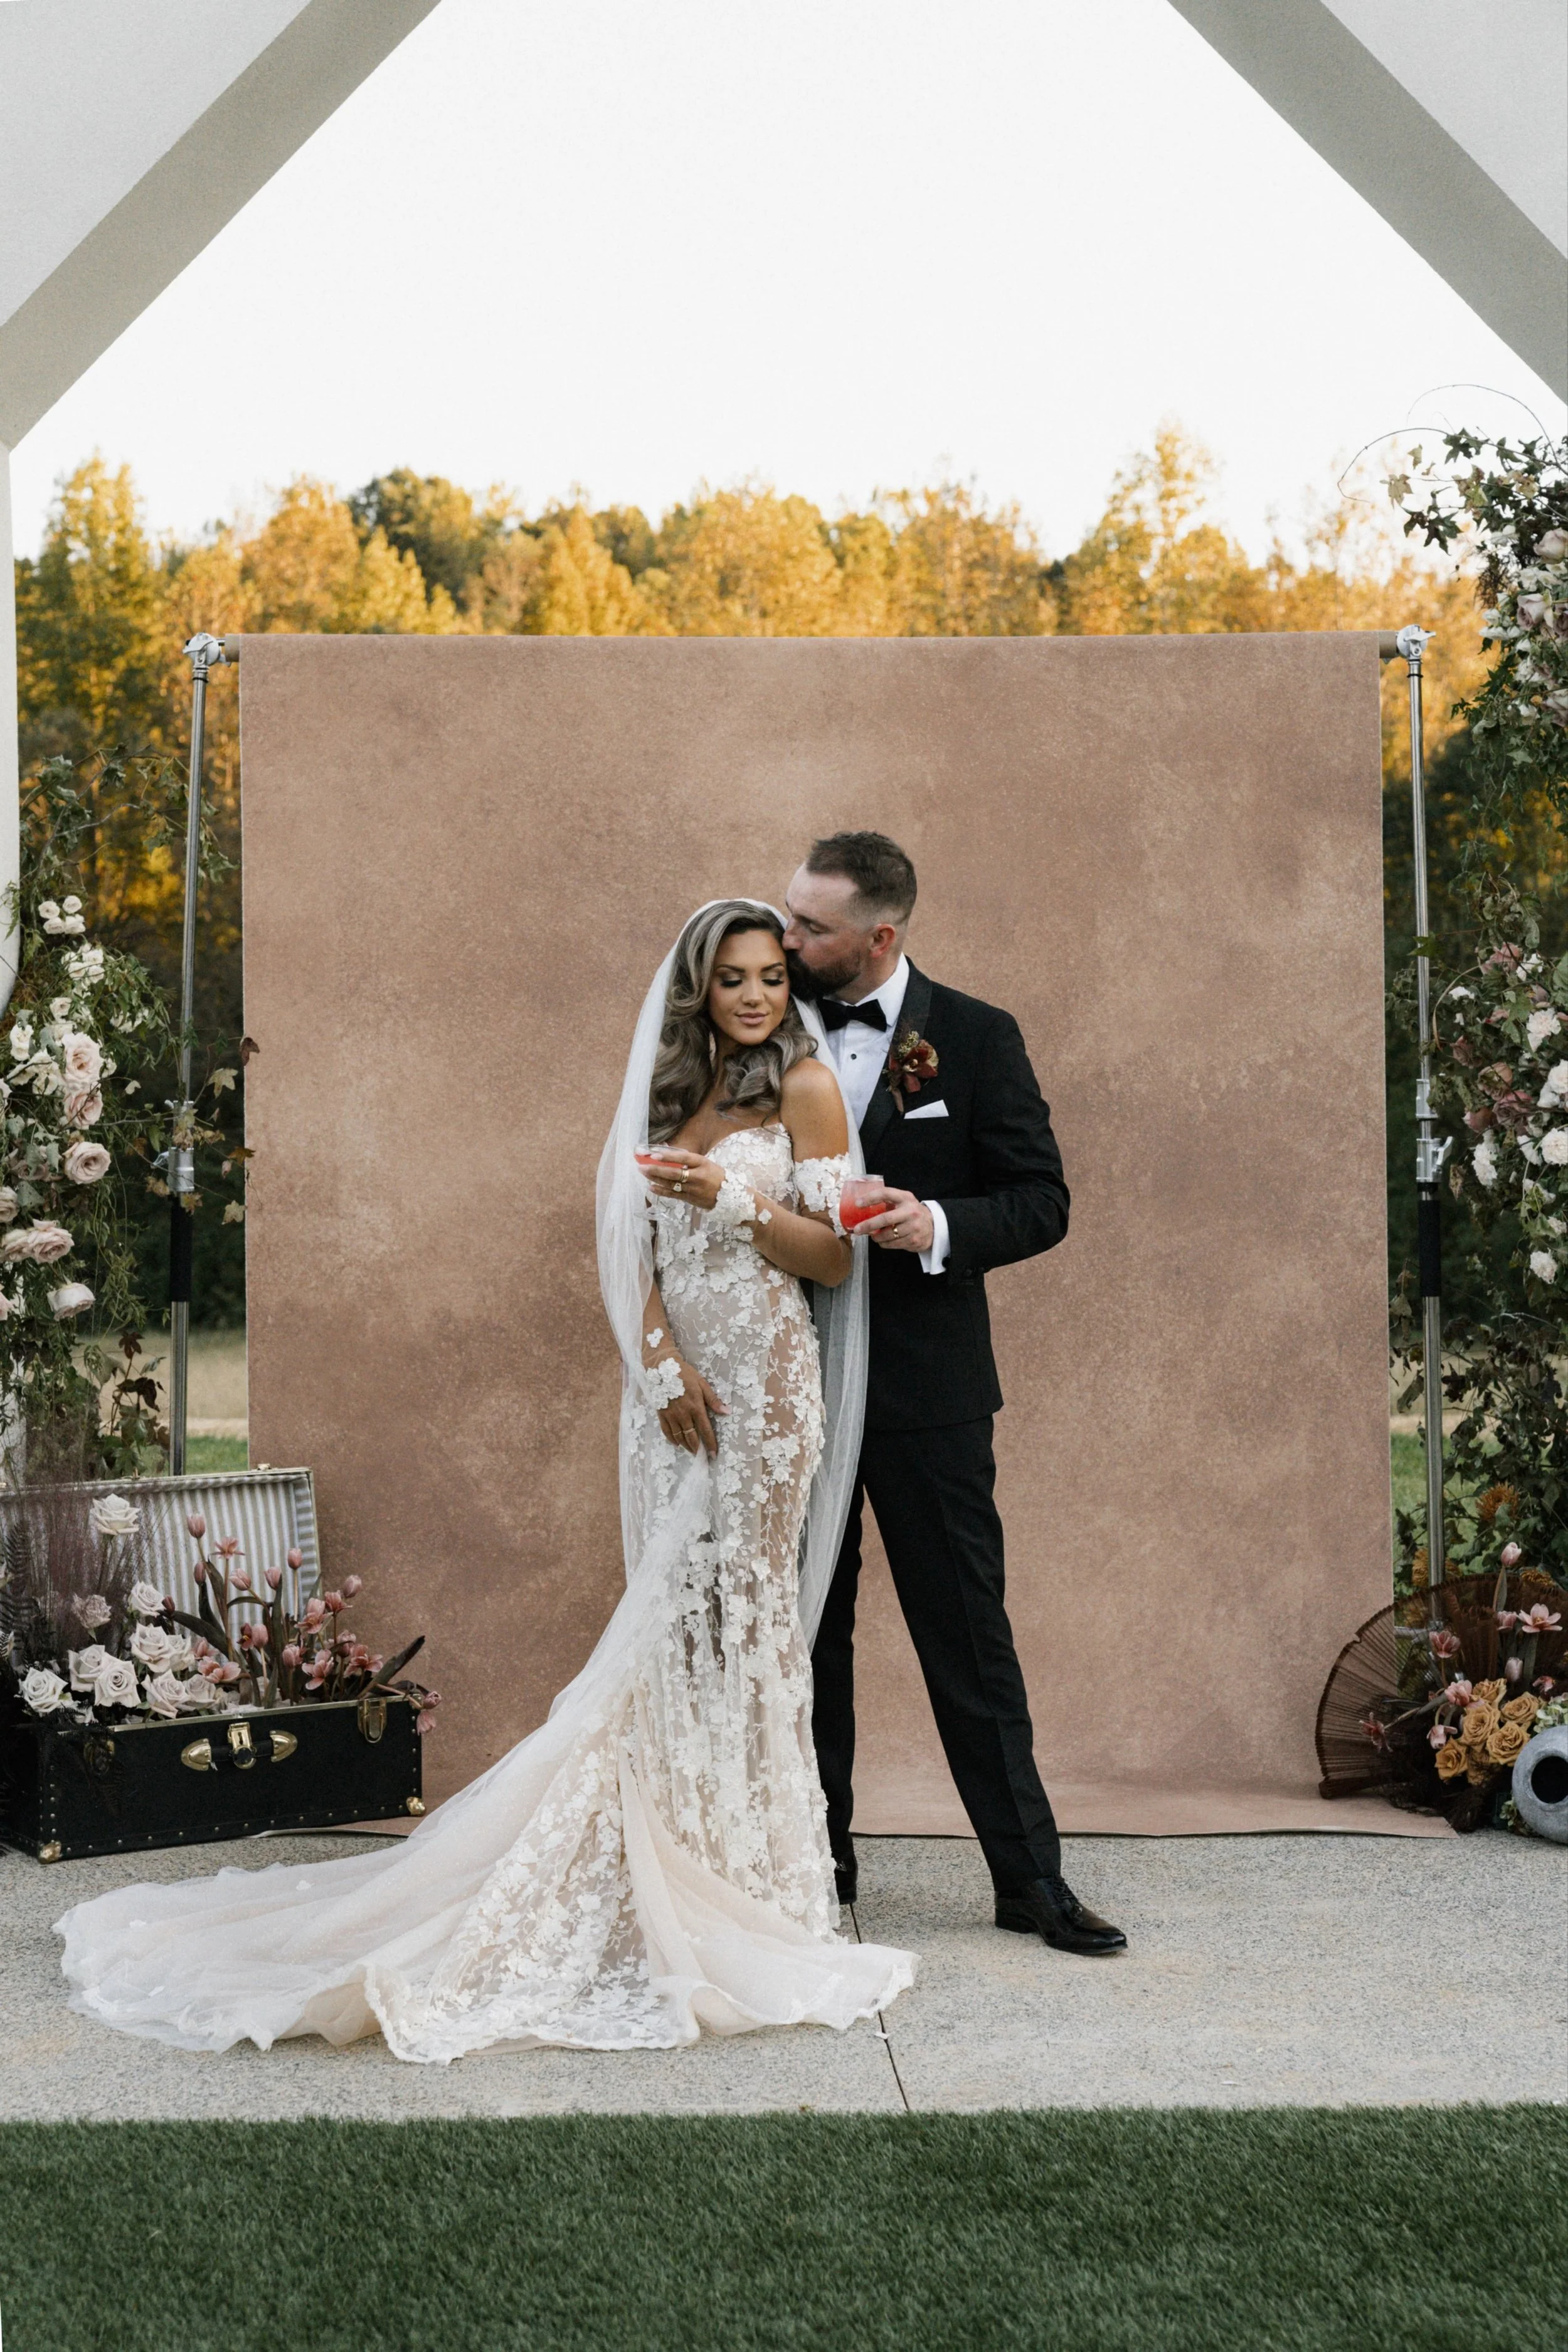
During golden hour, low angled sunlight adds warmth and dimension to a canvas backdrop, giving outdoor wedding portraits a richer look.
Specific Outdoor Scenarios (and What I've Learned in Each One)
Beach locations. Sand is unstable for C-stand legs. Spread the legs as wide as they'll go and twist them slightly into the sand for grip. Double your sandbag weight because the stands will slowly settle into soft sand over the course of a session. Watch for spray if you're near the waterline. Salt mist will leave a residue on canvas that you'll want to wipe down after the session (more on canvas care below). And check the tide schedule. I've set up beautiful beach portraits only to realize the tide was coming in and my comfortable shooting area was shrinking by the minute.
The upside of beach work: the open sky provides some of the most beautiful, even, wraparound light you'll find anywhere. Beaches are essentially giant open-shade environments because the reflected light from sand and water fills shadows beautifully. Your hand-painted canvas will photograph with incredible dimension in coastal light.
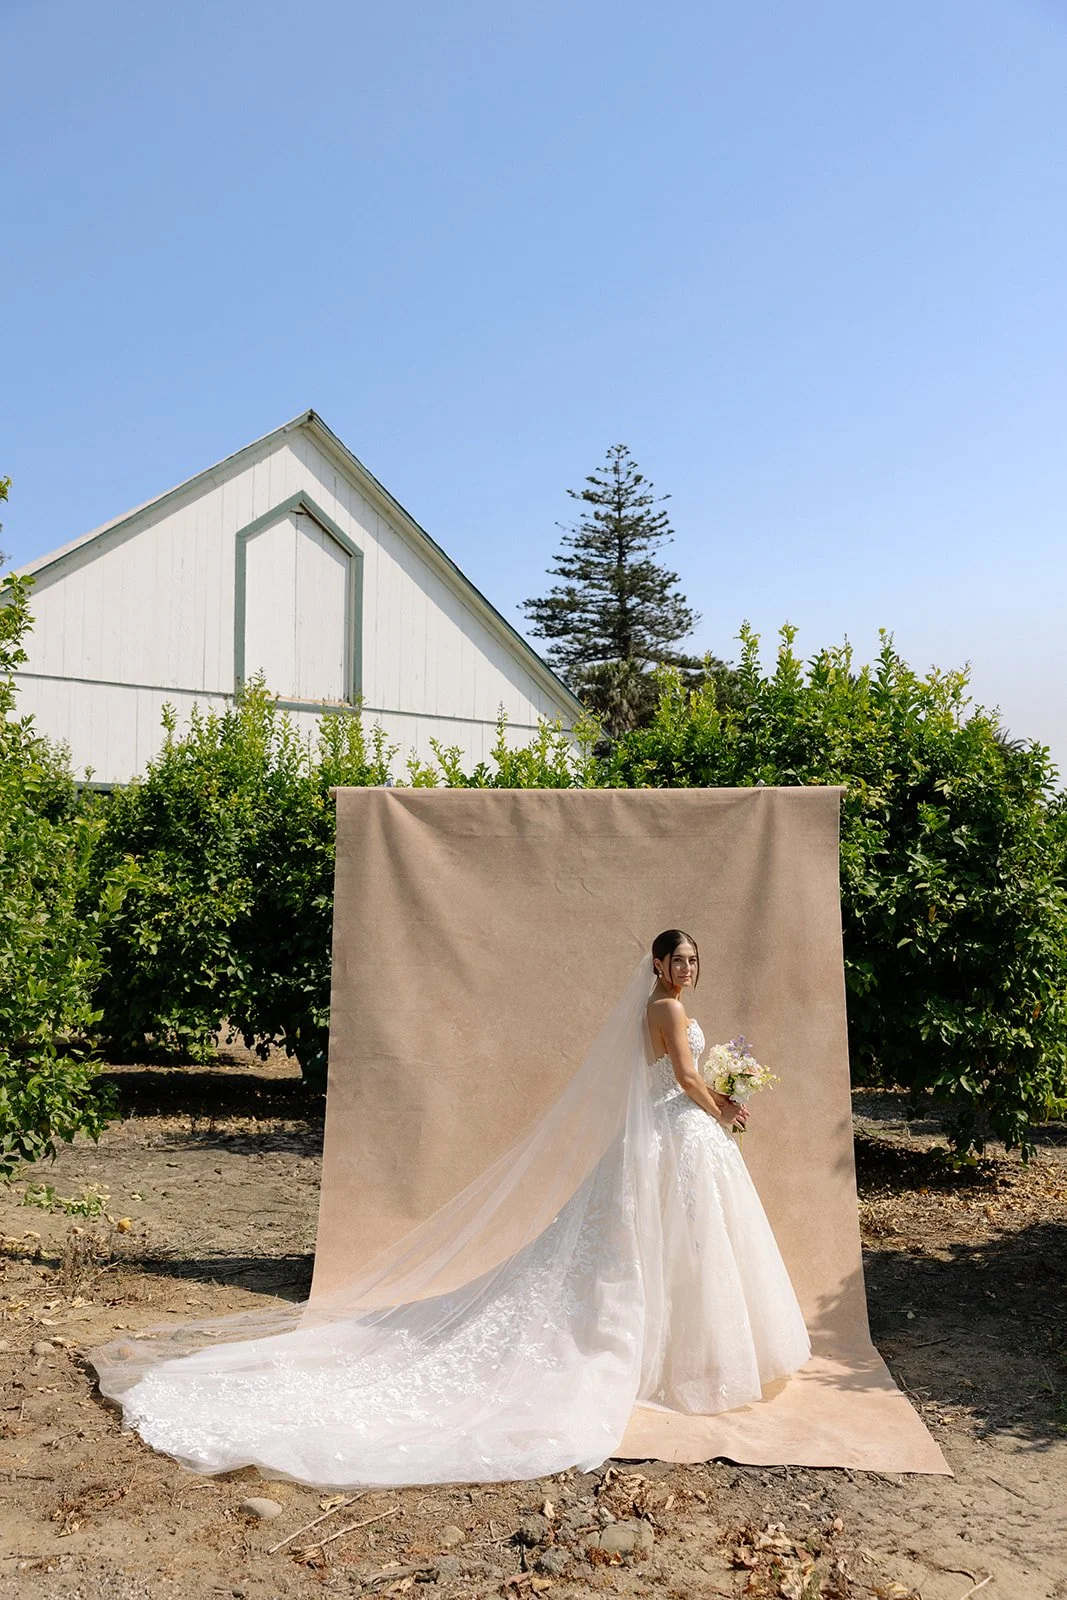
Garden and estate venues. These are often the most forgiving outdoor backdrop locations because trees, hedges, and structures provide natural wind protection. Look for sheltered corners where two walls or hedges meet at an angle. These create wind shadows that can be completely calm even when the open lawn is breezy. The challenge with gardens is ground conditions. Grass is soft and uneven, which means C-stand legs can shift during a session. I check my stand stability every few minutes and readjust as needed.
I shot a wedding at a botanical garden in San Marino last September where I found a spot between a hedge wall and a stone planter that was completely windless while guests' hair was blowing across the open lawn 20 feet away. Micro-environments like this exist at almost every garden venue. You just have to walk around and feel for them. Stand in different spots. Pay attention to what you feel on your face. The still pockets are often closer than you think.
Desert and arid locations. Heat is the variable most photographers don't consider. In summer desert locations (Palm Springs, Joshua Tree, Scottsdale), temperatures regularly exceed 100°F. Canvas handles heat fine. The paint won't melt or warp. But the metal C-stands and adapter mounts get hot enough to burn your hands. I wear lightweight work gloves during summer desert setups, which also gives me better grip when handling stands and canvas.
The other desert consideration is dust. Desert wind carries fine particulate that settles on everything. After a desert session, I brush my canvas down with a soft-bristled brush before rolling it. If I leave the dust and roll the canvas, the particles get pressed between the paint layers and can create micro-scratches over time. Our care guide covers deep cleaning in detail, but the field habit of brushing down before rolling is the single most important thing you can do to protect your canvas in dusty conditions.
Urban rooftops. Rooftops are wind tunnels. Even on calm days at street level, rooftop wind speeds can be dramatically higher because there's nothing blocking the airflow. I approach every rooftop setup as a high-wind scenario regardless of the forecast. Dual stands, maximum sandbag weight, low-hang technique, and the 5x8 canvas rather than the 8x10.
I shot an engagement session on a rooftop in downtown LA last spring. Street level: dead calm. Rooftop: consistent 20 mph wind with gusts over 30. I almost aborted. Instead, I dropped to the 5x8, hung it low between two stands weighted with four sandbags total, and positioned the couple between the backdrop and the wind so their bodies blocked some of the airflow. The backdrop swayed slightly between shots, but I timed my shutter to the calm moments and walked away with a series that the couple still uses as their profile photo everywhere.
The Weather Pivot: What to Do When Conditions Change
Here's a scenario that happens more often than any of us would like: you set up outdoors in beautiful conditions, and the weather changes mid-session.
Clouds roll in. The wind picks up. You feel a drop of rain.
The instinct is to panic and tear everything down. The better response is a 30-second assessment using the same wind framework from earlier. Has the wind pushed past your threshold? Is rain imminent or is it a few stray drops? Is the temperature dropping (which often means a weather front is approaching)?
If the wind has crossed into your abort zone, take the backdrop down. If rain starts, take the backdrop down. Canvas is not waterproof. A light mist won't damage the paint, but steady rain will saturate the cotton, and wet canvas on the ground picks up dirt that's much harder to clean than dry dust. The few minutes of shooting you might gain by pushing through rain are never worth the cleaning and potential damage to your canvas.
But here's what I've learned about clouds specifically: overcast is not your enemy. If the sky clouds over during an outdoor backdrop session, the light actually gets better for hand-painted canvas work. Cloud cover turns the entire sky into one massive diffused light source. The texture on your canvas gains even more dimension because the light is softer and more omnidirectional. I've had outdoor sessions that started in direct sun (not great), shifted to overcast (phenomenal), and the images from the overcast period were significantly stronger.
The weather pivot I use most often is shifting from full outdoor setup to a covered outdoor space. Porches, pavilions, covered walkways, open-air structures with roofs. These give you the outdoor light quality (which is still beautiful even when it's overcast or breezy) while providing wind and rain protection for your backdrop. I think of these as "outdoor rooms," and they're often the best of both worlds.
Protecting Your Canvas in the Field
I'm not going to repeat what's in our care and cleaning guide, which covers deep cleaning and long-term maintenance in detail. But I want to share the field-specific habits I've built for outdoor work that keep my canvases looking like new season after season.
Ground contact matters. When I use the low-hang technique and the canvas pools on the ground, I want to know what it's pooling on. Clean grass? Fine. Concrete? Fine. Wet ground, muddy patches, decomposed granite, or gravel? I'll lay a clean drop cloth (I carry a basic canvas painter's tarp) underneath the contact zone. The backdrop sits on the tarp rather than directly on rough or wet surfaces.
Brush before rolling. Always. After every outdoor session, before I roll the canvas back onto its core, I do a quick pass with a soft-bristled brush. Ten seconds. Both sides. This removes pollen, dust, grass fragments, and any debris that would otherwise get trapped between the canvas layers and potentially grind into the paint surface. This habit alone has saved me from needing to deep-clean my backdrops more than once or twice a year.
Never roll a damp canvas. If the canvas has picked up any moisture from ground contact, morning dew, humid air, or a light mist, I let it air dry completely before rolling. Even if that means draping it over two C-stands at the venue and waiting 15 minutes while I pack other gear. Moisture trapped inside a rolled canvas is how you get mildew, and mildew on hand-painted canvas is a problem you do not want to deal with. I'd rather be the last photographer to leave the venue than roll a damp backdrop.
Transport in the tube. The cardboard shipping tube that your backdrop arrives in isn't just packaging. It's a travel case. I keep my tubes and use them for every transport. The tube protects the rolled canvas from crushing, moisture, and UV exposure during transport. Some photographers toss the tubes and throw their rolled canvas in the back seat. This works fine indoors, but for outdoor work where the canvas might have residual moisture or debris, the tube provides an extra layer of protection that's worth the minor inconvenience of carrying it.
My Outdoor Backdrop Kit (Everything, Nothing Extra)
After four years of refining this, here's exactly what I bring to outdoor backdrop sessions. Nothing on this list is optional for outdoor work, and nothing is missing.
The canvas. For outdoor work, I default to the 5x8 unless I have confirmed information that the location is sheltered and calm. The 5x8 presents 40 square feet to the wind instead of 80 (the 8x10) or 112 (the 8x14). That's half the sail area. It's also lighter, which means less weight on the stands and faster setup and breakdown when conditions change. For outdoor bridal portraits (single subject, waist-up or tighter framing), the 5x8 gives you plenty of coverage.
The hand painted texture of the Rhodonite backdrop adds depth and softness that flat seamless backgrounds cannot replicate.
When I know conditions will be calm (early morning, sheltered garden, covered outdoor space), I'll bring the 8x10 for the additional coverage. But the 5x8 always comes as backup.
Two C-stands. Always two for outdoor work, even with the 5x8. The wind stability advantage of dual stands is worth the extra weight. Each stand gets an adapter mount.
Four sandbags (25 pounds each when filled). Two per stand. I use fillable nylon sandbags that weigh nothing empty and pack flat. I fill them on-site with sand, gravel, or even dirt if nothing else is available. 100 pounds of total base weight is my minimum for outdoor work.
Soft-bristled brush. For the post-session canvas brush-down.
Canvas drop cloth (painter's tarp). For ground protection under the low-hang pooling zone.
Work gloves. For hot metal in summer conditions and better grip in all conditions.
The shipping tube. For protected transport.
That's it. Everything fits in my car alongside my camera gear and doesn't require a second trip to unload.
The Outdoor Session That Changed How I Think About This
I want to end with a story that reframes everything in this post.
Last October I photographed a wedding at a vineyard in Santa Barbara wine country. The couple had specifically requested outdoor bridal portraits, and the timeline put us at the vineyard at 4:30 PM. Golden hour. Perfect.
I set up my CLAY canvas between two C-stands in a gap between vine rows with rolling hills behind us. The late afternoon sun was hitting the canvas at a low angle from the left side. Every brushstroke in the hand-painted surface was catching warm golden light on one edge and falling into a soft purple-blue shadow on the other. The canvas, which reads as a quiet, faded terracotta in indoor window light, was absolutely glowing.
The bride walked over from where her bridesmaids were taking group photos on the lawn. She looked at the backdrop and said, "Oh. That's beautiful."
She wasn't talking about the vineyard. She was talking about the canvas.
The portraits from that session are the strongest bridal images I've ever made. The outdoor light on the hand-painted texture created a richness and dimension that I have never achieved indoors. Not once.
That's the payoff of outdoor backdrop work. Yes, you need sandbags. Yes, you need to read the wind. Yes, you need to protect your canvas. But when the conditions align and the light hits that hand-painted surface at the right angle, you create something that indoor photography physically cannot replicate.
The risk is real. But the reward is worth every sandbag.
Ready to take your backdrop work outside? Start with our hand-painted canvas backdrops and equip yourself with adapter mounts for C-stand setups. For sizing help, our backdrop buying guide covers every option. And for post-shoot care, follow our cleaning and care guide to keep your canvas looking pristine season after season.

Creators of premium photography backdrops and styling surfaces
Trusted by thousands of discerning creatives worldwide
Every piece is handcrafted with intention in Orange County, California