
The Ultimate Flat Lay Photography Guide for Wedding Photographers
Pictured Surface: JOSHUA TREE | Photo Credit: REBECCA YALE
Updated December 3, 2025
You arrive at the getting-ready suite, ready to start the day strong. The couple is still getting hair and makeup done. This is your window. Your chance to knock out the detail shots before the timeline accelerates and everything gets hectic.
But when you start arranging those details (the rings, invitation suite, and accessories on whatever surface you can find), something goes wrong. The lighting isn't cooperating. Your composition feels cluttered. You're second-guessing every placement. Fifteen minutes turns into thirty. Then forty-five. You check your watch and realize you've burned an hour, and you haven't even started getting-ready coverage yet. The entire day's timeline is now behind before the couple is even dressed.
Sound familiar? You're not alone. Wedding flat lay photography happens at the very beginning of your day, which means struggling with it doesn't just affect one shot. It throws off your entire timeline and starts the day with stress instead of confidence. These seemingly simple detail shots require a perfect blend of styling, lighting, composition, and technical expertise. The good news? Once you understand the fundamentals and develop your system, you'll create stunning flat lays efficiently and consistently in 15 minutes or less. The kind of detail shots that justify your premium pricing, get featured on wedding blogs, and attract couples who value artistry over cheap packages. Images that separate you from every other photographer in your market and fill your portfolio with the work that books your ideal clients.
What You'll Learn in This Guide
Essential equipment for professional flat lay photography
Composition techniques that create visual impact
Lighting strategies for any venue condition
Camera settings for tack-sharp detail shots
Efficient workflow to shoot flat lays in 15 minutes or less
Post-processing techniques for polished results
Understanding Flat Lay Photography in Wedding Context
Flat lay photography is the art of arranging objects on a flat surface and photographing them from directly above. In wedding photography, these detail shots serve multiple purposes: they document the carefully chosen elements that make each wedding unique, provide beautiful content for albums and social media, and offer breathing room in your storytelling sequence.
What makes wedding flat lays particularly challenging is when they happen. You're shooting them at the very beginning of the day, before you've built any momentum, often in less-than-ideal lighting conditions, with items you've never seen before. And if you struggle here, you're not just losing time on one shot. You're starting the entire wedding day behind schedule.
When I first started shooting weddings, flat lays could easily eat up two hours of my morning. I'd rearrange, reshoot, second-guess every decision, and burn through precious timeline while the couple waited. Now, with a systematic approach, I can create portfolio-quality flat lays in 15 minutes or less. That's not because I became more talented. It's because I developed a repeatable system that works every time.
The most successful wedding flat lays tell a story. They're not random arrangements of pretty things. They represent the couple's aesthetic, the wedding's color palette, and the thought that went into every choice. Your invitation suite flat lay, for example, should immediately communicate the wedding's formality level, season, and style. A rustic barn wedding demands a different approach than a black-tie ballroom affair.
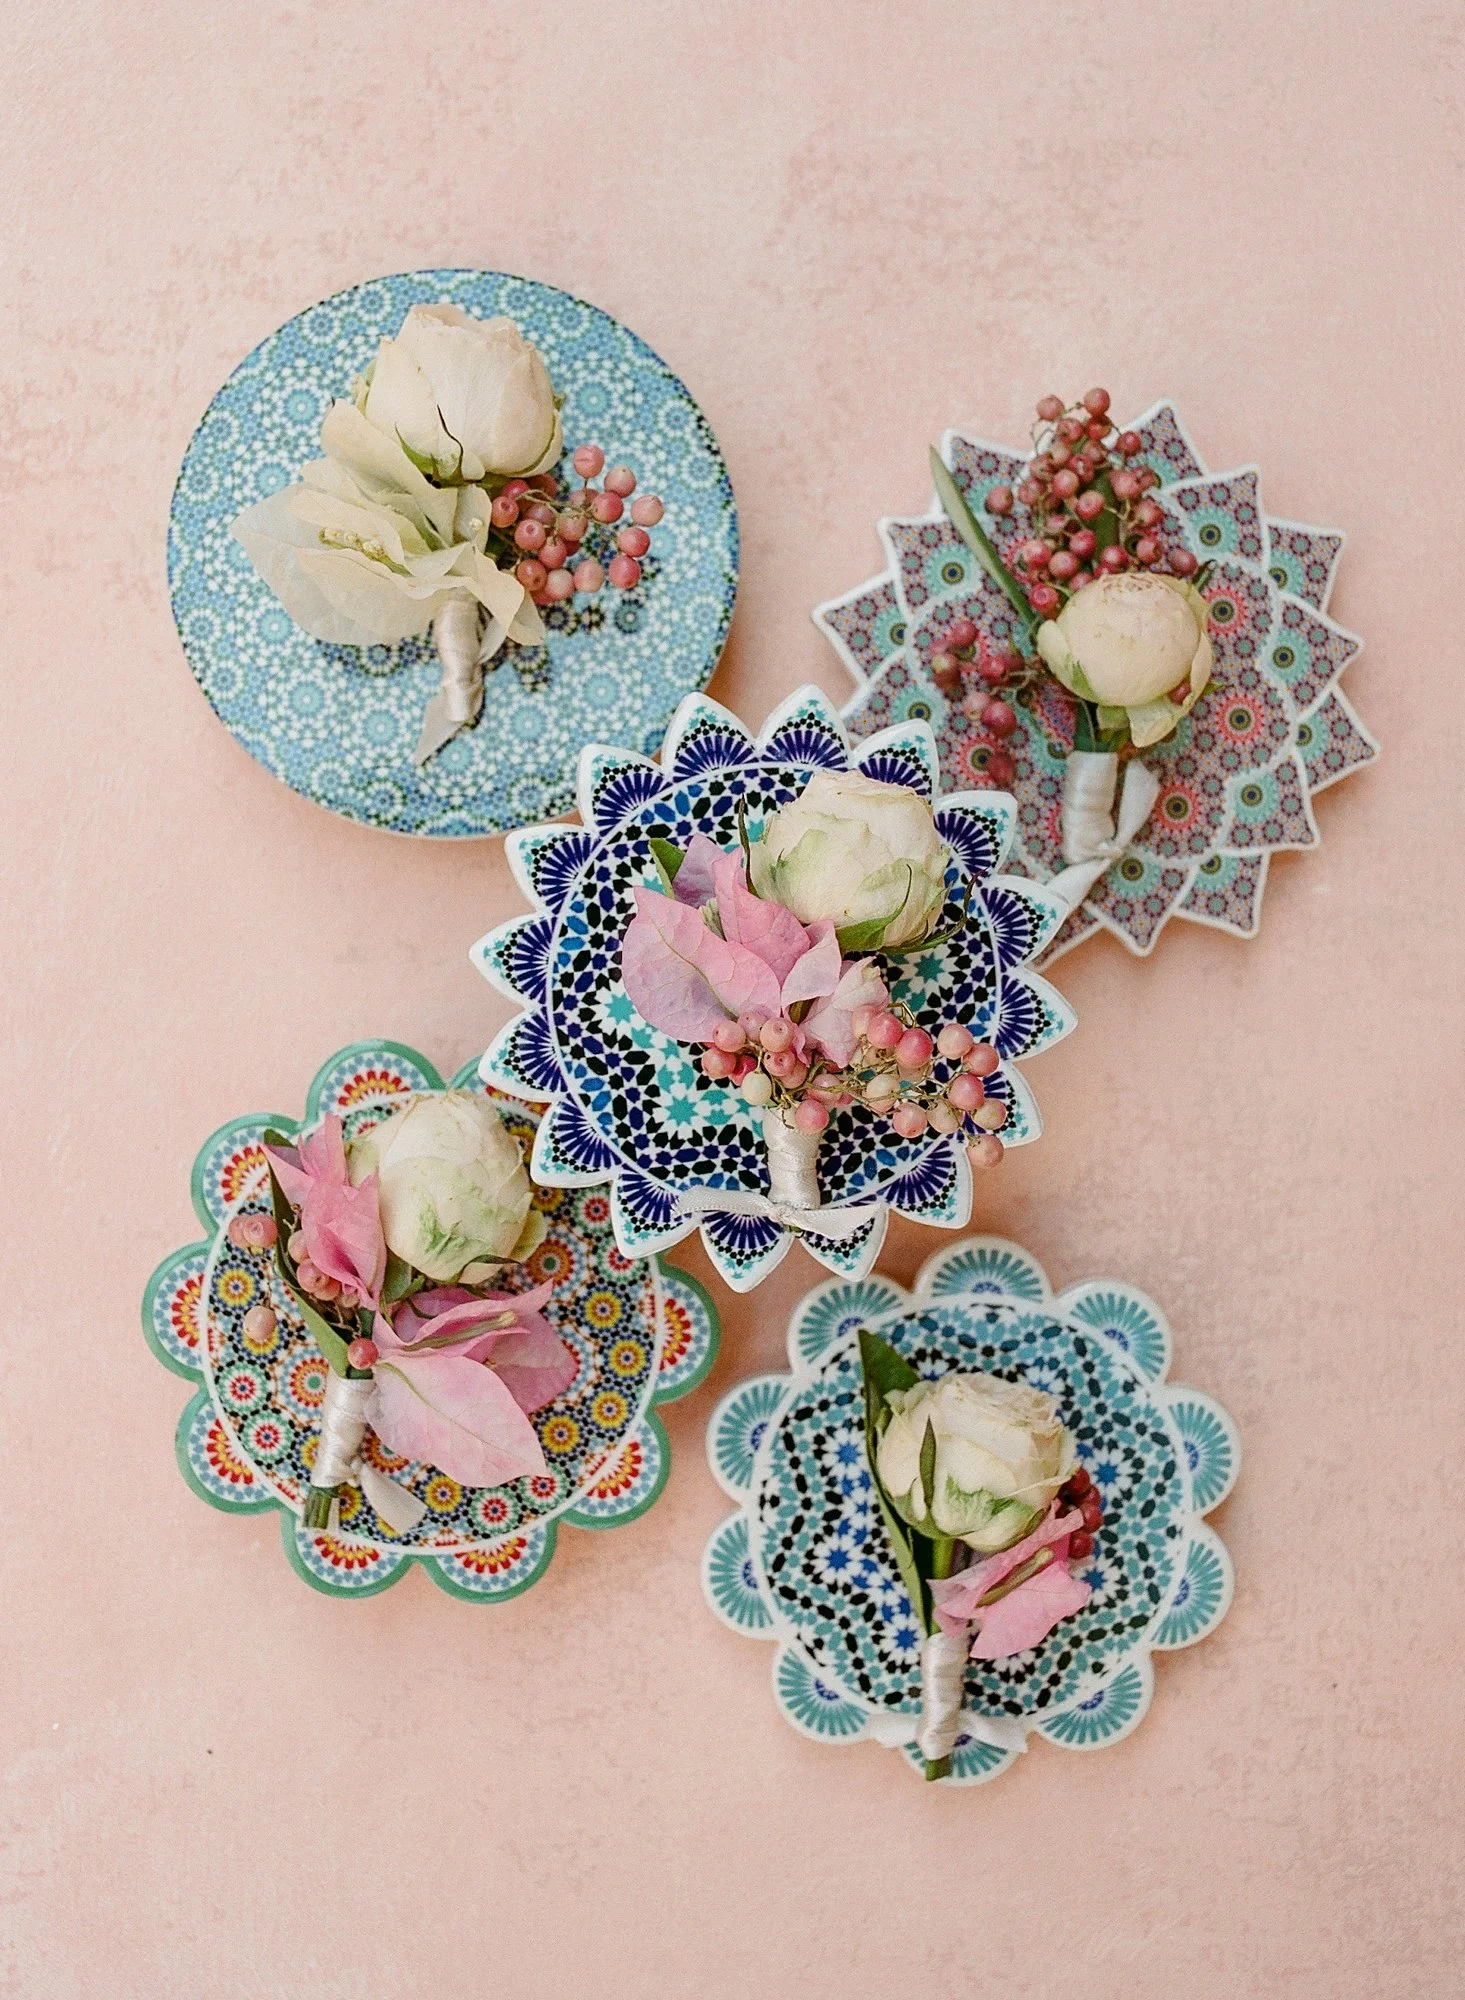
Consider what details truly matter. The invitation suite, rings, shoes, perfume, jewelry, and vows are essential elements at nearly every wedding. Secondary items might include the boutonniere, bouquet (or portions of it), meaningful heirlooms, or personalized touches like custom cocktail napkins or welcome gifts. Being selective prevents your compositions from looking cluttered or chaotic.
Pictured Styling Surface: YARROW | Styling a wedding invitation suite with garden-inspired botanical details. Soft sage tones complement organic elements without competing with delicate calligraphy.
Essential Equipment for Stunning Flat Lays
You don't need specialized gear to create beautiful flat lays, but certain tools make the process significantly easier and more consistent.
Camera and Lenses
A 50mm prime lens is the workhorse for flat lay photography. Its versatility, sharpness, and ability to work in various lighting conditions make it ideal. A 35mm lens works well in tighter spaces, while an 85mm or 100mm macro lens is perfect when you want to isolate specific details or capture intricate textures like lace or engraving. Avoid wide-angle lenses because they create distortion that makes rectangular items like invitations appear warped.
Support Systems
A sturdy tripod with a horizontal center column or a boom arm attachment is invaluable. This setup allows you to position your camera perfectly parallel to your surface, ensuring straight lines and no distortion. If your tripod doesn't have this feature, you can achieve similar results by carefully positioning your tripod legs, though it's less convenient.
Shooting tethered to a laptop or tablet transforms your flat lay workflow. When you're directly overhead, you can't easily see your camera's LCD screen. Tethering lets you check composition, exposure, and styling in real time without contorting yourself or constantly climbing up and down. Many photographers use a simple step stool or ladder to achieve the perfect overhead angle.
Lighting Equipment
Natural light is your best friend for flat lays, but you need to control it. A large diffuser or white sheer curtain softens harsh sunlight, preventing unflattering shadows and hotspots. A small reflector bounces light into shadowy areas without adding extra light sources. For indoor or evening weddings, consider a continuous LED light with a softbox. Flash can be tricky with reflective surfaces like jewelry and phone screens.
Styling Surfaces
Your choice of surface dramatically impacts your flat lay photography. Professional surfaces provide clean, intentional foundations that elevate your work beyond makeshift venue options.
Hand-painted surfaces offer painterly texture and sophisticated color variations, while fabric flat lay mats provide spill-proof practicality perfect for traveling photographers. For a complete breakdown of surface types, materials, colors, care, and how to build your collection strategically, see our Complete Guide to Flat Lay Styling Surfaces.
Additional Tools
Don't overlook essential styling tools: a lint roller (critical for keeping surfaces clean), straight pins (for securing ribbon or fabric), double-sided tape, and perhaps a few universal styling elements like silk ribbon in neutral tones. Many photographers also carry acrylic blocks or small risers to add dimension when needed.
For detailed recommendations on cameras, lenses, tripods, lighting setups, and complete gear checklists, see our Essential Photography Gear for Wedding Flat Lays guide.
Mastering Composition and Styling Techniques
Great flat lay composition follows the same principles as any compelling photograph: balance, negative space, leading lines, and intentional placement. But with all elements on a single plane, you need to be even more deliberate about arrangement.
Start with Your Anchor
Begin with your anchor piece, usually the invitation suite for wedding flat lays. Place it slightly off-center, following the rule of thirds. This creates visual interest and prevents the static, centered look that can make images feel like catalog shots rather than artful documentation.
Layer Strategically
Overlap elements slightly to create depth and visual connections between items. A ring box placed partially on the invitation, ribbon cascading across multiple elements, or a veil edge softly blurred in the background all help items relate to each other rather than floating independently in the frame.
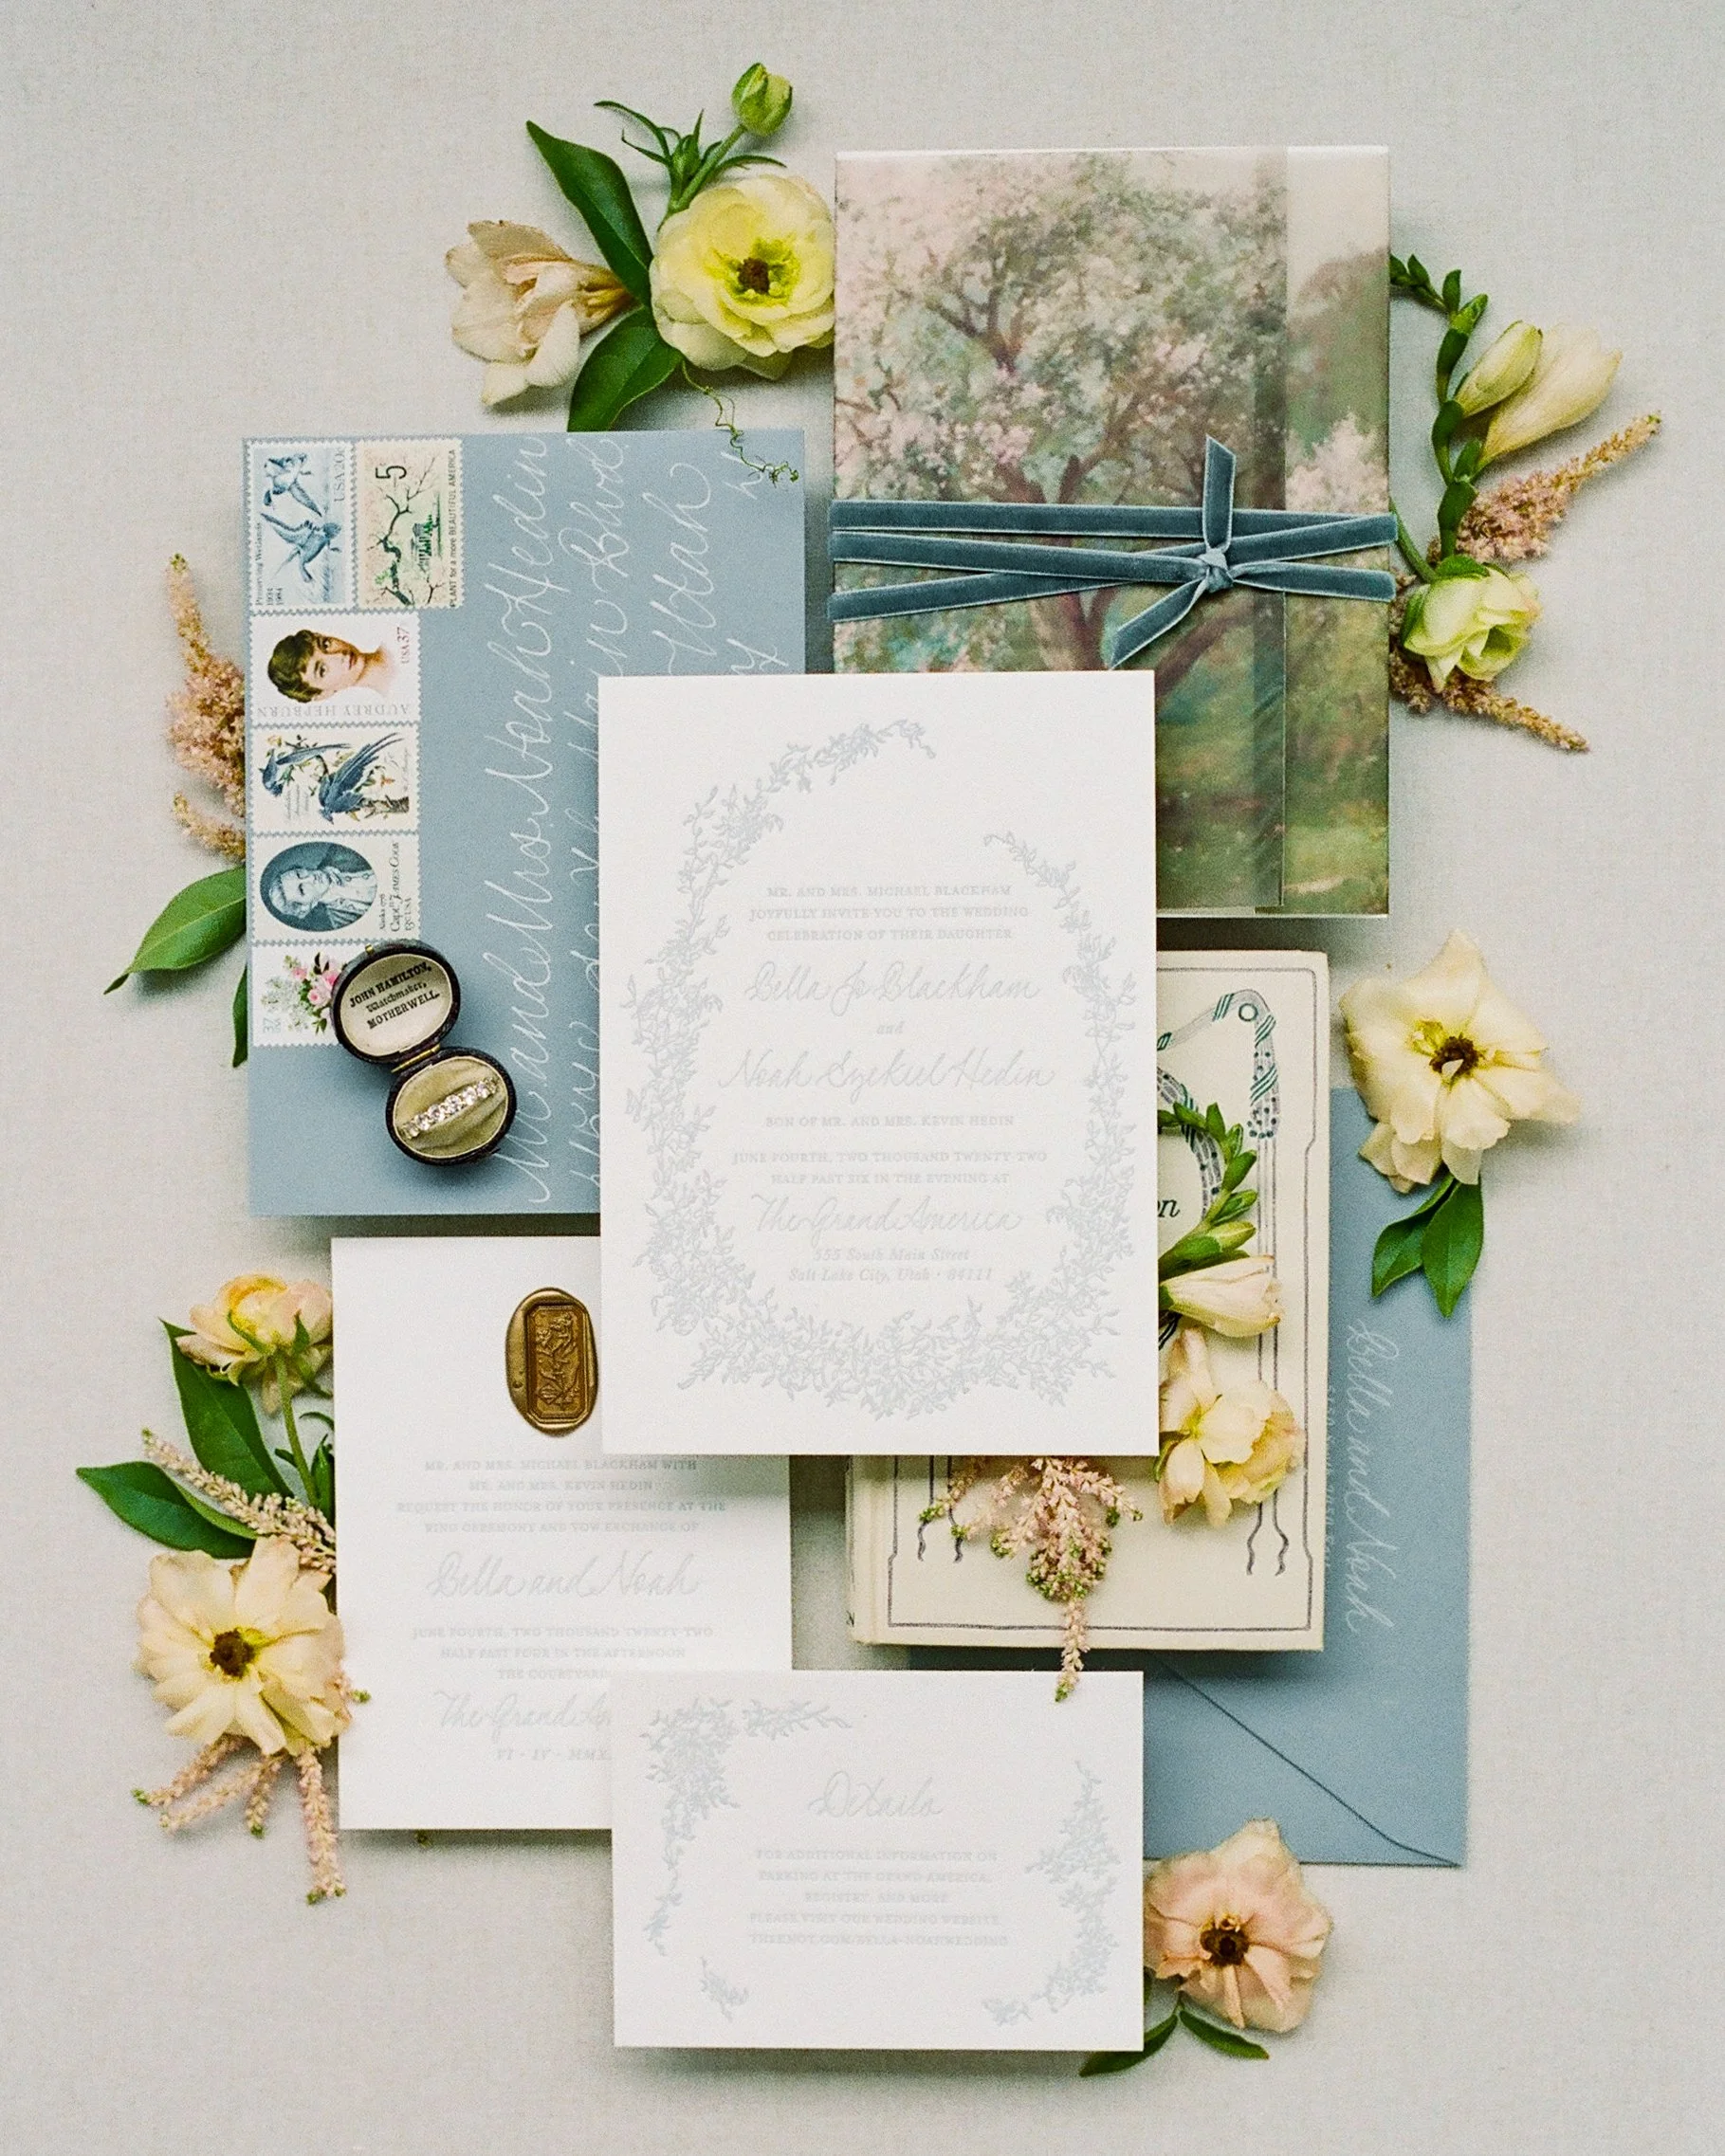
Pictured Styling Surface: ALDER | Layered composition demonstrating overlapping elements and strategic placement. Soft blue-gray tones complement vintage stamps, velvet ribbon, and delicate florals without competing for attention
Create Triangles
Humans naturally look for triangular patterns, finding them pleasing and balanced. Arrange three key elements (perhaps the invitation, rings, and perfume bottle) in a triangular formation, then fill in with supporting details. This technique works whether your triangle is obvious or subtle.
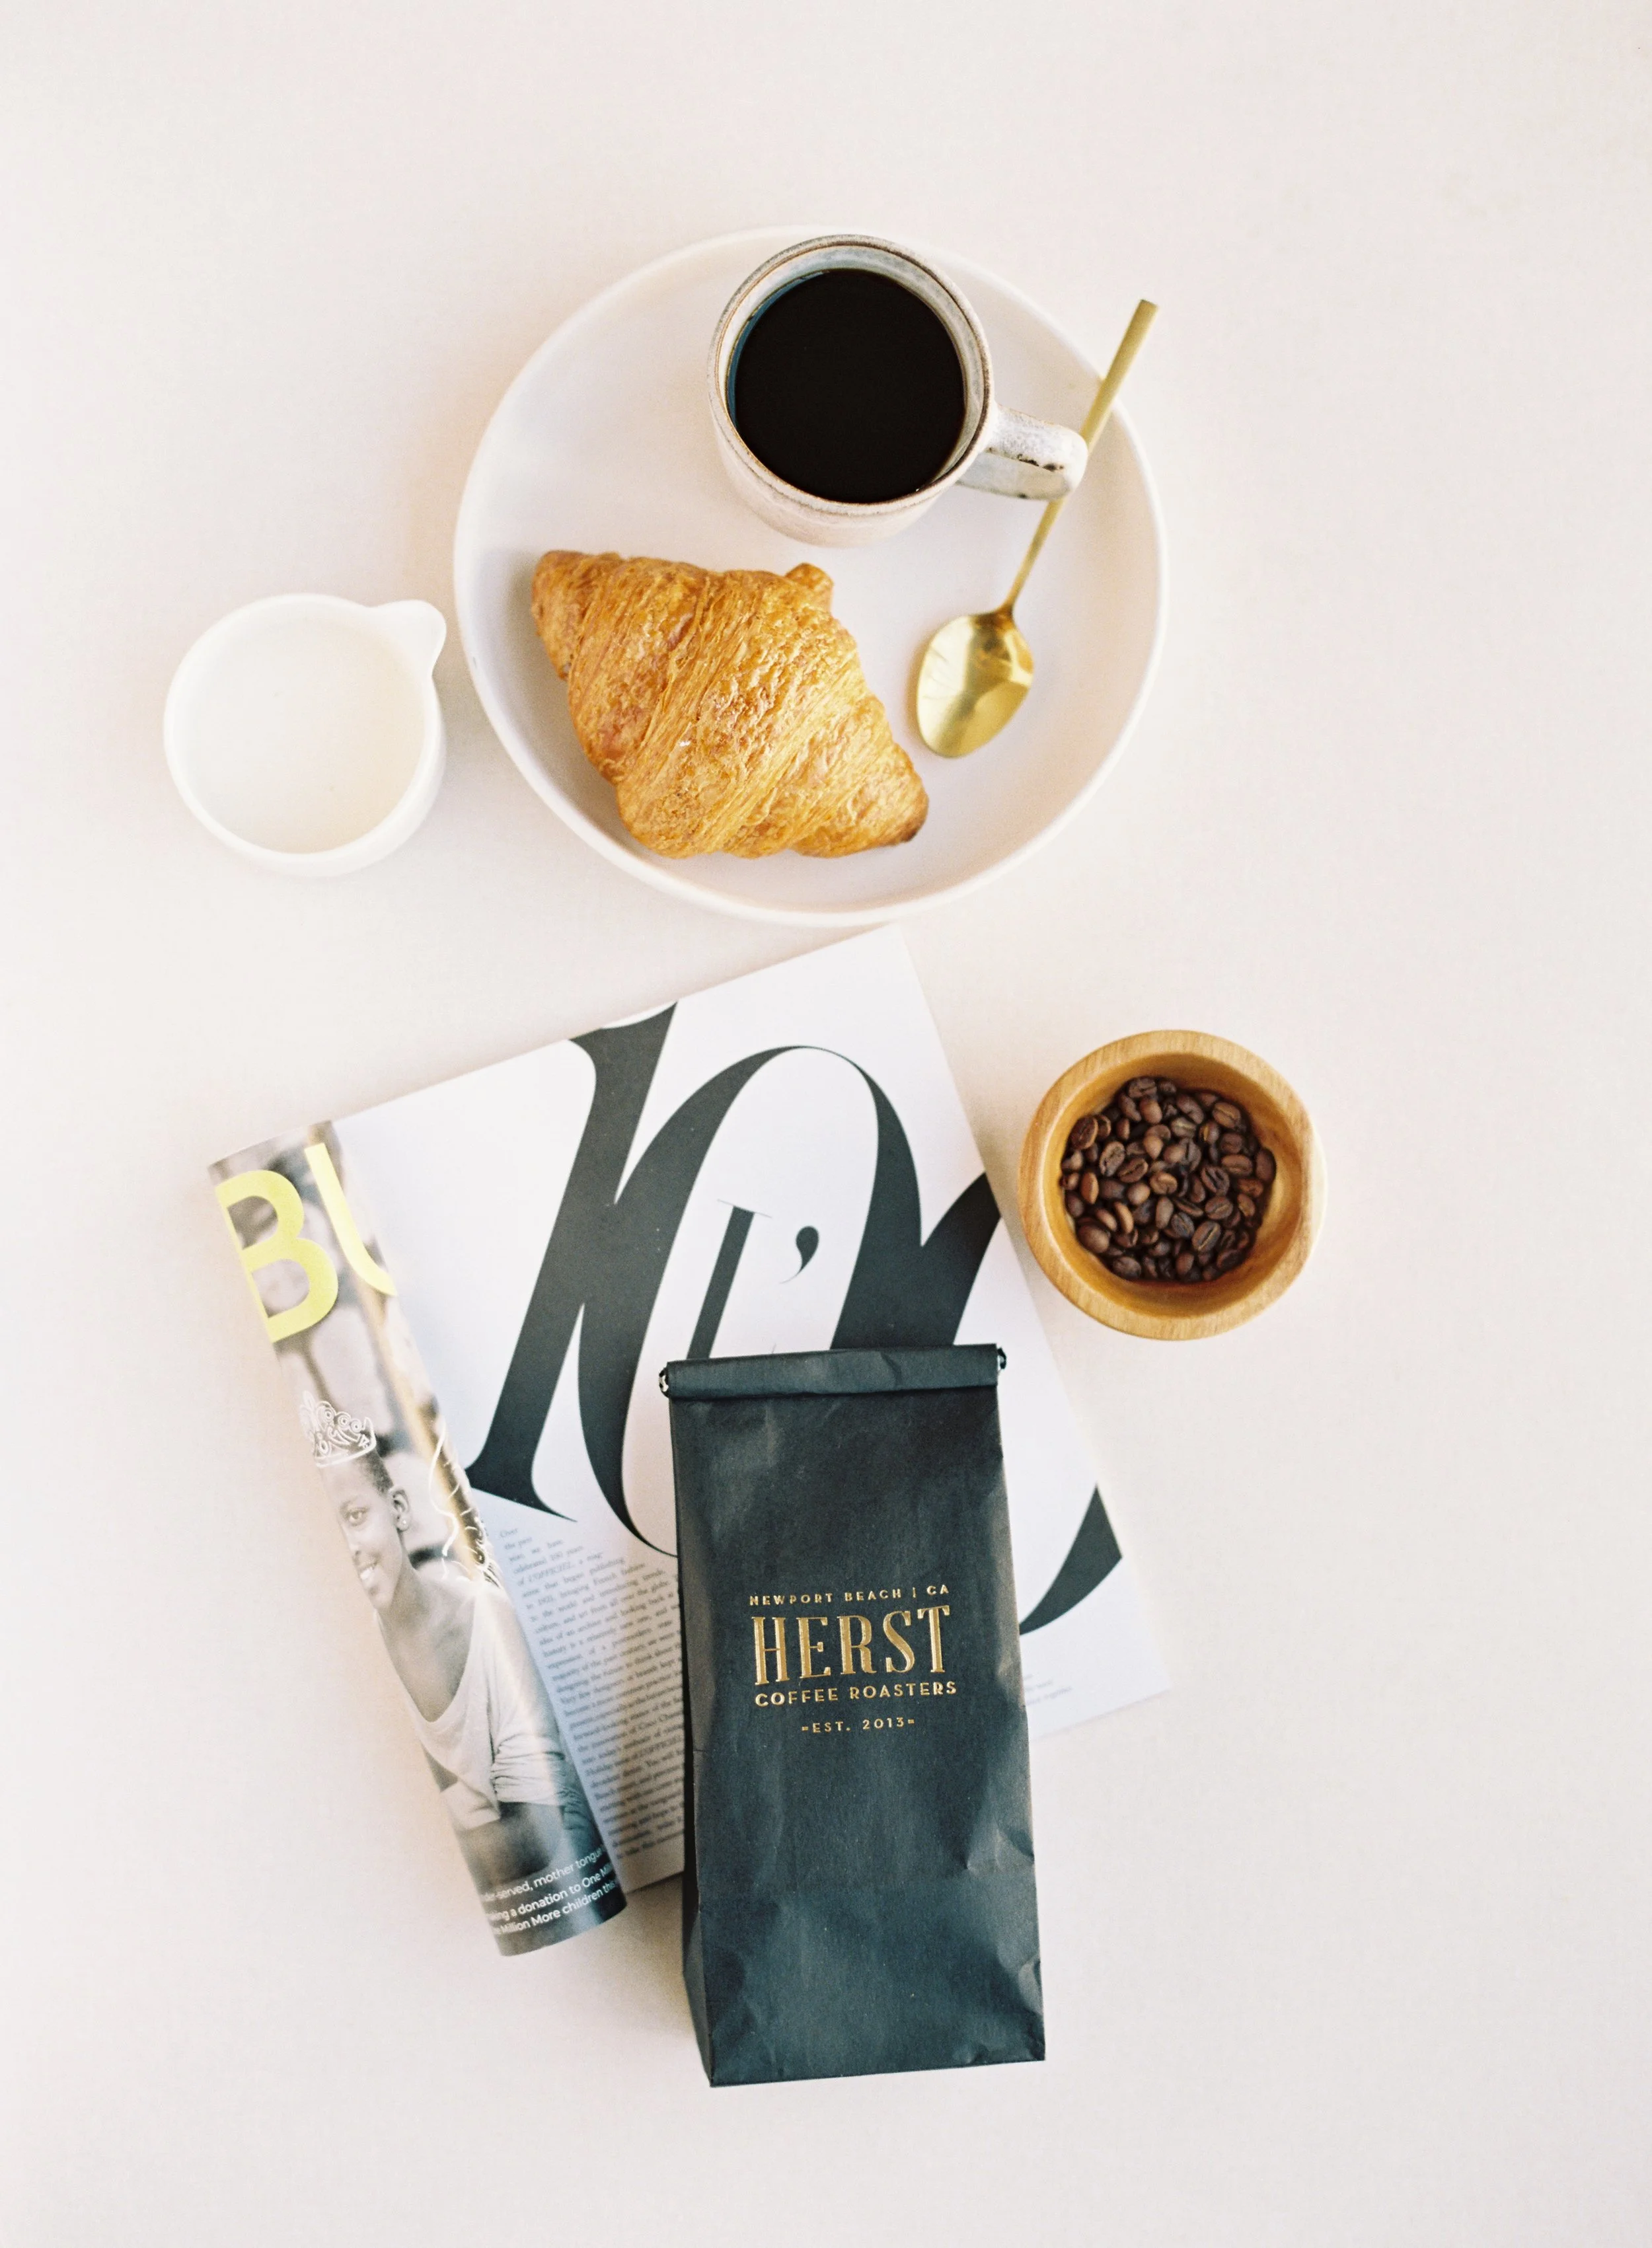
Pictured Styling Surface: YARROW | Triangular composition in action: coffee cup, magazine, and coffee bag create three visual anchor points that guide the eye through the frame. Cool white tones keep lifestyle and product photography feeling fresh and modern
Embrace Negative Space
Negative space is not wasted space. It's breathing room that allows the viewer's eye to rest and the important elements to shine. Don't feel compelled to fill every inch of your frame. In fact, simpler compositions often photograph more elegantly and align better with current design trends. Consider the 60/40 rule: let objects occupy roughly 60% of your frame, leaving 40% as negative space.
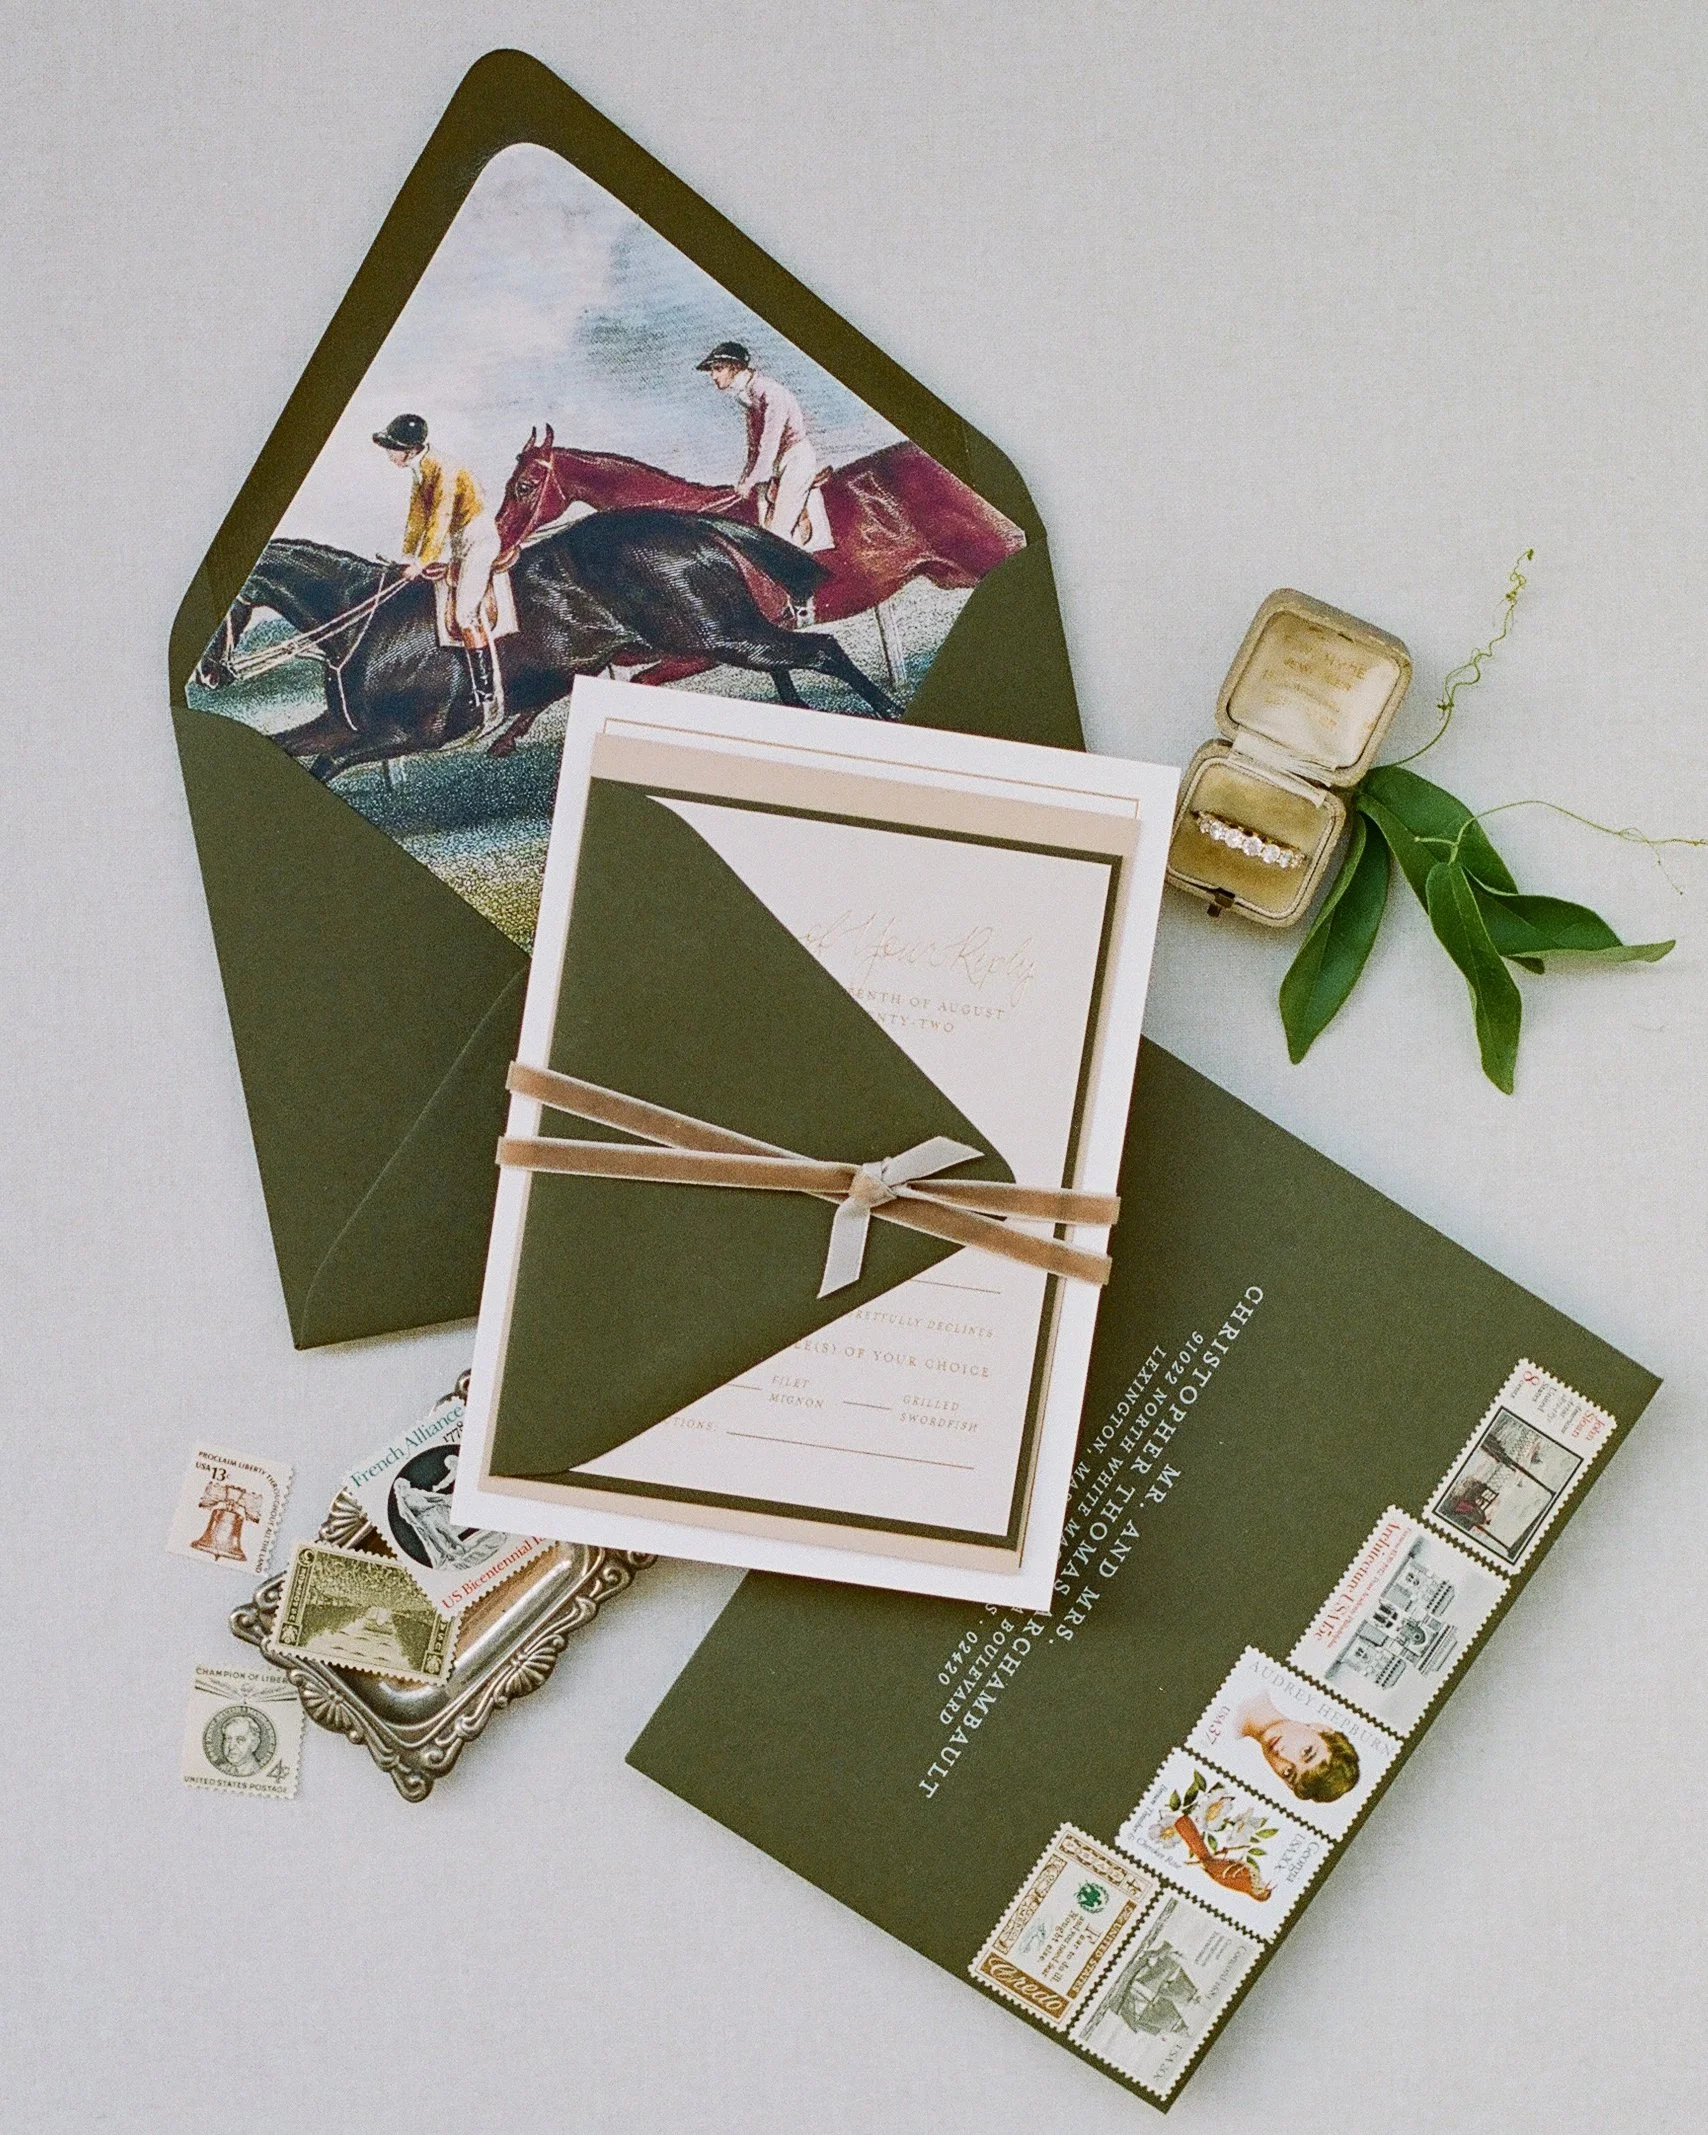
Pictured Styling Surface: BUCKWHEAT | Embracing negative space: approximately 40% of this frame is empty, allowing the equestrian-themed invitation suite to breathe and command attention. Cool white card stock prevent compositions from feeling cluttered or overwhelming
Manage Color Flow
Your eye should move smoothly through the image, guided by color relationships. If you have three white elements, distribute them throughout the composition rather than clustering them in one area. Similarly, if there's a pop of color (a bright lipstick or colorful invitation liner), use it intentionally as an accent, not lost in a corner.
Use Odd Numbers
Three, five, or seven items feel more organic and dynamic than even-numbered groupings. If you have pairs (like shoes), break up the symmetry by angling them differently or positioning other elements asymmetrically.
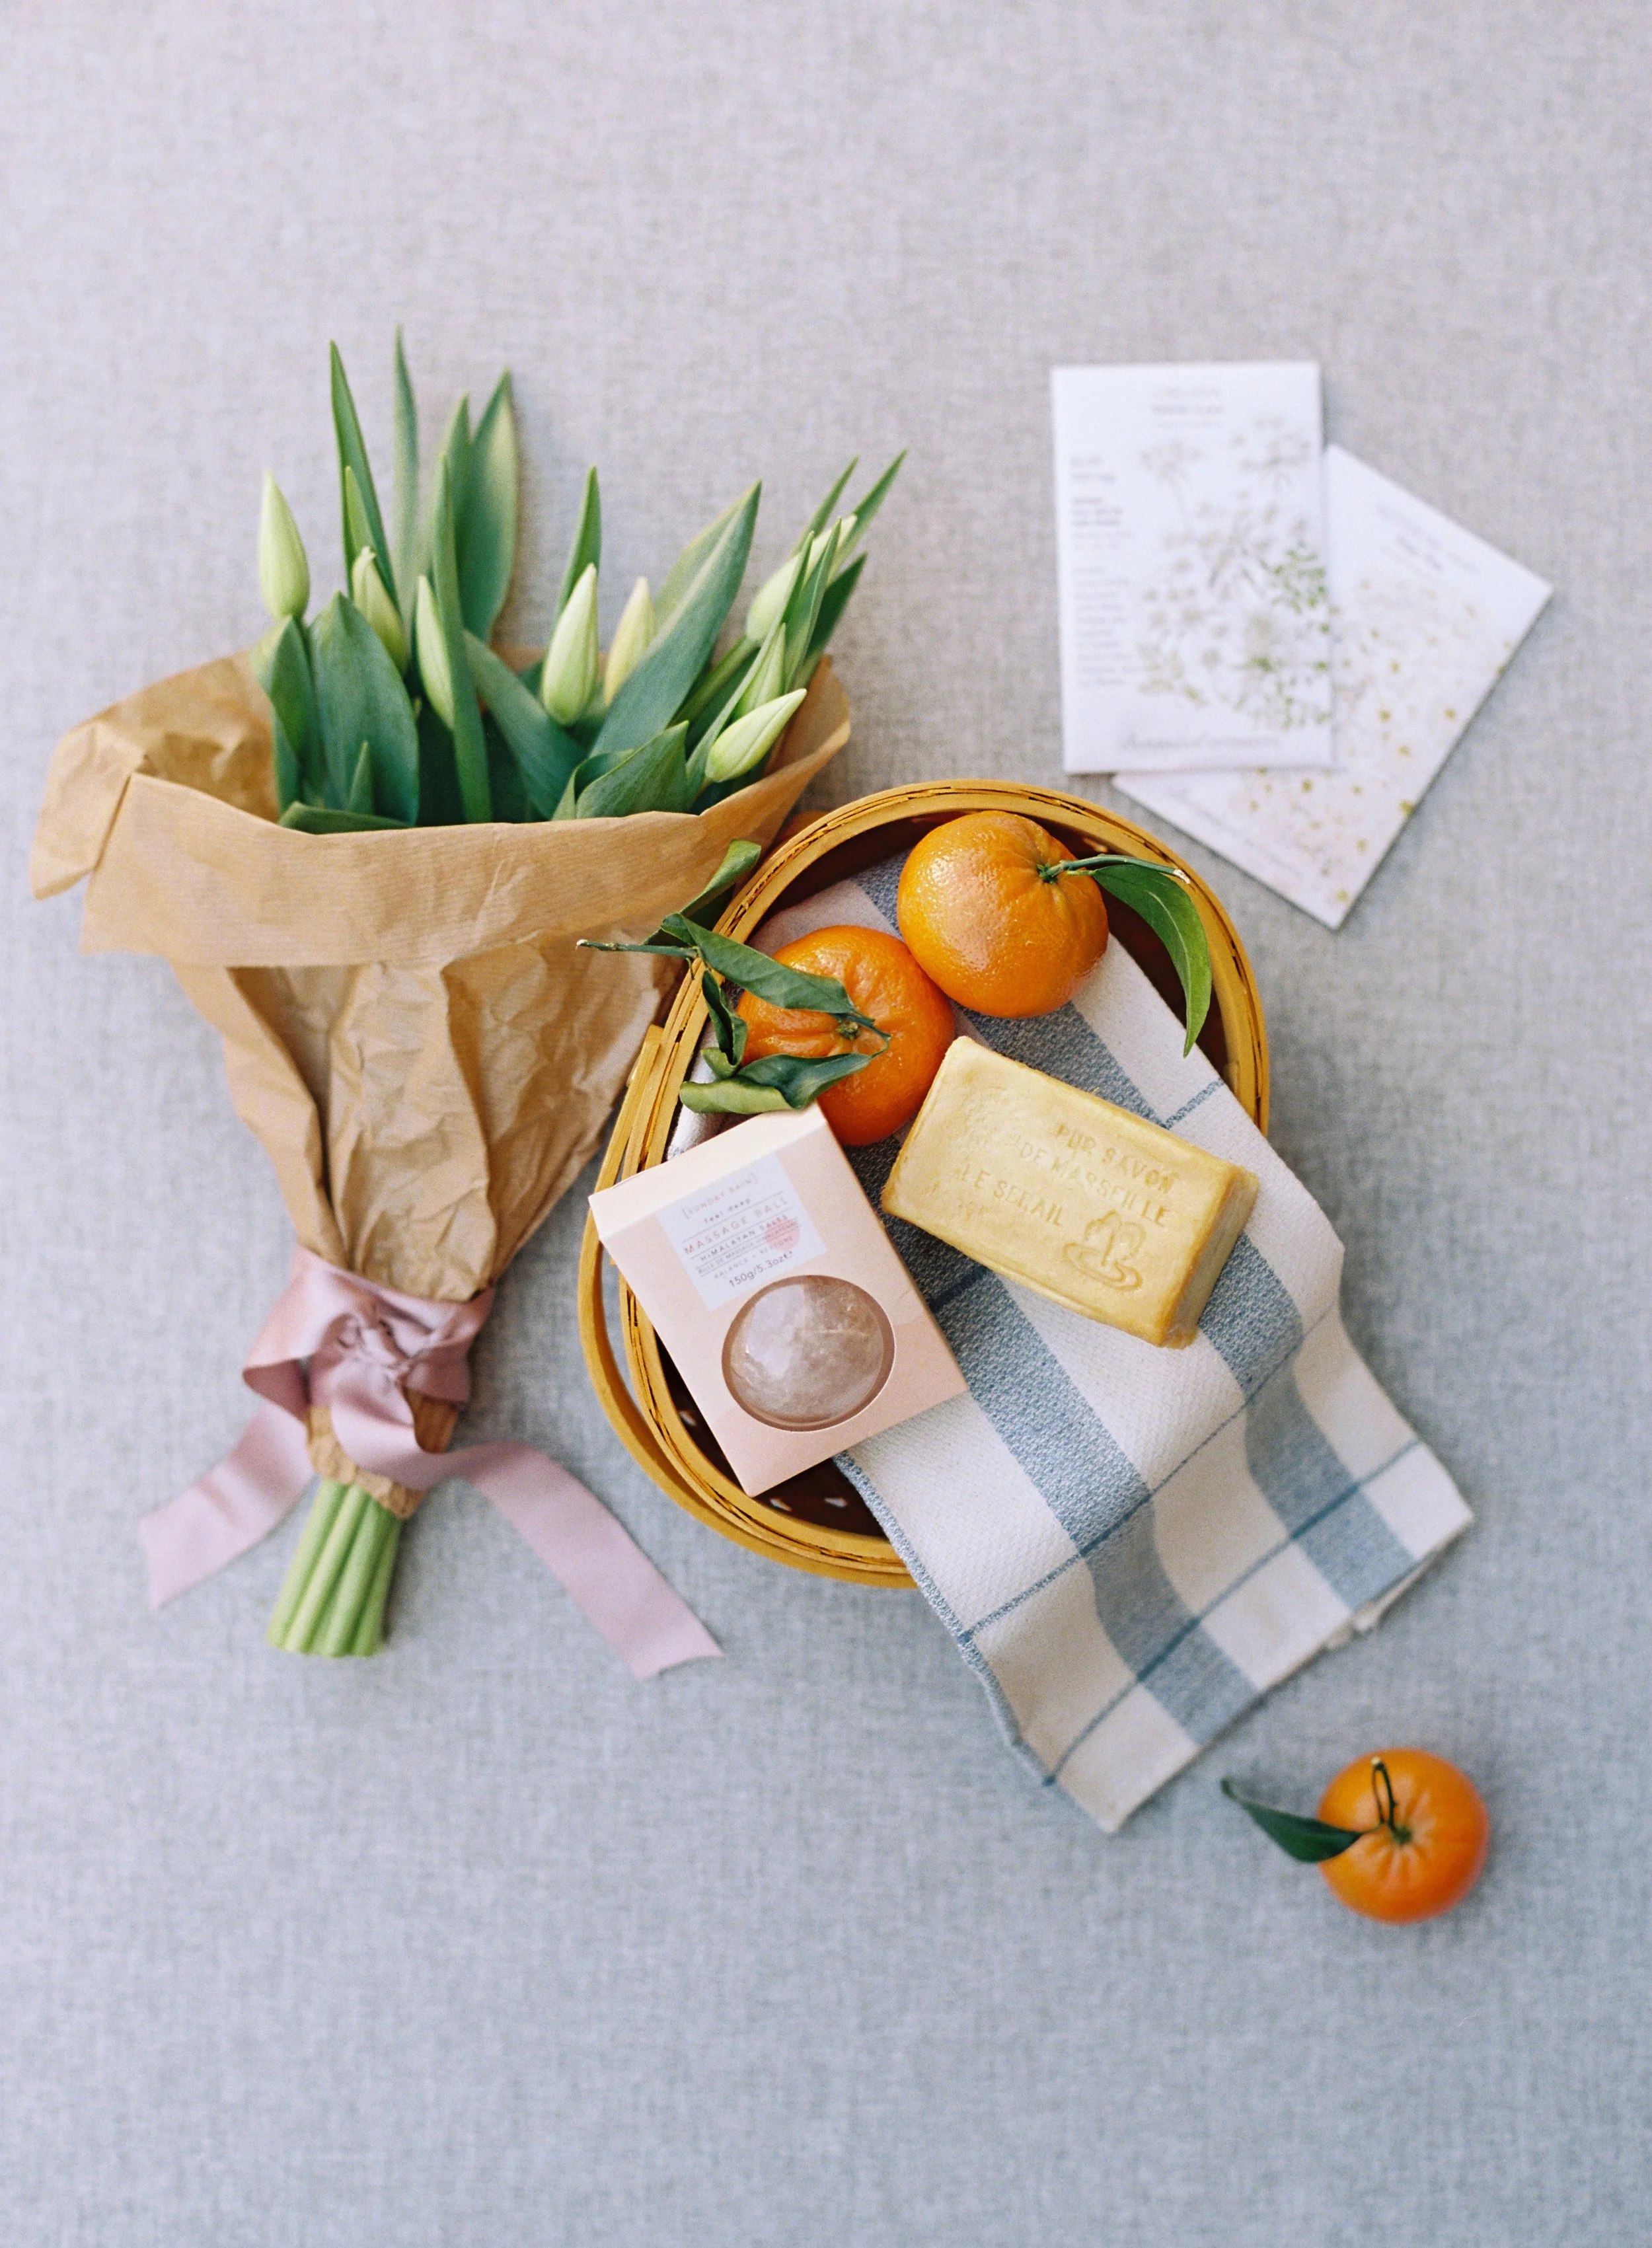
Pictured Styling Surface: ALDER | Odd-number rule in action: three tulips, three main oranges, one accent. Odd groupings feel more natural and dynamic than pairs or even numbers. This technique works for any flat lay styling, from gift baskets to wedding details
For quick composition fixes and common mistakes to avoid, check out our 7 Common Flat Lay Photography Mistakes guide.
Lighting Strategies for Perfect Detail Shots
Lighting can make or break your flat lay photography. The goal is soft, even illumination that reveals texture and detail without harsh shadows or blown-out highlights.
Window Light Technique
Window light is ideal when available. Position your flat lay surface perpendicular to a large window, with light coming from the side. This creates gentle, directional light that adds dimension without harsh contrast. The best time is during soft light hours (early morning or late afternoon) or on overcast days when clouds act as a natural diffuser.
Avoid direct sunlight hitting your flat lay at midday. The high-contrast light creates unflattering shadows and makes proper exposure difficult, especially with white items like invitations and light-colored ribbons. If you're stuck with harsh light, use a diffusion panel or sheer white curtain between the window and your setup.
Positioning Yourself
When shooting overhead, watch for your own shadow falling across the scene. This seems obvious but is surprisingly easy to miss. Position yourself so light comes from the side, or use a longer focal length lens that allows you to stay further back from the setup.
Artificial Light Setup
For indoor or evening weddings, continuous LED lights offer more control than flash. Position one large softbox at a 45-degree angle to your flat lay surface for your main light, then use a reflector opposite to fill shadows. This setup mimics beautiful window light and works consistently regardless of venue conditions.
White Balance and Color
Check your white balance carefully. Mixed lighting (window light combined with ambient tungsten lights) creates color casts that are difficult to correct in post-processing. When possible, turn off overhead lights and rely solely on your primary light source. Shoot a gray card reference frame to ensure accurate color correction later.
Managing Reflections
Reflective surfaces require special attention. Rings, phone screens, glass perfume bottles, and metallic elements can all create distracting hotspots or reflections. Slightly adjust the angle of these items, use a polarizing filter, or position your light source to minimize glare while maintaining overall exposure.
Technical Camera Settings for Crisp, Detailed Images
Your technical approach must ensure every element is tack-sharp with accurate colors and proper exposure.
Baseline Settings
Shoot in manual mode for consistency. Start with these baseline settings and adjust as needed: ISO 200-400 (keeping it low for maximum image quality), aperture f/5.6 to f/8 (providing sufficient depth of field without diffraction), and shutter speed 1/125 or faster (eliminating any camera shake).
Aperture Selection
Aperture selection is crucial for flat lays. Too wide (f/2.8 or wider) and you risk having some elements fall out of focus, especially if your surface isn't perfectly flat or items have varying heights. Too narrow (f/16 or smaller) and diffraction reduces sharpness. The sweet spot for most lenses is f/5.6 to f/8, providing edge-to-edge sharpness while maintaining beautiful image quality.
Focus Technique
Focus carefully and intentionally. Use single-point autofocus and place your focus point on the most important element, usually the invitation text or the ring detail. In Live View mode, use focus magnification to ensure critical sharpness. Some photographers prefer manual focus for ultimate control, especially when shooting tethered.
File Format
Shoot in RAW format exclusively. The flexibility in post-processing is essential when working with white and light-colored elements that can easily blow out or delicate jewelry details that need shadow recovery. RAW files contain significantly more color and tonal information than JPEGs.
Eliminate Camera Shake
Use a cable release or your camera's timer to eliminate any vibration. Even when shooting on a sturdy tripod, pressing the shutter button can introduce subtle shake. This is especially important at slower shutter speeds or when using longer focal lengths.
Exposure Bracketing
Bracket your exposures if time permits. Take one shot at your meter's recommended exposure, one slightly underexposed (negative 1/3 to negative 2/3 stop) to preserve highlight detail in white elements, and one slightly overexposed (positive 1/3 to positive 2/3 stop) for shadow detail. This insurance policy ensures you have the perfect exposure in post.
Efficient Workflow for Timeline Management
Time is your most precious resource on a wedding day. A streamlined flat lay workflow lets you create stunning images without eating into couple portraits or getting-ready coverage.
Pre-Wedding Communication
Communicate with your couples before the wedding day. Include a detail shot checklist in your welcome guide, requesting they gather all items in one location, preferably the getting-ready suite. Specify exactly what you need: both sides of the invitation suite, ring boxes, jewelry, shoes, perfume, and any personalized items they want photographed.
Scout Your Location
Scout your location immediately upon arrival. Identify the best natural light source and the clearest surface. A bed with white linens, a table near a large window, or even a clean floor area can work. If you're using professional flat lay surfaces, you have complete control over your backdrop regardless of venue conditions. Having this planned before you start gathering items saves valuable minutes.
Learn more about choosing and caring for professional surfaces in our Complete Guide to Styling Surfaces.
Gather Everything Efficiently
Gather everything at once. Use a small basket or tray to collect all items in a single trip, preventing multiple runs back and forth. This also ensures nothing gets misplaced during the chaotic getting-ready time.
Build Your Composition
Start with your foundational setup. Place your largest or most important element first (typically the invitation suite) and build around it. This approach is faster than arranging everything then rearranging because the composition doesn't work.
Shoot Variations Quickly
Shoot variations efficiently. Rather than completely restyling, capture your main composition from multiple angles: straight overhead, then slightly angled. Move items slightly to create 2-3 variations. Remove elements for simpler compositions. This approach gives you and your clients options without starting from scratch multiple times.
Create Dedicated Ring Shots
Include rings in context and isolated. Photograph the rings with the full flat lay, then create a dedicated ring shot, perhaps on the invitation or in the box with dramatic lighting. This ensures you have both storytelling and detail-focused images.
Work in Batches
Work in batches. Photograph all invitation-focused shots together, then all jewelry and accessories, then shoes and perfume. This efficiency prevents repeatedly adjusting your lighting and camera position.
Time Yourself
Time yourself and set a limit. Fifteen minutes maximum for all detail shots keeps you on schedule. Use your phone timer as accountability. As you practice this workflow, you'll naturally become faster while maintaining quality.
Post-Processing Techniques for Polished Results
Post-processing completes your flat lay vision, transforming good captures into portfolio-worthy images.
Global Adjustments
Start with global adjustments in Lightroom. Correct white balance first. This is critical for accurate color representation, especially with wedding details. Adjust exposure, highlights, shadows, and whites to create a bright, airy feel that's currently popular for detail shots, or a moodier, more dramatic look if that suits the wedding style.
Preserve White Details
Watch your white point carefully. Wedding details often include white or cream elements (invitations, ribbons, fabric) that should be bright but not blown out. Use the highlights slider and white point adjustment to preserve subtle texture and detail in these areas.
Enhance Details Subtly
Clarity and texture sliders enhance fine details like paper texture, lace, or engraving, but use restraint. Over-sharpening creates an artificial, harsh look. A light touch (clarity positive 10 to positive 20) adds definition without looking processed.
Color Grading
Color grading establishes mood and cohesion. For romantic, timeless images, warm your shadows slightly and cool your highlights subtly. For fresh, modern looks, keep colors more neutral or slightly cool-toned. Whatever you choose, apply the same treatment to all your flat lays for a cohesive gallery.
Local Adjustments
Use the adjustment brush for local corrections. Brighten specific elements that need emphasis, darken edges slightly for natural vignetting, or enhance color saturation in select areas. These subtle refinements guide the viewer's eye and add polish.
Straighten and Crop
Straighten and crop with precision. Flat lays require perfectly aligned horizontal and vertical lines. Use the crop tool's angle adjustment to ensure invitations and rectangular elements are straight. Even a slight tilt appears sloppy in overhead compositions.
Remove Distractions
Remove distractions with the healing tool. Dust on a ring box, lint on fabric, or an unavoidable shadow edge can all be eliminated quickly, ensuring nothing detracts from your carefully arranged composition.
Create Consistency
Create a Lightroom preset based on your signature style. Once you've developed a look you love, save those settings as a starting point for future flat lays. This dramatically speeds up your editing workflow while maintaining consistency across weddings.
Frequently Asked Questions About Flat Lay Photography
What camera settings should I use for flat lay photography?
Start with manual mode: ISO 200-400, aperture f/5.6 to f/8, and shutter speed 1/125 or faster. Shoot in RAW format for maximum editing flexibility. The aperture range of f/5.6 to f/8 ensures everything stays in focus while maintaining sharpness across your entire composition.
What lens is best for flat lay photography?
A 50mm prime lens is ideal for most flat lay work. It provides a natural perspective without distortion and works well in various lighting conditions. For tighter spaces, use a 35mm lens. For detailed close-ups of intricate elements like ring engravings or lace texture, an 85mm or 100mm macro lens works beautifully.
How do I get good lighting for flat lays?
Natural window light is your best option. Position your flat lay surface perpendicular to a large window with light coming from the side. This creates gentle, directional light that adds dimension. For indoor or evening weddings, use a continuous LED light with a softbox positioned at 45 degrees to your surface. Avoid direct overhead lighting and always use diffusion to soften harsh light.
How long should flat lay photography take at a wedding?
With a systematic workflow, you should complete all detail shots in 15 minutes or less. This includes invitation suite, rings, jewelry, shoes, perfume, and accessories. The key is pre-communication with couples to have everything gathered in one location before you arrive, plus having your lighting and surfaces ready to go.
What surface should I use for flat lay photography?
Professional hand-painted or fabric surfaces provide the best results. They offer consistent texture, eliminate venue-dependent variables like wrinkled bedspreads or distracting patterns, and elevate your work beyond makeshift options. Hand-painted surfaces add painterly depth, while fabric mats offer spill-proof practicality. See our Hand Painted vs Fabric Styling Surface Guide for detailed recommendations.
How do I compose a flat lay?
Start with your anchor piece (usually the invitation suite) placed off-center following the rule of thirds. Layer elements with slight overlaps to create depth, arrange items in triangular patterns for visual balance, and leave approximately 60% negative space. Distribute colors evenly throughout the frame and use odd numbers of objects (three, five, or seven) rather than even numbers for more organic compositions.
What's the best way to photograph wedding rings?
Photograph rings both in context with the full flat lay and as dedicated close-up shots. Use a macro lens or your regular lens at its minimum focusing distance. Shoot at f/5.6 to f/8 for sufficient depth of field. Position rings on the invitation suite or in their box with side lighting to reveal texture and sparkle. Always check focus on the diamonds or center stones.
How do I avoid shadows in overhead flat lay photography?
Position yourself so light comes from the side rather than from behind you. Use a longer focal length lens (85mm or 100mm) that allows you to stand further back from your setup. If using artificial light, position your light source at a 45-degree angle to your flat lay surface. Watch your camera's live view screen to spot any unwanted shadows before shooting.
Mastering Your Flat Lay Photography
Flat lay photography transforms you from a photographer who simply documents details into an artist who crafts stunning visual stories. These images become some of your most shared on social media, most requested by publications, and most appreciated by couples who've invested thought and budget into every wedding detail.
The key is practice and systemization. Don't wait for wedding days to hone these skills—practice at home with your own accessories, invitations from past weddings, or styled shoots. Time yourself, experiment with different lighting setups, and develop your signature style that makes your detail shots immediately recognizable.
Ready to dive deeper? Explore our Complete Guide to Styling Surfaces for product guidance and collection-building strategies, or check out our 7 Common Flat Lay Mistakes for quick wins that immediately improve your work.
Continue Your Flat Lay Education
Master the Foundations:
Complete Guide to Flat Lay Styling Surfaces - Choose the right surfaces for your work
Essential Photography Gear for Wedding Flat Lays - Build your complete equipment kit
Avoid Common Mistakes:
7 Common Flat Lay Photography Mistakes and How to Fix Them - Quick wins for immediate improvement
10 Flat Lay Mistakes That Make Your Work Look Amateurish - Refine your technique
Industry-Specific Guides:
How to Style Stunning Flat Lays for Florists - Techniques for floral arrangements
DIY Flat Lay Props You Already Own - Maximize what you have

Creators of premium photography backdrops and styling surfaces
Trusted by thousands of discerning creatives worldwide
Every piece is handcrafted with intention in Orange County, California