
Wedding Season Prep: Getting Your Backdrop Kit Ready for Spring
Updated on Apr. 18, 2026
Last March, I walked into a bridal suite at a Malibu estate with three backdrops tucked under my arm. I'd shot twelve weddings on those canvases the previous fall, packed them away over winter, and hadn't looked at them since November.
I unrolled my go-to neutral and there it was. A crease running right through the center of the canvas. Not a soft wrinkle that would disappear when hung. A hard fold line from four months of being stored improperly in the back of my car.
I spent the first 20 minutes of that wedding day trying to shoot around it. The crease caught light differently than the rest of the surface, creating a visible stripe behind the bride that I knew I'd be retouching out of every single frame. It wasn't the end of the world, but it was entirely avoidable.
That experience changed how I prep for spring wedding season. Now, every February, before the first booking hits, I go through a full backdrop audit. And every photographer I've told about this system has said the same thing: "Why didn't I think of that sooner?" For a complete overview of photography backdrops, start with our ultimate backdrop guide.
Here's the complete process.
Spring wedding season starts sooner than you think. If you haven't audited your backdrop kit yet, February is your window. New hand-painted canvas backdrops take 5 to 7 business days to process. Order now so you're ready before the first booking hits.
Why February Is Your Prep Window
Spring wedding season typically kicks off in late March or early April, depending on your market. That gives you roughly four to six weeks to get everything in order before the pace picks up and stays relentless through October.
If you wait until you're actively shooting to assess your gear, you're already behind. Ordering a new backdrop takes 5 to 7 business days for processing, plus shipping time. If you discover a problem with your current collection the week before a booking, you're scrambling. And scrambling is the opposite of how premium wedding photographers should operate.
February is quiet for most of us. Engagement season is winding down. You're finalizing contracts and timelines. This is the window where a few hours of intentional preparation pays off for the next eight months of shooting.
Step 1: The Full Unroll and Inspection
This is the step most photographers skip, and it's the most important one.
Take every backdrop you own and unroll it completely. Lay each one flat on a clean surface. Your living room floor works. A clean garage works. Anywhere you can spread out and actually see the entire painted surface.
You're looking for three things.
Creases and fold lines. If your backdrops were stored rolled (which they should be), minor surface wrinkles are normal and disappear quickly once hung. But hard creases from improper storage or from being folded instead of rolled need attention. A gentle iron on low heat applied to the canvas backside will usually release these. Never iron the painted face directly. For a full walkthrough on addressing creases and maintaining your canvases, our complete care guide covers everything in detail.
Stains and marks from last season. Lipstick transfers. Shoe scuffs. Champagne residue you forgot about in the rush of packing up at 11pm after a long reception. Now is the time to address these, not ten minutes before a portrait session. A white art gum eraser handles most surface marks. For anything stubborn, a slightly damp terry cloth rag with gentle pressure usually does the job without affecting the paint layer.
Overall condition of the paint surface. Look for any areas where paint might be thinning, flaking, or showing wear. Quality hand-painted canvas backdrops are built to last for years, but if you've been shooting 30+ weddings a season on the same surface, high-traffic areas might show use. Catching this early lets you plan replacements or additions rather than discovering it on a wedding day.
Take photos of any issues you find. This creates a reference for tracking wear over time and helps you make smarter purchasing decisions later.
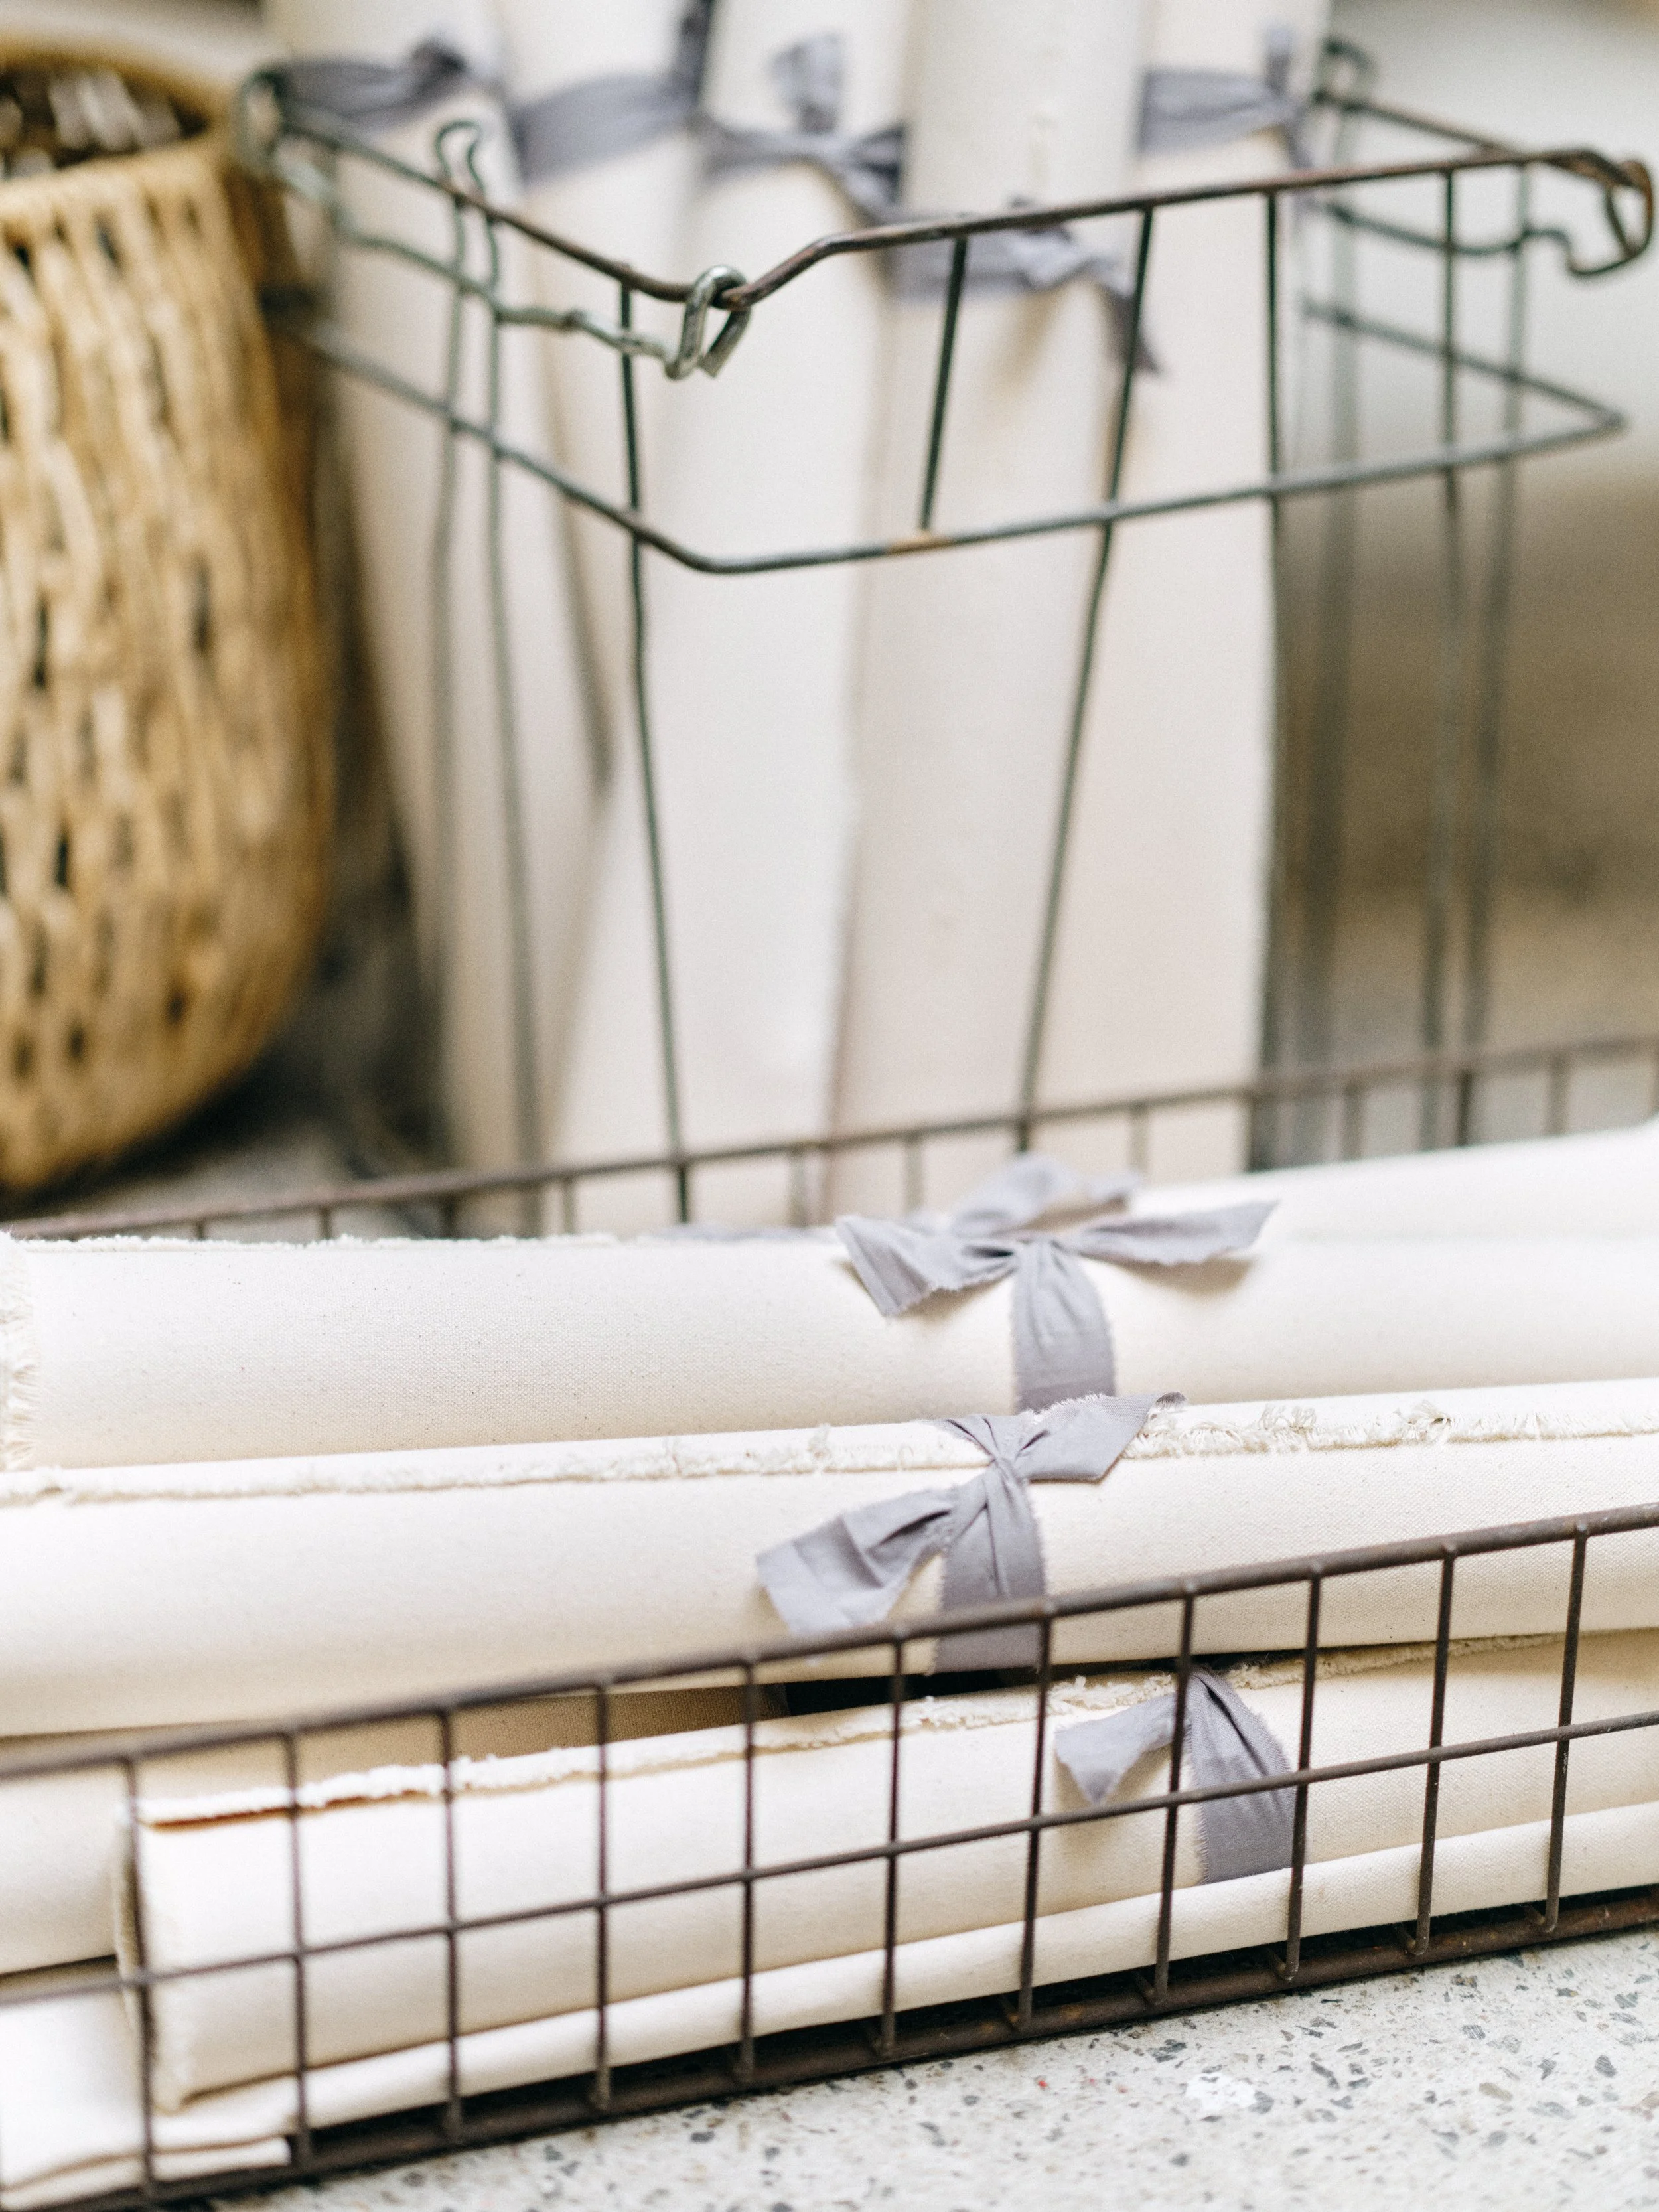
How you store your backdrops between seasons matters more than most photographers realize. Always rolled, never folded, in a cool dry space away from heat and humidity. A few minutes of proper storage saves you hours of retouching later.
Step 2: Deep Clean Everything
Once you've inspected, it's time to clean. Even if your backdrops look fine from a distance, a season of use leaves behind subtle buildup that affects how the surface photographs. Dust, skin oils from handling, environmental particles. These accumulate gradually and dull the vibrancy of hand-painted texture.
Your cleaning kit should include a soft-bristled brush (a chip brush works perfectly), a white art gum eraser, a clean terry cloth rag, and a lint roller or strip of masking tape. That's it. No chemicals. No cleaning sprays. Nothing wet unless you're addressing a specific stain.
Start by brushing the entire surface gently with the soft brush to remove loose dust and debris. Work from top to bottom so particles fall away from clean areas. Then use the lint roller over the full surface to catch anything the brush missed.
For scuff marks and smudges, the art gum eraser is your best tool. It lifts marks without damaging paint. Work gently and in small circles. Don't press hard or scrub aggressively.
For your flat lay surfaces, both hand-painted canvas and fabric options, this same process applies. The fabric flat lays with spill-proof coating are easier to maintain, but they still benefit from a seasonal refresh. Our complete flat lay surface guide covers material-specific care if you need a deeper reference.
Step 3: Assess Your Color Range Against 2026 Bookings
This is where preparation becomes strategy.
Pull up your confirmed spring and summer bookings. Look at the style boards your couples have shared, the venues you'll be shooting at, and the overall aesthetic direction of each wedding. Then look at what you actually have in your backdrop collection.
Do your current colors serve this season's work?
If you've been shooting primarily on cool neutrals and your 2026 calendar is filled with warm, earthy-toned weddings at desert-inspired venues, you might have a gap. If every couple this season has a romantic, soft palette and your boldest option is a deep charcoal, you may want to add something that bridges that range.
This doesn't mean buying a new backdrop for every wedding. One well-chosen neutral handles the majority of scenarios. That's the whole point of building your collection strategically. But reviewing your bookings against your current inventory prevents that frustrating moment when you realize your backdrop options don't match the wedding aesthetic you're walking into.
The 2026 wedding photography trends we covered in detail are pushing toward warm, complex neutrals, terracotta and clay tones, muted sage greens, and dusty coastal blues. If your collection leans entirely cool-grey, this might be the season to add warmth.
A few specific colors that continue to be incredibly versatile for spring and summer work:
Limestone is a light tan that photographs beautifully with virtually any floral palette. It's the kind of neutral that disappears behind your subject when you want it to and adds warmth when you let it breathe in the frame.
Sandstone brings warm peach-brown earth tones that complement garden weddings, outdoor ceremonies, and the organic styling that continues to dominate spring celebrations.
Celadonite offers a soft, muted sage green that works with botanical styling and nature-inspired weddings without feeling seasonal or limiting.
If you're building or expanding your collection, our backdrop buying guide walks through sizing decisions and our color theory guide for photographers helps you think about how different colors interact with skin tones, florals, and venue settings.
Step 4: Organize Your Transport System
Having beautiful backdrops means nothing if your transport setup is chaotic. I've watched photographers wrestle backdrops out of cluttered car trunks, unroll them on gravel parking lots because they couldn't find their stand clamps, and waste precious portrait time untangling gear that should have been ready to go.
Your backdrop transport system should let you go from car to shoot-ready in under five minutes. Here's what that looks like in practice.
Storage at home or in studio. Backdrops should be stored rolled, not folded. Always. Roll them tightly around the cardboard core they ship on (keep those cores) and secure with the included retaining bands. Store them standing upright or lying flat in a cool, dry space. Avoid the trunk of your car for long-term storage. Heat and humidity are the enemy.
Your go bag. For wedding days, you should have a system where your backdrop, stands, and mounting hardware travel together as one unit. Some photographers use a dedicated gear bag. Others keep a designated section of their car. The method matters less than the consistency. You should be able to grab your backdrop kit and walk into any venue without digging through other gear.
Stands and hardware. For canvas backdrops, you'll need C-stands and adapter mounts. The 5x8 size works with a single stand. The 8x10 and 8x14 sizes need two stands for proper support. Check your stands for any damage, tighten any loose joints, and replace any worn clamps before the season starts. Discovering a stripped bolt on a C-stand at 2pm on a Saturday at a vineyard wedding is not the experience you want.
Flat lay surfaces for detail work. Your hand-painted flat lay surfaces and fabric flat lays should have their own designated space in your kit. The linen carrying bags hold up to three surfaces each, keeping them clean and organized during transport. Throwing loose flat lay surfaces into your camera bag alongside lenses and flash units is how surfaces get scratched and corners get damaged.

We hear this from wedding photographers every spring: 'I have three backdrops but none of them feel right for this wedding.' Reviewing your confirmed bookings against your current collection before the season starts is the step most photographers skip. It takes an hour and saves you from showing up underprepared.
Step 5: Do a Test Shoot Before Your First Booking
This is the step that separates photographers who show up confident from photographers who hope for the best.
Before your first spring wedding, set up your backdrops and shoot. Not a full production. Just 30 minutes in your home or studio where you hang each backdrop, light it the way you'll light it on a wedding day, and take a handful of test shots.
You're confirming a few things with this test.
First, that your backdrops look the way you remember them looking. Muscle memory from last season can be unreliable after a few months off. You might discover that a color you thought was warm reads cooler than you expected, or that a texture you loved in fall doesn't serve the lighter, airier look your spring couples are requesting.
Second, that your setup workflow is smooth. Time yourself. Can you go from rolled canvas to hung and ready in five minutes? If not, practice until you can. Our lighting guide has the full breakdown on positioning backdrops relative to window light, but the short version is this: perpendicular to your light source reveals texture, parallel to your light source flattens it. Knowing this instinctively rather than having to think about it on a wedding day comes from practice.
Third, that everything works together. Hang your backdrop, set up your flat lay surface nearby, and shoot a quick mockup of both portrait and detail work. This simulates what a real wedding day transition looks like: backdrop up for bridal portraits, then surface down for invitation suite and ring shots. You want that transition to feel effortless.
Step 6: Build Your Spring Shot List
This one isn't about gear at all, but it's connected to everything above.
Before the season starts, create a reference shot list for how you plan to use your backdrops this spring. Not a rigid checklist that makes your shooting feel formulaic, but a creative roadmap that helps you think intentionally about what you're trying to create.
Maybe you want to incorporate more dramatic floral installations in front of your backdrops this season. Maybe you saw a bridal editorial last month that used a backdrop at a 45-degree angle and you want to experiment with that composition. Maybe you want to offer styled mini sessions between wedding weekends and need to plan which backdrops and surfaces pair together.
Writing down these intentions while you're in planning mode means you'll actually follow through when the pace picks up. The photographers consistently creating portfolio-worthy work aren't doing it by accident. They're walking into wedding days with a vision that's been formed weeks before the first shutter click.
For inspiration on how backdrops work in real wedding scenarios, our guide on how wedding photographers use hand-painted backdrops successfully shows specific applications from bridal portraits to getting-ready coverage to styled editorial work.
The Pre-Season Checklist (Your Quick Reference)
For those who want the condensed version, here's what to work through before your first spring booking:
Unroll and inspect every backdrop and flat lay surface you own. Address any creases with gentle heat on the canvas backside. Clean all surfaces with soft brush, art gum eraser, and lint roller. Photograph any wear or damage for your records. Review spring bookings and compare client aesthetics to your current collection. Order any new backdrops or surfaces at least 2-3 weeks before your first shoot (remember, hand-painted pieces take 5-7 business days to process). Check all stands, clamps, and mounting hardware for function and wear. Organize your transport system so your backdrop kit travels as one unit. Do a 30-minute test shoot at home to confirm setup workflow and color accuracy. Build your creative shot list for how you want to use backdrops this season.
That's it. A few hours of focused preparation in February sets up your entire spring and summer season.
Before your first spring wedding, every backdrop you own needs to come off the shelf and get unrolled completely. Hard crease lines, scuff marks, and paint wear don't show up until you're looking at the full surface in good light. Find them now, not at 2pm on a Saturday at a vineyard.
One More Thing: Order Timing Matters
If your inspection reveals that it's time to add to your collection, or if you've been putting off that first backdrop purchase, now is the time. Not April. Not "before my next wedding."
Every hand-painted canvas backdrop is painted to order here in our Orange County studio. Jennifer hand-paints each one. That process takes 5 to 7 business days before shipping. If spring wedding season starts in late March for your market, and you wait until mid-March to order, the math doesn't work in your favor.
The photographers who show up to the first wedding of the season fully equipped made their purchasing decisions in January or February. They've already done their test shoots. They've already practiced their setup. When they walk into that first venue, they're not figuring things out. They're executing a system they've refined before a single wedding guest arrives.
If you're building your collection from scratch, start with one versatile neutral backdrop and a set of flat lay surfaces for detail work. If you're expanding, add the color that fills the specific gap your spring bookings reveal. Our Ultimate Photography Backdrop Guide for 2026 covers every consideration from materials to sizing to color selection.
Spring wedding season doesn't wait for you to be ready. But with a few intentional hours right now, you can make sure you're ready for it.
Ready to prep your kit for 2026 spring wedding season? Shop hand-painted canvas backdrops, artisan flat lay surfaces, and professional styling tools built for photographers who refuse to leave their best work to chance.

Creators of premium photography backdrops and styling surfaces
Trusted by thousands of discerning creatives worldwide
Every piece is handcrafted with intention in Orange County, California