
Getting Ready Photography: How to Shoot Stunning Bridal Portraits in Hotel Rooms
Posted on Mar. 3, 2026
I once walked into a hotel room in Laguna Beach that had turquoise damask wallpaper, a bolted-down painting of a lighthouse, and overhead lighting so orange it made everyone look like they'd applied self-tanner with a paint roller. The bride was gorgeous. Her $12,000 gown was perfect. And every wall in the room was actively working against me.
That was a Thursday in October. The following Saturday, I walked into a penthouse suite in Santa Monica with floor-to-ceiling windows facing north, white walls, and natural light so beautiful I barely had to think about it.
Both brides got bridal portraits that looked editorial. Both sets of getting-ready images made it into my portfolio. The only difference was that in Laguna, I had to create the environment myself. In Santa Monica, the room did most of the work for me.
If your getting-ready coverage only looks good when the room cooperates, you're building a portfolio that depends on luck. And luck is a terrible business strategy.
This is the guide to making hotel room bridal portraits look intentional every single time, regardless of what the room gives you.
Photographers ask us how to get more of these soft, natural getting-ready portraits and less of the rushed, cluttered chaos that most hotel rooms produce. The answer is always the same. Arrive early, clear your shooting zone, find your window light, and let the morning unfold in front of you. The bride just has to be herself. You just have to be ready.
Why This Part of the Day Matters More Than You Think
Here's something I didn't fully appreciate in my first few years shooting weddings: getting-ready photos are the most frequently shared images from the entire wedding day, outside of the ceremony itself.
When a bride posts the morning after her wedding, she's not leading with the reception dance. She's sharing the quiet portrait by the window. The candid of her mom fastening the last button on her dress. The image where she looked like the best version of herself, before the hugs and the happy tears and the Texas humidity undid two hours of hair styling.
Those images drive bookings. Not in theory. In measurable, traceable ways.
I've tracked this across my own business and talked with photographers around the country who've seen the same pattern. When your getting-ready coverage looks like it belongs in a bridal editorial, the couples who find those images on Instagram and Pinterest and wedding blogs aren't just liking them. They're sending inquiry emails. Multiple photographers I know credit their shift from $4,000 to $8,000+ packages directly to upgrading how their getting-ready work looked in their portfolio.
Not their editing. Not their camera bodies. How the environments in their bridal portraits appeared.
The Real Problem Nobody Talks About
Every photographer blog will tell you to "find the window" and "declutter the space." That's fine advice. It's also completely inadequate for what actually happens on a wedding morning.
Here's the reality. You walk into a Courtyard Marriott in Pasadena. The bride's suite has one window facing a parking structure. The walls are beige with a brown accent stripe that was trendy in 2009. There's a geometric carpet pattern that creates visual noise in every single frame where you can see the floor. The bathroom vanity has five bridesmaids' worth of makeup and hair products covering every flat surface. The bed is piled with garment bags, shopping totes, and someone's emotional support snack collection.
The bride is in the makeup chair and she looks stunning. Her mom is already emotional. The light coming through that one parking-structure-facing window is... fine. Not great. Workable.
You have about 25 minutes between when hair and makeup wraps and when the first look needs to happen.
This isn't a lighting problem. This isn't a composition problem. This is an environment problem. And the photographers who consistently deliver elevated getting-ready work are the ones who stopped hoping the environment would cooperate and started controlling it instead.
The Window Rules Everything (But Not How Most Guides Explain It)
Yes, natural light from the window is your primary tool. That part you already know. Here's the part most guides skip.
The direction the window faces changes everything about your timeline. East-facing windows give you that beautiful, warm, low-angle morning light, which is gorgeous but also means you're on a clock. As the sun climbs, that light gets harsher or disappears entirely if the building orientation shifts the direct sunlight past your window. If you're in an east-facing room and hair and makeup isn't wrapping until 11am, your portrait light may already be gone.
North-facing windows are quiet and consistent all day long. The light never dramatically shifts. It's soft, even, and forgiving. This is the light that makes skin look luminous without any effort from you. If I could choose one window direction for every getting-ready room for the rest of my career, it would be north.
West-facing windows in a morning getting-ready scenario are basically decoration. You'll get ambient bounce at best. Plan to supplement.
Here's the thing nobody mentions: you can call the hotel. Before the wedding day. You can ask what direction the bridal suite windows face. You can request a room on a higher floor (fewer obstructions blocking the light). I've even asked front desk managers which suites get the best morning light, and they almost always know. They've heard from other photographers before. This five-minute phone call has saved me more times than any piece of gear I own.
Turn off every artificial light in the room. I don't mean most of them. I mean every single one. The overhead fixtures. The bedside lamps. The bathroom light. The vanity light the makeup artist is using (she'll need a portable LED, and most experienced MUAs already bring one).
Here's why this matters beyond the standard "mixed lighting" explanation: tungsten light doesn't just create color cast problems. It flattens everything. That beautiful directional quality you get from a single window source only works when the window is the dominant light. The second you leave a lamp on across the room, you've filled in the shadows that were giving your portraits depth and dimension. You've turned cinematic into clinical.
For the full technical breakdown of how natural light interacts with textured surfaces specifically, our guide to lighting hand-painted backdrops goes deep on the principles. Everything in that piece applies directly to getting-ready scenarios.
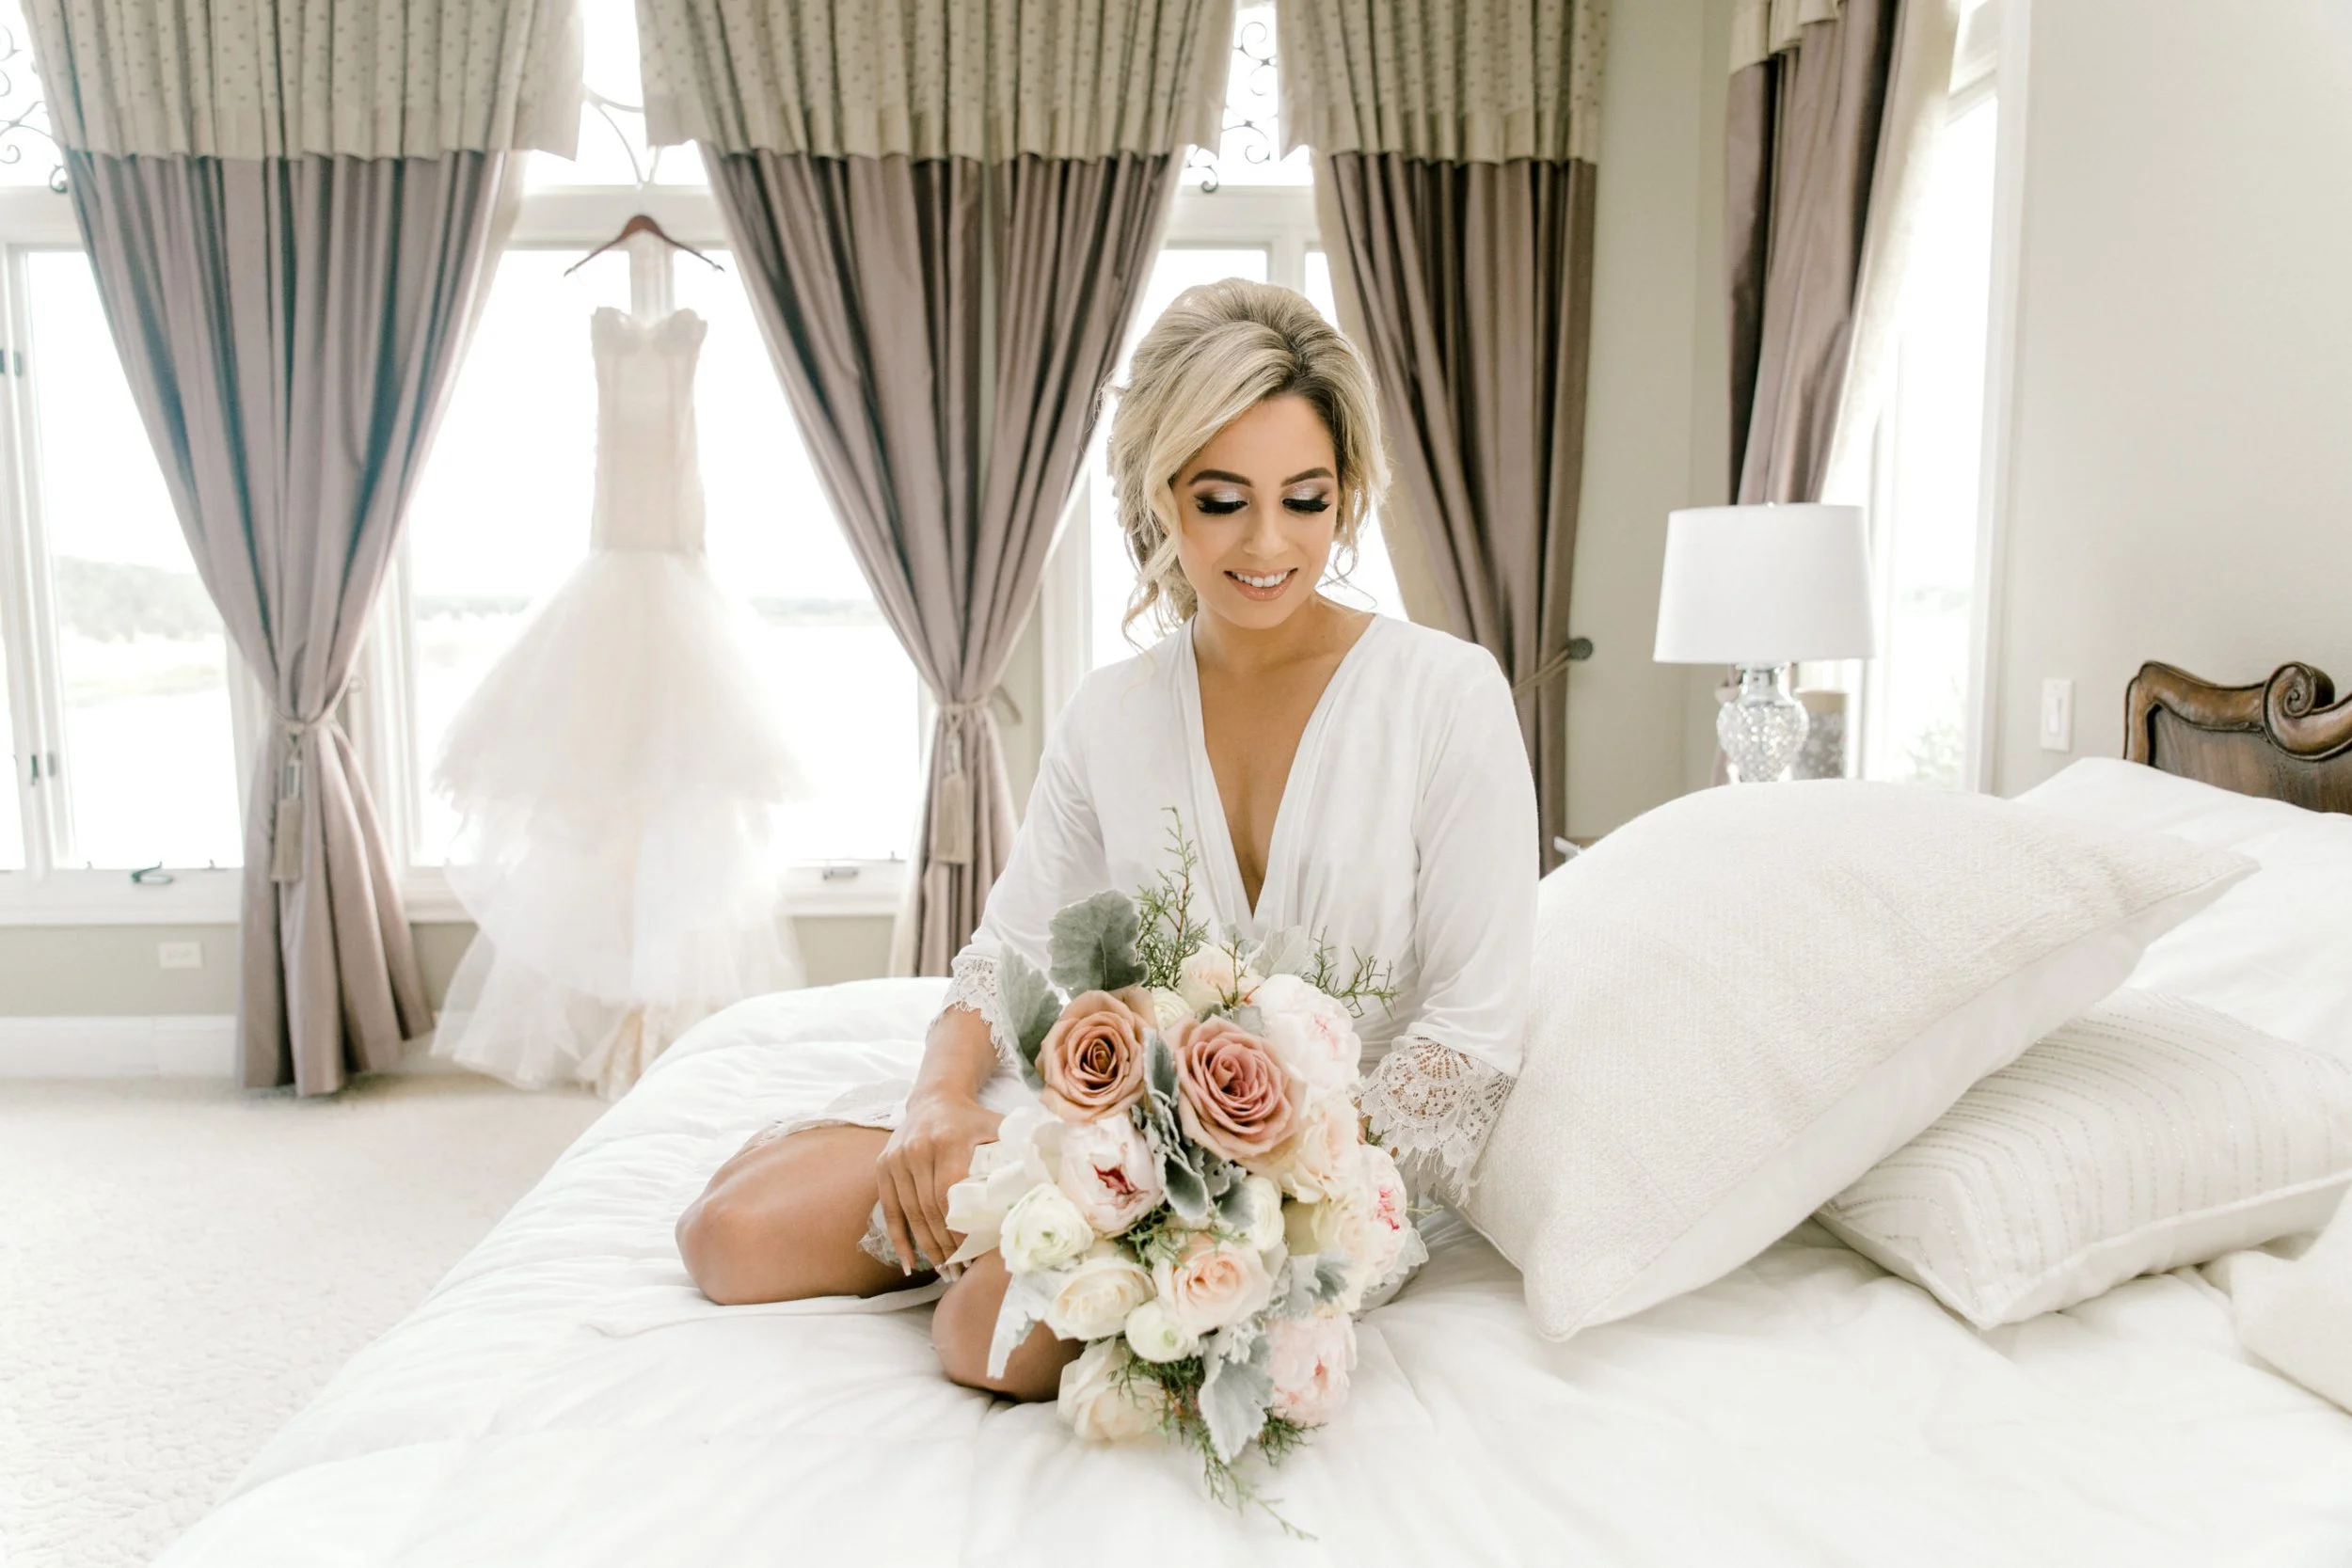
Position the bride 2 to 4 feet from the window, not right against it. I see this mistake constantly in behind-the-scenes reels. The photographer places the bride with her shoulder touching the window frame. Flat light. No dimension. No shadow play. No sculpting.
Pull her back. Let the light travel those few feet. Now it has direction. Now one side of her face is brighter than the other. Now the gown has highlights and shadows that give it three-dimensionality instead of looking like a flat white shape. That gap between the window and your subject is where portraits start looking like portraits instead of snapshots.
My 10-Minute Room Reset (Stolen From Hundreds of Wedding Days)
When I walk into a getting-ready room, I run the same sequence every single time. It's automatic now. Like muscle memory, except instead of picking up a camera, I'm picking up a terrible painting off a wall hook.
First 3 minutes: Identify and clear the shooting zones. You do not need to organize the entire room. That's the coordinator's job or nobody's job. You need two zones: one near the best window for portraits and candids, and one surface near a secondary light source for detail work.
Clear the portrait zone. Move luggage behind furniture. Relocate the garment bags to the closet or the bathroom. If the bed is in your shooting zone and it's covered in stuff, ask a bridesmaid (there's always one who loves organizing) to consolidate everything to one side or onto a chair.
The thing I wish someone told me earlier: you don't need a big space. You need a clean space of about 6 by 6 feet. That's it. That's enough for a bridal portrait setup. Stop trying to make the whole room work. Make six feet of it work brilliantly.
Minutes 3 through 5: Edit the walls. Most hotel art lifts off its hooks in about three seconds. Try it gently. If it comes off, put it in the closet. If it's bolted or wired, leave it and shoot in front of it with enough depth of field compression that it disappears.
I've removed no-smoking signs, decorative mirrors, sconces that weren't hardwired, and one truly unfortunate motivational poster from a conference room that had been repurposed as a bridal suite. Every single item I've removed has gone back before I left. This isn't vandalism. It's art direction.
Here's one people miss: check for the thermostat on the wall. The little white rectangle that always seems to land right at head height behind your subject. You can't remove it, but you can position your backdrop to cover it or angle your composition so it's out of frame. It's the kind of detail your clients will never notice but that saves you ten minutes of clone-stamping in Lightroom.
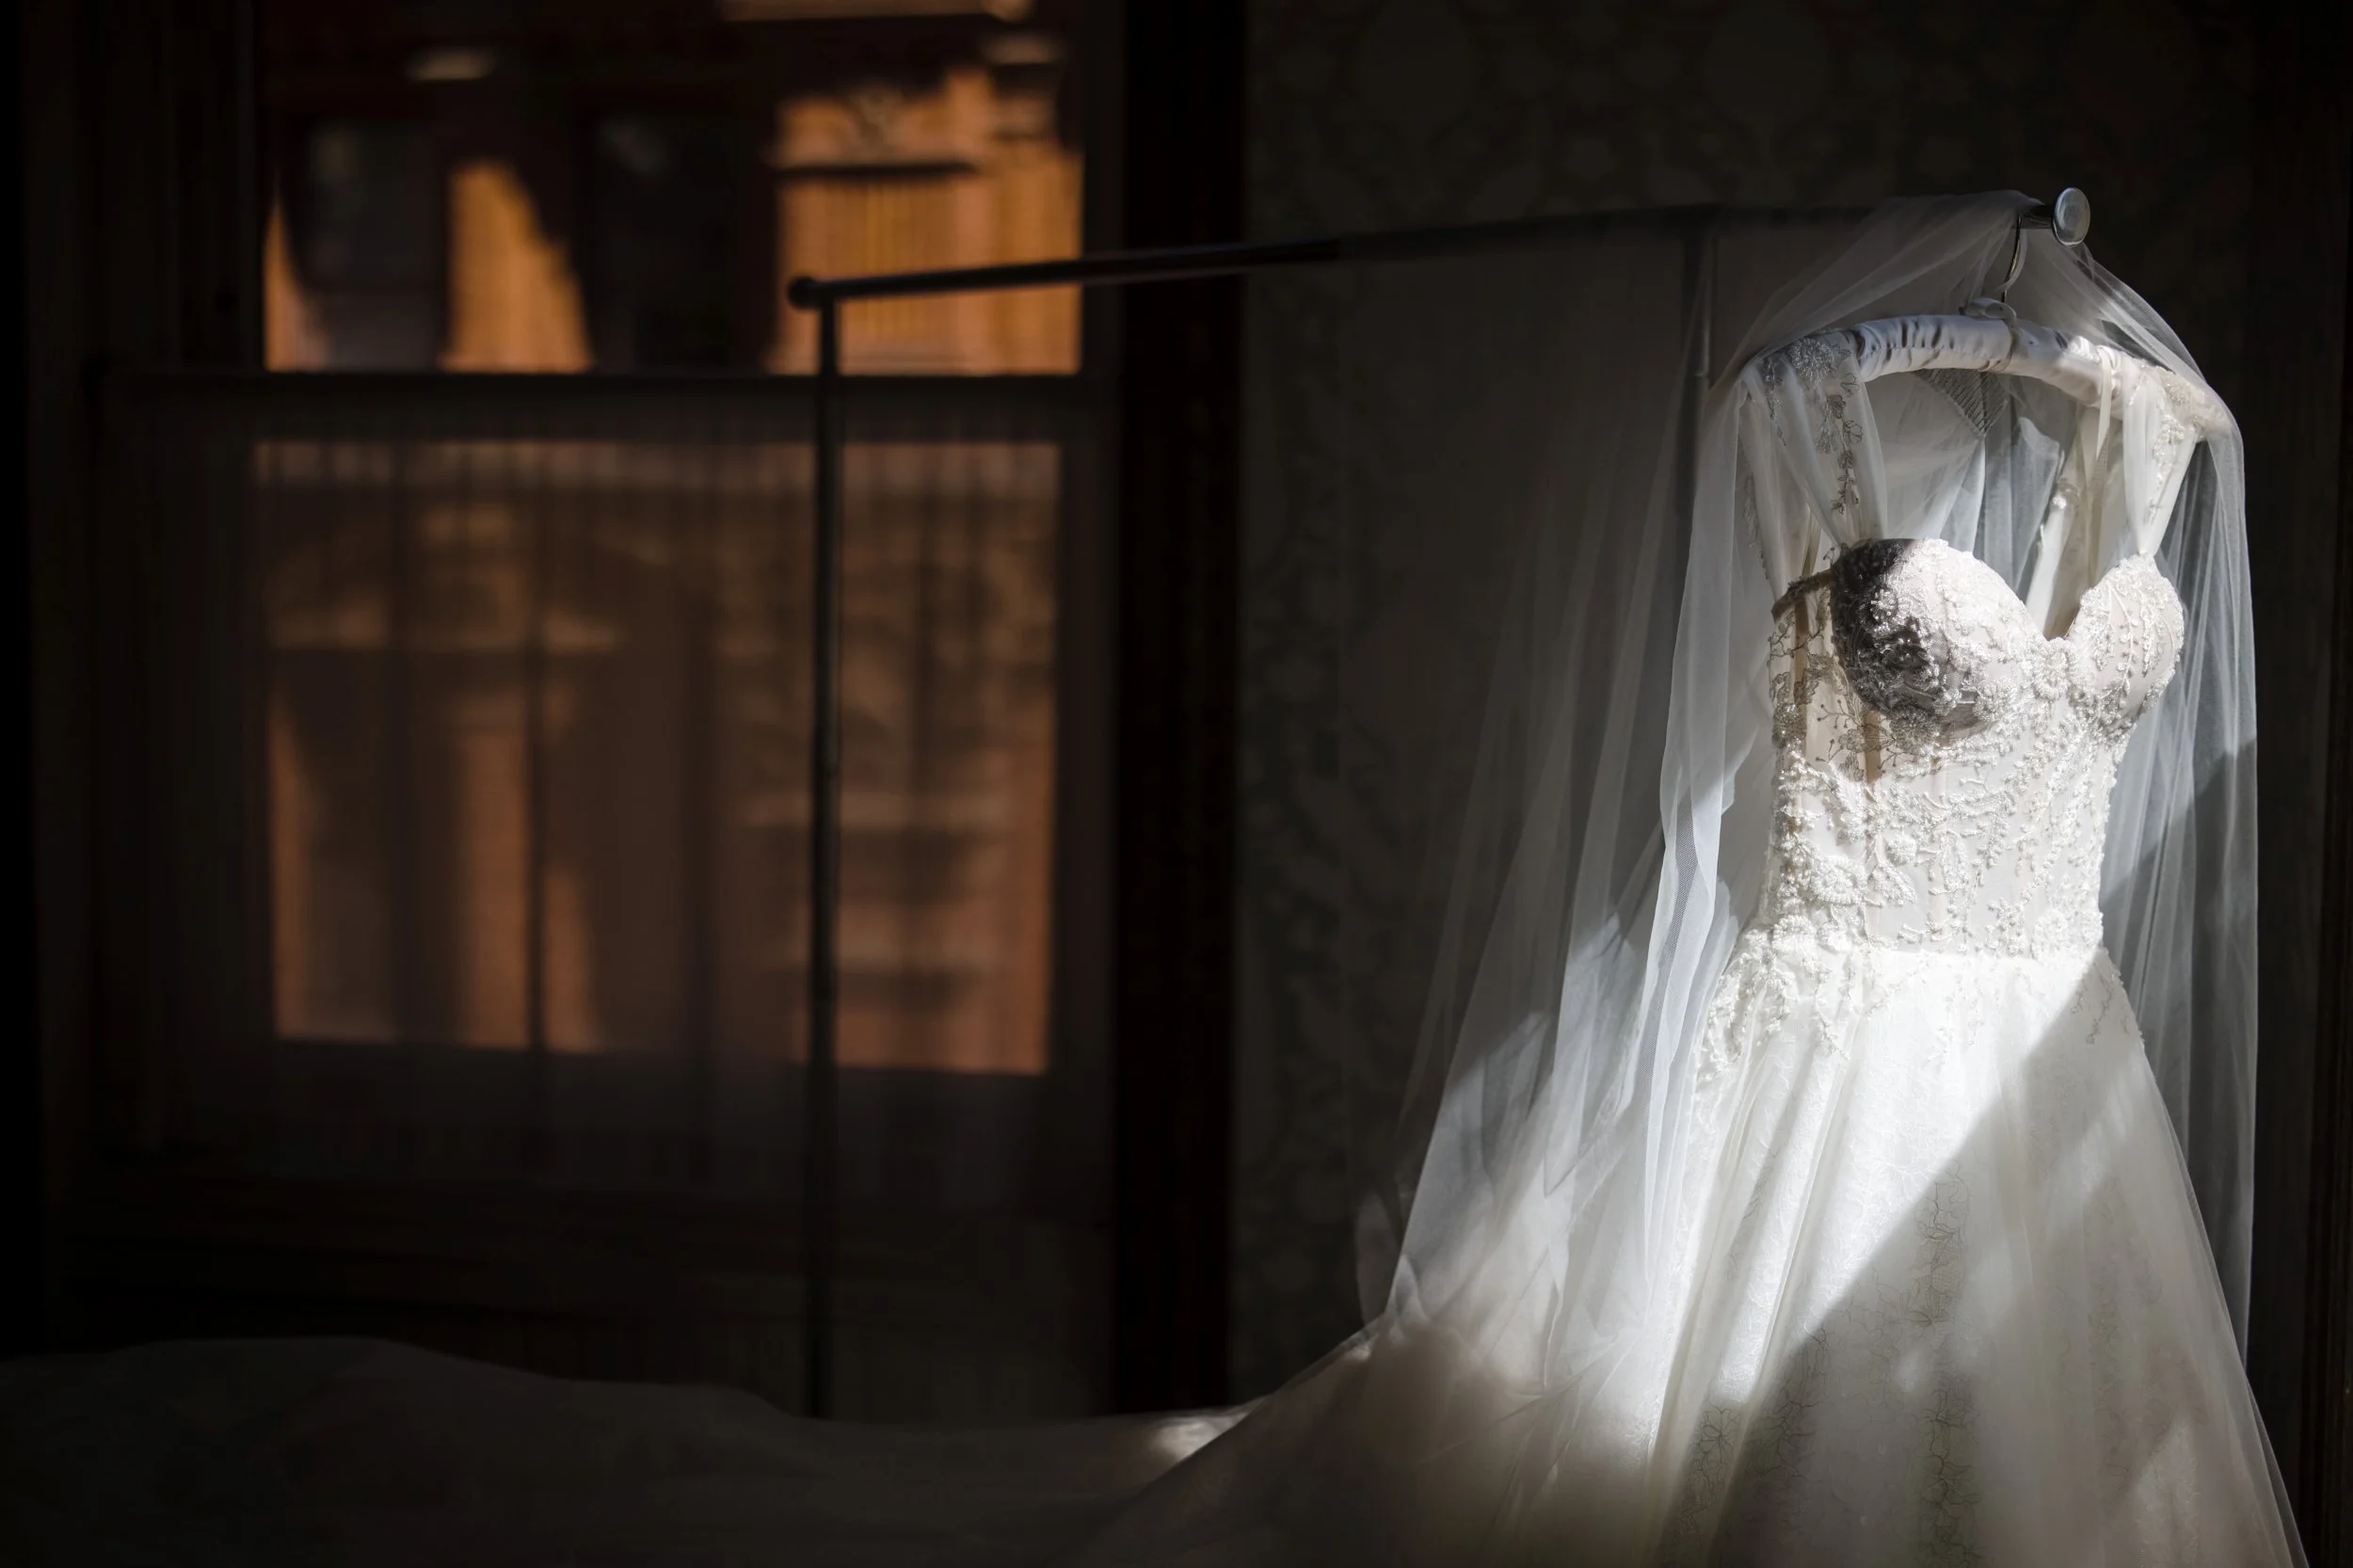
Photographers tell us they struggle to make dress detail shots look editorial, especially in dark or difficult hotel rooms. This image came from exactly that kind of room. The secret is not better gear or a brighter space. It is turning off everything artificial, finding the one window with directional light, and letting the shadows do what shadows are supposed to do.
Minutes 5 through 8: Set up your portable backdrop. This is the single biggest upgrade you can make to your getting-ready workflow. A hand-painted canvas backdrop on a C-stand positioned against the cleanest wall near your best window transforms any hotel room into a controlled portrait environment.
One C-stand. One backdrop. Two minutes to set up. I've timed it. The setup walkthrough on our journal shows the exact process, so I won't repeat the steps here.
The 5x8 size is purpose-built for this scenario. It fits in hotel room corners. It works on a single stand. It's light enough to carry alongside the rest of your kit without feeling like you packed for an expedition. For getting-ready work where you're primarily shooting waist-up and head-and-shoulders compositions, it's the right tool.
And here's why this matters beyond just covering an ugly wall. A hand-painted canvas surface responds to that beautiful directional window light in ways that a plain wall never will. The subtle brush strokes and color variation across the surface create dimension. Shadows from the window settle into the texture differently depending on your shooting angle. You get visual depth that separates your subject from the background naturally, without having to shoot at f/1.4 and pray your focus is tack sharp on the correct eyelash.
Minutes 8 through 10: Set your detail staging area. While your backdrop is up, arrange your flat lay surface on the desk or a cleared section of the bed near your second-best light source. Gather rings, invitation suite, shoes, jewelry, perfume, and heirloom pieces. This is your detail station for the next 20 minutes, and having everything consolidated here means you're not hunting behind someone's bridesmaid tote bag for the rings when the timeline gets tight.
Ten minutes. You just took a generic hotel room and turned it into a space where every shot has intention behind it.
The Four-Phase Getting Ready Workflow
The order you shoot getting-ready coverage matters as much as how you shoot it, because the morning has a natural rhythm and fighting that rhythm costs you moments you can never recreate.
Phase 1: Details and Flat Lays (Arrive 60 to 90 minutes before hair and makeup finishes)
This is your calm, creative window. The energy in the room is relaxed. Nobody's watching you work. The bride is in the makeup chair having a conversation with her mom. You have space and time to be deliberate.
Style and shoot your flat lays now. Not later. Now. I made the mistake for years of thinking I could circle back to details after portraits if I ran out of time. You know what happens after portraits? The first look. And after the first look? The ceremony. Those rings you were going to photograph "later" are now on a groomsman's pinky finger somewhere near the bar. The invitation suite is stuffed back in its box and loaded into someone's car.
The flat lay photography guide covers the full styling and composition approach, so I won't replicate that here. The principle for getting-ready coverage specifically is: treat detail work like it has a hard deadline, because it does.
Twenty minutes, maximum. Set a quiet alarm on your phone if you need to. Then move on.
Phase 2: Candid Documentary Coverage (20 to 40 minutes before hair and makeup finishes)
Put down the flat lay surface. Pick up your camera with a longer lens (85mm is my go-to for this phase). Become a quiet observer.
This is where the real getting-ready story lives. The makeup artist blending the last touch of color. The bride's hands nervously fidgeting with a piece of jewelry. Her best friend sitting on the bed behind her scrolling through a speech she wrote on her phone, mouthing the words to herself. The mom standing in the corner trying not to cry and failing completely.
You can't direct these moments. You shouldn't try. Your job is to be in the right position with the right light awareness and let them unfold. Stand where the window illuminates faces. Shoot through mirrors and doorways for depth. Use the natural geometry of the room (the bathroom doorframe, the gap between half-open curtains) to create frames within frames.
One moment to watch for specifically: the instant the bride sees her completed hair and makeup in a mirror for the first time. I've shot this hundreds of times, and it is almost always genuine. That tiny exhale. The way her eyes soften. It lasts maybe four seconds. You either have your camera up and ready, or you miss it. Be ready.
Phase 3: The Dress and Bridal Portraits (15 to 20 minutes before first look or departure)
This is the main event. Everything you've set up pays off here.
The bride steps into her gown. Mom or a sister or a best friend helps with the buttons or the zipper or the lace-up back. You're shooting this against your backdrop, near the window, and the result looks like something a magazine art director staged.
I want to be specific about why the backdrop matters here more than at any other point in the day. The bride's dress is white or ivory. The hotel wall behind her is almost certainly not a complementary tone. If it's dark, the dress blows out against it. If it's busy, the detail in the lace or beading gets lost in visual noise. A neutral hand-painted surface like Limestone or Bentonite creates enough tonal separation to let the gown's texture read clearly while keeping the overall feel clean and editorial.
The buttoning-up moment deserves multiple angles. Tight on the hands and buttons (this is the shot that gets pinned on Pinterest). Wide to show the full scene with the helper's face visible. From behind, from the side, from slightly above. Give yourself options because each angle tells a slightly different emotional story.
After the dress is on, you have a narrow window for formal bridal portraits. This is when the bride looks her absolute best. Hair and makeup are untouched. The dress is unwrinkled. Nothing has been hugged, cried on, danced in, or dragged through grass yet.
Position her 3 to 4 feet in front of your backdrop, angled slightly toward the window. Five minutes. That is genuinely all you need if you know what you're shooting.
Here's a technique that makes those five minutes work harder: shoot the same pose from multiple angles. A bridal portrait straight-on reads completely differently than the same pose photographed from 45 degrees, because the textured backdrop surface responds to light differently at each angle. The brush strokes catch the window light differently. The shadows shift. You get three distinct images from one pose without asking the bride to do anything different. That's how you build variety into a tight timeline.
Vary your compositions: full-length (if your backdrop coverage allows), three-quarter, headshot, profile with the window light rimming the veil. This is portfolio work. Treat it accordingly.
Phase 4: Group Moments and First Looks (Final 5 to 10 minutes)
If the timeline allows, keep your backdrop up for the bridesmaid first look. The reactions when the bridal party sees the bride for the first time are consistently some of the most emotional images in any wedding gallery, and having them photographed against a clean, intentional backdrop instead of a hotel bathroom door takes them from candid to keepsake.
The dad or parent first look belongs here too. Same backdrop, same light, same visual language. Now your entire getting-ready gallery has a cohesive thread running through it. The details, the candids, the dress moment, the portraits, and the emotional reveals all feel connected because the environment is consistent. That's the editorial quality couples notice when they compare portfolios.
Choosing Your Getting Ready Backdrop Color
Not every color works equally well in getting-ready contexts. The existing Ultimate Photography Backdrop Guide covers the full range of color options and their applications. For getting-ready work specifically, here's what I've found after shooting with various colors in dozens of hotel rooms.
Warm neutrals are your workhorse. Limestone (light tan) and Bentonite (mid-taupe) handle 80% of getting-ready scenarios beautifully. They complement every skin tone. They don't compete with any gown color from bright white to deep ivory. They absorb and reflect window light with a warmth that reads as intentional rather than clinical. If you're buying one backdrop primarily for getting-ready coverage, start here.
I personally reach for Limestone more often for spring and summer weddings and Bentonite for fall and winter, but honestly either works year-round. The color theory guide on our journal breaks down why certain tones pair better with specific palettes if you want to get precise about it.

Photographers always ask how to get consistent, elevated bridal portraits when every getting-ready room is different. This is the answer. One backdrop changes the entire equation. It doesn't matter what the walls look like. It doesn't matter if the hotel has questionable taste in art. You bring your own environment and you shoot in front of that instead.
Romantic tones for photographers who skew editorial. If your brand lives in the soft, romantic, fine-art space, Lavender Quartz or Sakura add a layer of color that makes bridal portraits feel like they were shot for a submission to a print magazine. The soft purple and pink undertones create visual separation from white gowns without competing. I've seen photographers pair these with a neutral flat lay surface from the same color family so the portraits and the detail shots feel connected across the entire gallery.
Richer tones for moody, dramatic work. If couples book you specifically for dark, fashion-forward imagery, Clay (faded terracotta) or Silt (dark taupe) create natural drama with nothing but window light. The contrast between the directional light on the bride and the deeper tones of the backdrop produces the kind of images that don't need heavy editing to feel editorial. They just arrive that way.
Small Room, Big Portraits: Techniques That Work in Tight Spaces
Hotel rooms force creative problem-solving. Once you stop resenting that fact, the constraints actually push you toward more interesting work.
Resist the wide-angle instinct. Your brain says "small room, go wide." Your brain is wrong. Wide angles in tight hotel rooms stretch everything, distort faces at the edges, and make the space look like a fishbowl. Compression is your friend. Back up as far as you can (step into the hallway if you have to, shoot through the open door) and shoot at 85mm to 135mm. Your subject's proportions stay natural, the background compresses into creamy bokeh, and whatever visual clutter remains behind them becomes abstract color.
Use the bathroom doorway, not the bathroom. The doorframe creates natural framing that adds narrative depth. Bride inside, you standing just outside with the door frame forming a border. Or reverse it: bride in the main room, you shooting through the bathroom doorway so the frame creates a sense of intimacy and voyeurism that makes the image feel documentary.
The bed is a platform, not just furniture. For overhead flat lays, step onto the bed for elevation. For high-angle portraits that show the full sweep of a train or veil, that extra three feet of height changes the geometry completely. Step carefully. The hotel won't notice.
Create layers with what's there. A chair positioned between you and the bride, slightly out of focus, adds foreground depth. A section of sheer curtain draped between your lens and the subject creates a gauzy texture overlay. The bride's veil held up by a bridesmaid, backlit by the window, becomes a luminous frame. None of this requires extra gear. It requires seeing the room as a set of compositional tools rather than a list of obstacles.
Mirrors double your angles. Most hotel rooms have at least one large mirror. That mirror gives you a two-for-one: the subject and her reflection in a single frame. Position the bride at an angle to the mirror so you can see her face in the reflection while photographing her from behind. Or photograph the reflection itself, which lets you shoot a "portrait" while standing in a spot where there's physically no room to stand facing the subject directly.
Building This Into Your Client Experience
The best getting-ready images start weeks before the wedding morning.
Send a getting-ready guide to every couple. I send mine six weeks out. It covers the things that actually impact photo quality: choosing rooms on higher floors with larger windows, scheduling hair and makeup to finish at least 30 minutes before the first look (not 10 minutes, which is what most timelines default to), keeping one area of the room clear for photography, and consolidating detail items in one accessible spot.
Brides genuinely want to help you succeed. They just don't know what matters unless you tell them. The photographer who sends a thoughtful prep guide looks more professional than the photographer who shows up and starts rearranging furniture without explanation.
Research the room before you arrive. Call the hotel. Check their website for suite photos. If you've shot at the venue before, reference your own notes from previous weddings. I keep a running document of venues and hotels with notes on window direction, wall colors, available space, and any quirks ("Suite 401 has the best light but the bathroom mirror has a weird crack" is an actual note in my file).
This sounds like extra work. It saves you 15 minutes of scrambling on the morning of, which is worth roughly ten times what it costs in advance planning.
Pack a getting-ready kit. Beyond camera gear: your portable backdrop, a flat lay styling surface, clear clips for securing fabric to stands, a lint roller (you will use this on the bride's dress, guaranteed), and a small white towel (for quickly wiping down surfaces). Preparedness is the difference between looking like the professional who controls the environment and the photographer who's reactive to it.
The Mistakes I've Made So You Don't Have To
I've spent too long on flat lays and missed the moment the bride saw herself for the first time. This happened to me in year three. I was perfecting a ring shot and heard a gasp from the other room. By the time I grabbed my camera, the moment was over. That's when I started setting a 20-minute limit on detail work. The rings can be slightly imperfect. The mirror moment cannot be recreated.
I've fought a room for 20 minutes when I should have adapted in 5. There was a venue in Temecula with a bridal suite that had burnt orange walls and absolutely no natural light. I spent the first 20 minutes of coverage trying to make those walls work from different angles, with different white balance settings, at different apertures. Nothing looked right. I finally set up my backdrop and had beautiful portraits in three minutes. The lesson was expensive in lost time, but I never made that mistake again.
I've neglected groom coverage because the bride's room was "more important." Couples notice. Especially in 2026, equal preparation coverage isn't just expected, it's specifically requested. If you're a solo shooter, discuss timing with both partners in advance. The same lighting and backdrop principles apply in the groom's space, and the groom getting ready with his best friends is often more relaxed and candid than the bridal suite because there's less production involved.
I've assumed the hotel room would have decent backgrounds. Even nice hotels have questionable design choices. Even suites with beautiful furniture have walls that don't photograph well. The only assumption that serves you is this: bring your own background and hope you don't need it. You'll need it more often than you won't.
What This Creates for Your Business
I want to bring this back to the business case because the practical benefits extend beyond one wedding.
Every time you shoot bridal portraits against your own backdrop, you're building a portfolio with visual consistency. When a potential client scrolls through your work and sees that every getting-ready gallery has the same elevated, editorial quality regardless of venue, that signals professionalism. It signals that your work doesn't depend on the venue cooperating. It signals that hiring you means guaranteed results.
That confidence shows in your client interactions, too. When you walk into a hotel room and start setting up with purpose, the bride relaxes. The family relaxes. The videographer and the coordinator notice that you have a system. Everyone's experience of those first few hours of the wedding day improves because you're not visibly stressed about the room.
The same backdrop you're using for getting-ready portraits on Saturday works for mini sessions during the week, styled shoots that build your portfolio, vendor collaboration images for florists and planners, and personal projects that keep your creative eye sharp between wedding seasons. It's not a single-use expense. It's a business tool that generates return across multiple income streams.
The backdrop isn't an afterthought. It's what makes the dress, the bouquet, and the bride read the way they're supposed to. A neutral hand-painted surface lets the gown's texture do the work without competing. See the difference at ChasingStone.com.
Ready to Stop Being at the Mercy of Hotel Rooms?
The difference between getting-ready coverage that fills a gallery and getting-ready coverage that fills inquiry forms is environment control. You either hope the room has decent walls and good light, or you show up knowing you can make it work regardless.
If you're ready to stop editing around thermostats and painting-bolted-to-the-wall situations, explore hand-painted canvas backdrops designed specifically for on-location portrait work. Every surface is hand-painted in our Orange County studio on premium cotton canvas, built to travel, and designed to respond to natural light with the kind of depth that flat surfaces can't replicate.
Browse the full collection at chasingstone.com and find the tones that match how you want your getting-ready coverage to look.
Related Reading
How Wedding Photographers Use Hand-Painted Backdrops Successfully
How to Light Hand-Painted Backdrops: Natural Light Techniques That Actually Work
2026 Wedding Photography Trends: Backdrops, Colors & Textures That Book Clients
The Complete Flat Lay Surface Guide for Wedding Photographers
Color Theory for Photographers: Understanding the Wheel, Harmony, and Contrast
How to Set Up a Hand-Painted Canvas Backdrop in Under 2 Minutes

Creators of premium photography backdrops and styling surfaces
Trusted by thousands of discerning creatives worldwide
Every piece is handcrafted with intention in Orange County, California